Microsoft Identiy Platform, Configuration
This chapter describes how to enabled the Microsoft Identiy Platform hosted on Azure. The configuration and screenshoots used here might be different on your platform.
Azure configuration
Application registration
Create an application registration, follow the steps found at Register applications | Microsoft Learn
Setup roles
Setup Roles for the application registration, follow the steps found at Add app roles and get them from a token - Microsoft identity platform | Microsoft Learn
Roles need to following syntax defined by Safran. For more information see chapter Access Roles.
Example, from the Appsettings.json (ConnectionStrings):
"ConnectionStrings": {
  "Database1": "Server=1.1.255.255;Database=Safran Project Test Database;User Id=APITestUser;Password=<MyPassword>;",
  "Database2": "Server=1.1.255.255;Database=Safran Project Production Database;User Id=APIProdUser;Password=<MyPassword>;"
}
Define the role in Azure:
Database1.Activities.Read
Allows Get commands for the Activities endpoint in the Database1 connection string.
Database2.Resources.Edit
Allows Patch calls to the Resources endpoint in the Database2 connection string.
Continue the setup in Azure for the app registration, when you get to the “Expose an API” section. The Application URI needs to be set, and it will also have to be updated in the appsettings.json file.
From the “Edit Application ID URI section, Azure has the following explanation: “The globally unique URI used to identify this web API. It is the prefix for scopes and in access tokens, it is the value of the audience claim. Also referred to as an identifier URI.”
Example, from the Appsettings.json (AppSettings):
"AppSettings": {
  "_comment_SafranWebApiAuthenticationType": "Use 'None' for no authentication, 'Basic' for basic database 'user' table authentication, or 'Kerberos' for Kerberos Windows Active Directory authentication, Use ‘JsonWebToken’ to enable Oauth",
  "SafranWebApiAuthenticationType": "JsonWebToken",

  "jsonwebtoken": {
    "_comment_key": "<secret key> Not used with Azure implementation",
    "issuer": "<ISS from a token>",
    "audienceclaim": "<Application URI>"
  }
},
Example, JsonWebToken:
"_comment_issuer": "(Note, ISS or Issuer both work)"
"issuer": "https://login.microsoftonline.com/3924abce-2c97-4ebf-9f46-5c8a0e9bb8af/v2.0",)>",
"_comment_aud": "(Note, AudienceClaim or AUD both work)",
"aud": "e8a494f5-f180-4df4-bbc3-762a85ce7d0f"
Connect to the App-Registration:
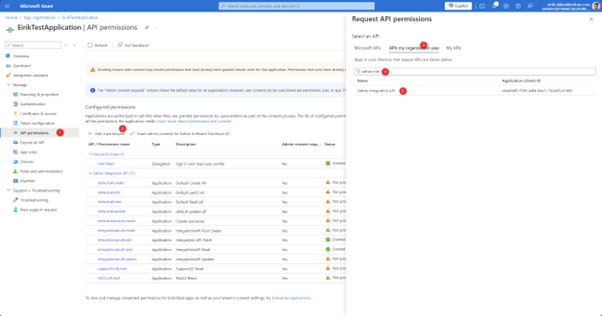
An app registration can connect to itself (usually for testing) or other app registrations can connect to your app registration. To do this, open your app registration in Azure and head to “Api Permissions” and click “Add a permission”. Search for the API used for your AudienceClaim, where you created the Roles.

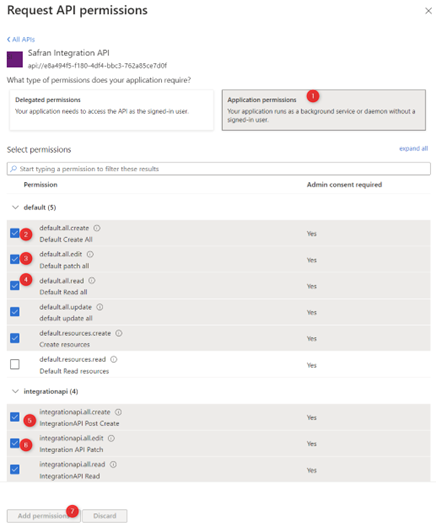
Add the permissions you require for your use of the API:

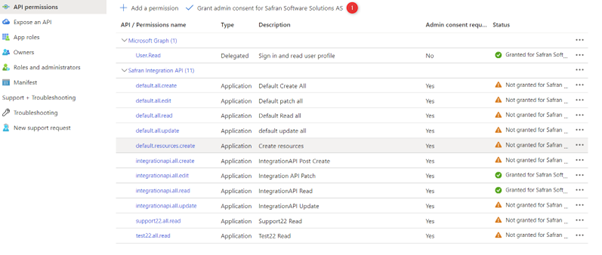
Grant Admin connect for your company.
This requires admin rights in Azure to complete:

Create a secret for your app registration.
Create a secret for your app registration, in certificates & secrets section:
Remember to write down the “Value” of the secret, as you will not be able to recover that information later. If it is lost, you will have to create a new key.

Most of the JsonWebToken setup can be found by decrypting the JsonWebToken you have generated from the App-Registration (though for instance Postman). JSON Web Tokens.