Configuration
Setting up Jobs
-
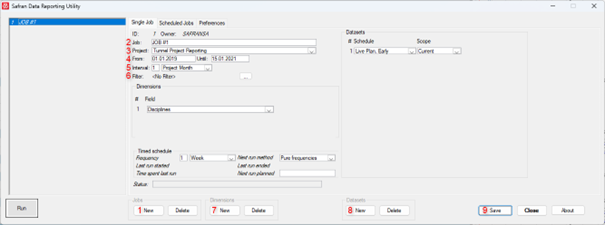
Start by clicking New in the Jobs area.
-
Give the job a name or keep the default value.
-
Select the project to retrieve data from. It is not possible to select project groups.
-
Set the job period span.
-
Select the interval to be used for the job. Options are:
a. Year
b. Quarter
c. Calendar Month
d. Project Month
e. Week -
Set up a filter for the job (optional). This can be useful when you want to narrow down the data you're retrieving, for example, if you only want to see data from a specific department or time period.
-
Add dimensions/groupings for the job from the list of user fields, activities, or totals. A maximum of 4 dimensions can be added.
-
Add the datasets for the job. Please note that the User-defined scope is not included in the scope selection, which means that you cannot customize the scope for this job.
The dataset options are:
| SCHEDULE | SCOPE |
|---|---|
| Baseline Plan Early | Baseline |
| Baseline Plan, Late | Baseline |
| Baseline Scope | Baseline |
| Current Plan, Early | Baseline / Current / Total |
| Current Plan, Late | Baseline / Current / Total |
| Earned | Baseline / Current / Total |
| Expended | Baseline / Current / Total |
| Live Plan, Early | Baseline / Current / Total |
| Live Plan, Late | Baseline / Current / Total |
| Original Plan, Early | Baseline / Current / Total |
| Original Plan, Late | Baseline / Current / Total |
- Save the job.
Executing jobs
Manual run
- Choose the job by identifying it in the Job list from the Single Job tab.
- Press the Run button at the bottom left of the window.
- The selected job starts calculating the results; the old results are deleted, and the new ones are stored in the database.
- A confirmation message will be displayed at the end of the job. Usually, the job only takes a few seconds or minutes, but this is very dependent on factors like the number of activities and resources in the project, the type of calculation, and the communication between the software client and the database.
Batch job
For the jobs to be run in batches, the frequency, the run method, and the next run planned must be set.
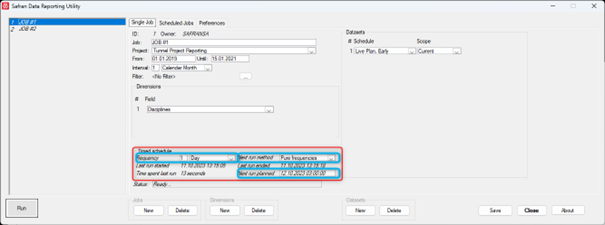
The timed schedule for the job needs to be set up.
Frequency options are Month, Bi-week, Week, Day, Hour, Minute, Never and Immediately.
The next run method options are pure frequencies, the last run started, and the previous run ended. The planned date and time for the next run are updated when a job is completed. The pure frequency will add the frequency to the Next run planned. The last run started will add the frequency of when the job started to get the new next run planned time, and the previous run ended will be used when the job ends.
The next planned run needs to be filled in to get a scheduled job. In the example above, the Next planned run is set to 12.10.2023 03:00. When the job is completed, the next planned run will be updated to 13.10.2023 03:00 due to the pure frequencies and 1-day interval setup.
When the timed schedule has been set up for all the scheduled jobs, click the Scheduled Jobs tab.
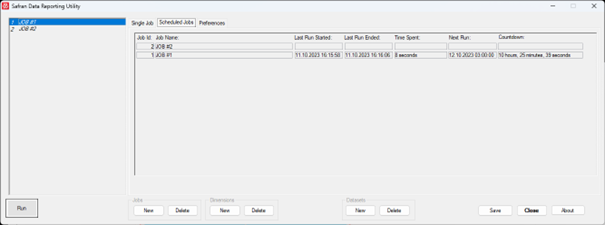
You get a new view of the jobs in the Scheduled Jobs tab. The jobs are sorted ascending by the Next Run column. Information on when the jobs last started and ended and how long they took to complete is listed. In addition, the Next Run time and a countdown to the next run are present.
Click the Run button in the lower-left corner of the window from the Scheduled Jobs tab to start executing the jobs. When the Scheduled Jobs are running, the Run button is replaced by a red Stop button to stop the execution. The Stop button can only be clicked when no job is actively running. Erroneous jobs will be marked in red.