Resource Leveling
In project management, resource leveling is defined in A Guide to the Project Management Body of Knowledge (PMBOK Guide) as "A technique in which start and finish dates are adjusted based on resource limitation with the goal of balancing demand for resources with the available supply".
When performing project planning activities, the planner will attempt to schedule certain tasks simultaneously. When more resources such as machines or people are needed than are available, or perhaps a specific person is needed in both tasks, the tasks will have to be rescheduled concurrently or even sequentially to manage the constraint. Project planning resource leveling is the process of resolving these conflicts. It can also be used to balance the workload of primary resources over the course of the project[s], usually at the expense of one of the traditional triple constraints (time, cost, scope).
Resource leveling is also useful in the world of maintenance management. Many organizations have maintenance backlogs which in turn consist of work orders. In a "planned state" these work orders have estimates such as 2 electricians for 8 hours. These work orders have other attributes such as report date, priority, asset operational requirements, and safety concerns. These same organizations have a need to create weekly schedules. Resource-leveling can take the "work demand" and balance it against the resource pool availability for the given week. The goal is to create this weekly schedule in advance of performing the work. Without resource-leveling the organization (planner, scheduler, supervisor) is most likely performing subjective selection. For the most part, when it comes to maintenance scheduling, there is less, if any, task interdependence, and therefore less need to calculate critical path and total float.
Resource leveling must not be confused with resource smoothing. Although resource leveling and resource smoothing are both resource optimization techniques used in project management, they differ in their primary goals and how they impact the project schedule. Resource leveling focuses on optimizing resource availability and potentially extending the project timeline to accommodate resource constraints. Resource smoothing, on the other hand, focusses on removing/reducing fluctuating resource requirements within a resources availability.
Resource leveling may be carried out manually, however this is often quite complicated and unrealistic.
Safran has a highly comprehensive, configurable, integrated Resource Leveling tool that, in its simplest/default form, attempts to postpone/place activities within their Total Float in order to reduce resource requirements to fit the resource’s availability.
In order to carry out resource leveling there are two basic pre-requisites. You obviously need to define one or more resources and additionally specify an Availability for each resource.
The result of the resource level process, i.e. the modified start and finish dates for the activity, are stored in the fields ‘Early Start Leveled’ and ‘Early Finished Leveled’ in addition to a number of fields containing meta data from the process.
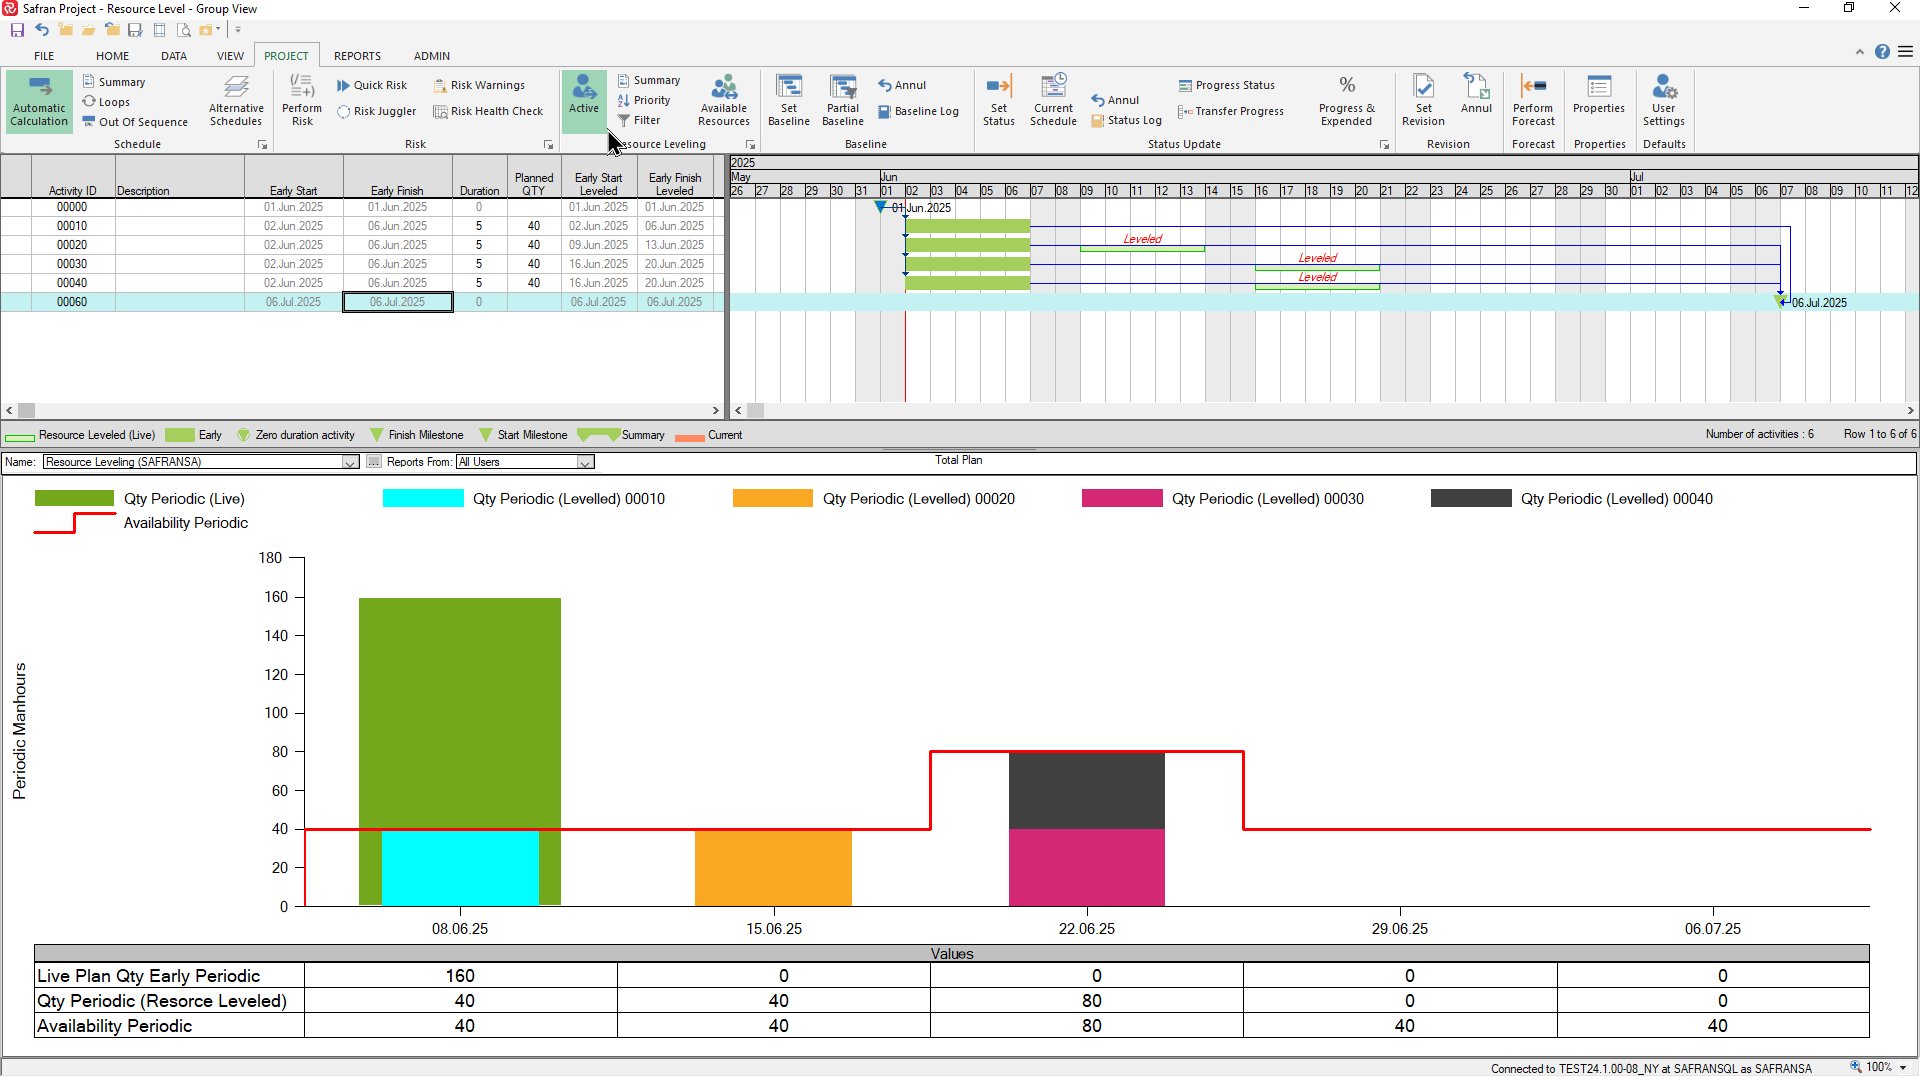
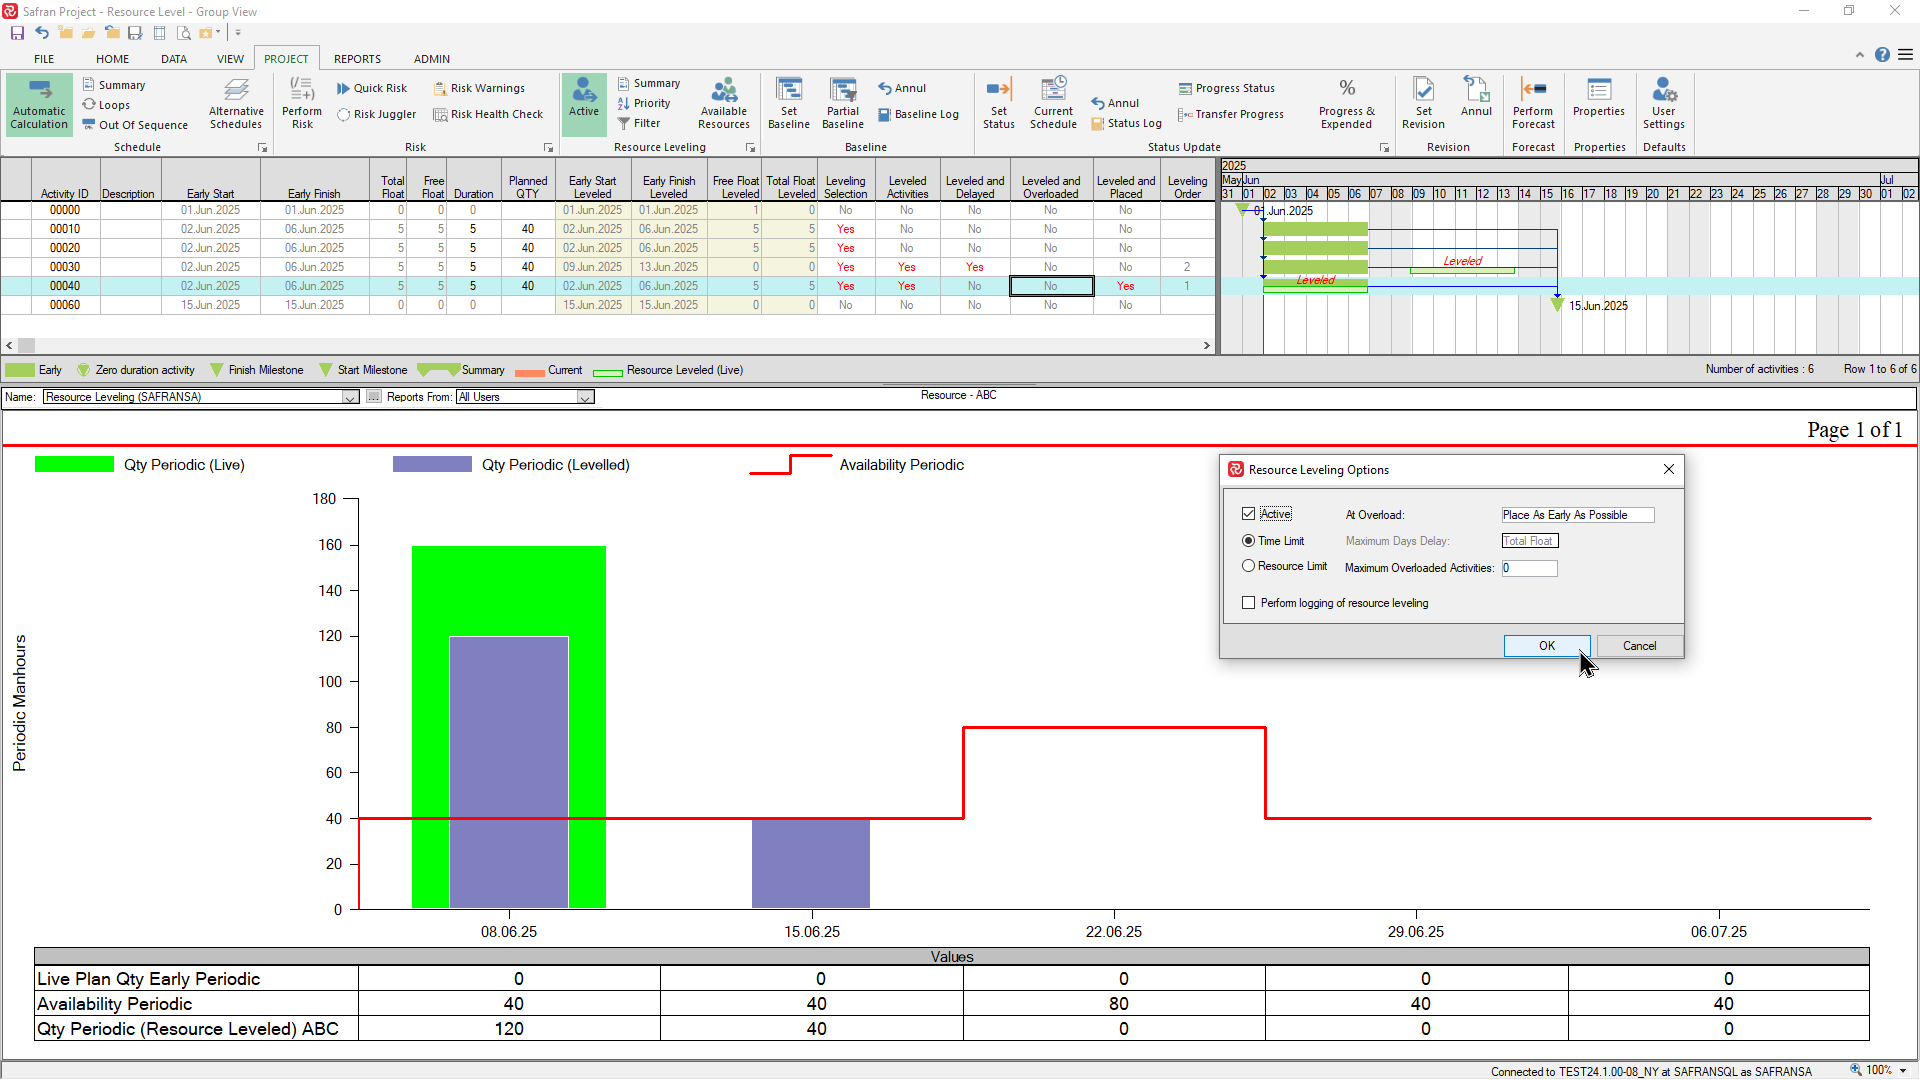
To illustrate the basic concepts of resource levelling consider the following simple example:
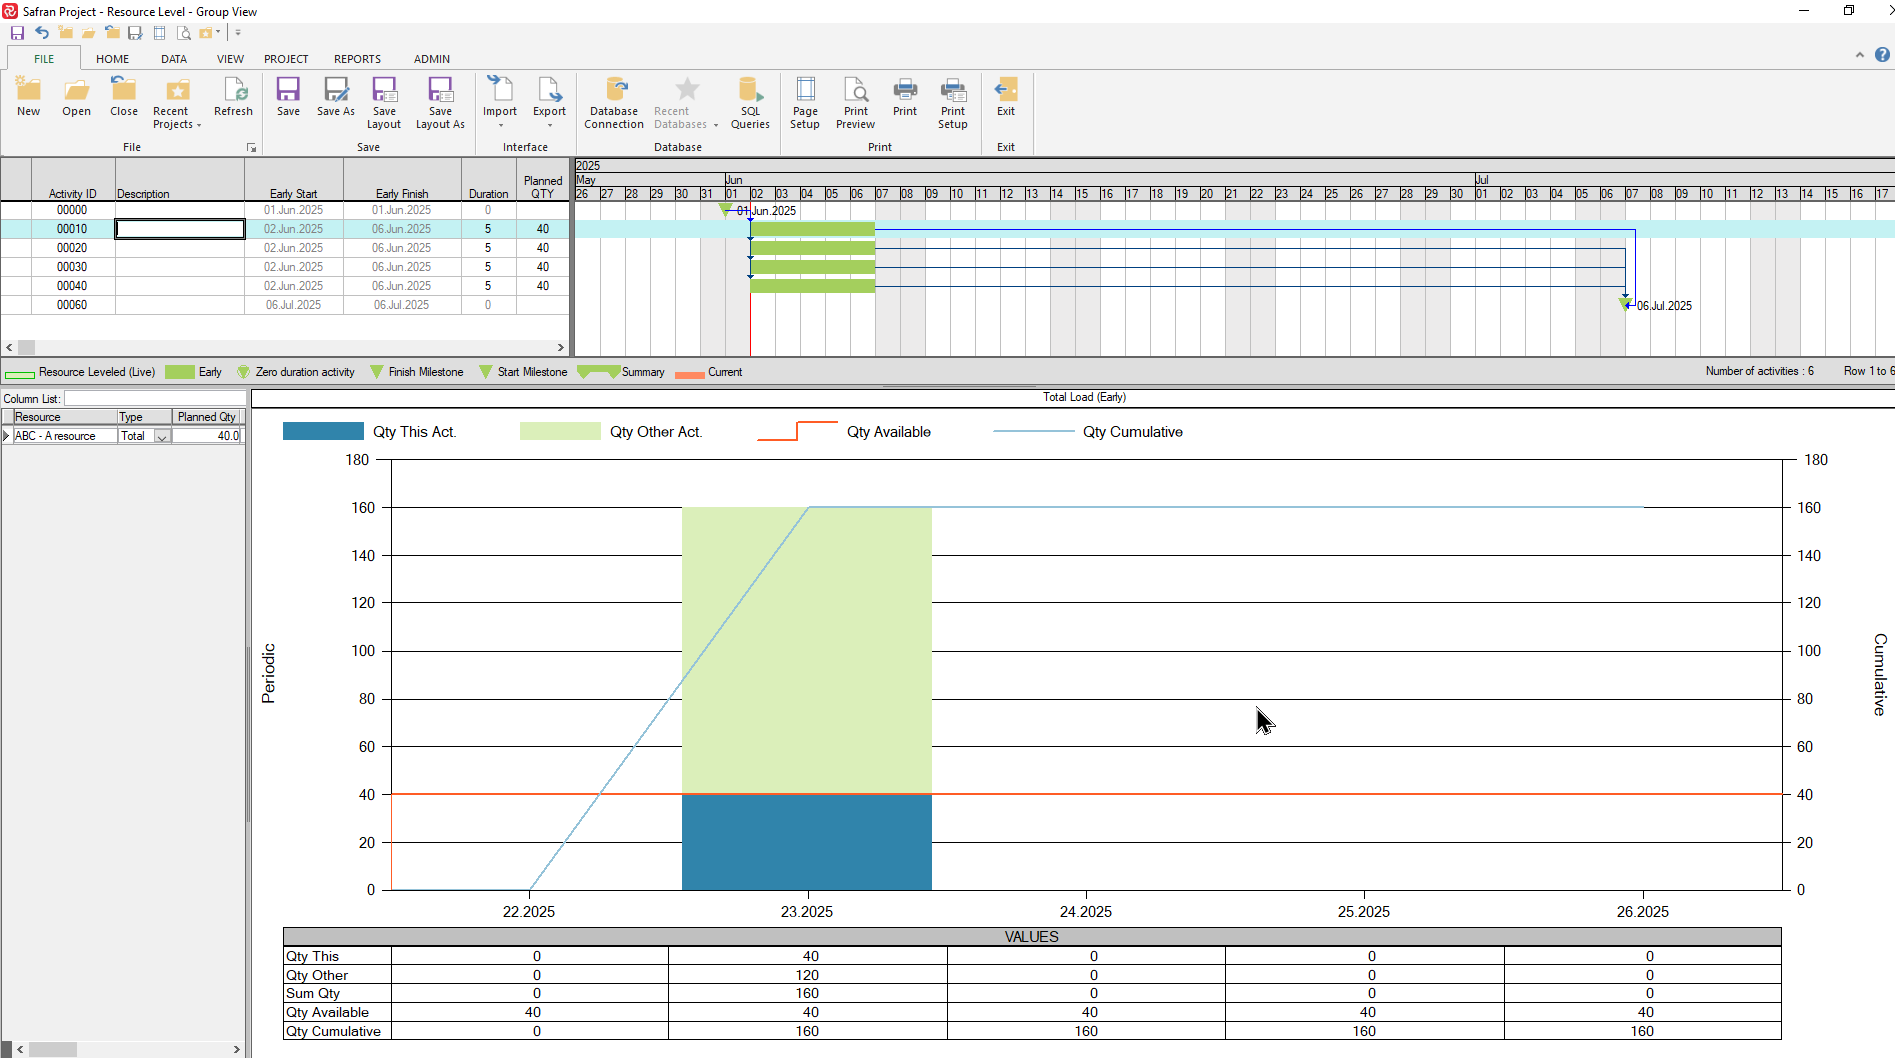
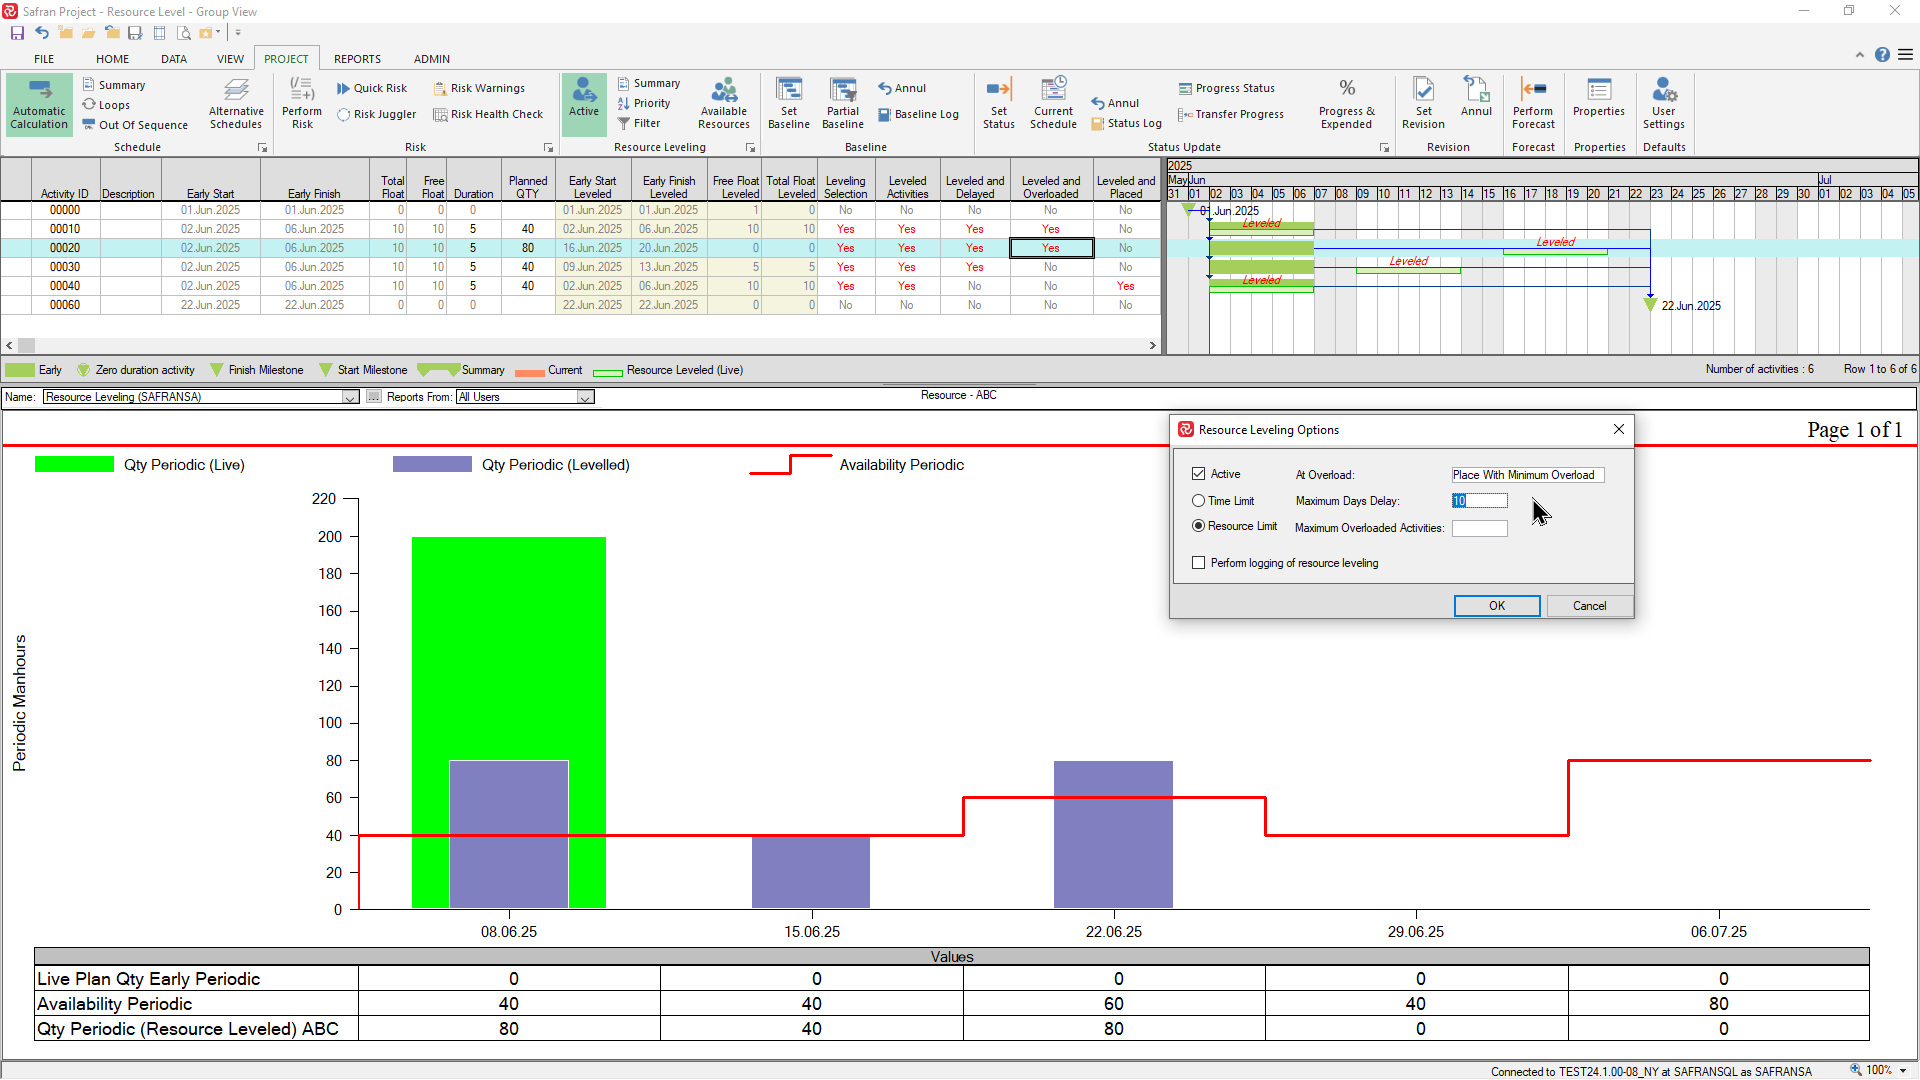
The project has four activities each with a 5-day duration and a 40 ‘hour’ manpower requirement. The activities must be completed during a 5-week period in order to meet the finish milestone. The resource’s availability is 40 hours per week and is shown by the horizontal red line in the histogram. The manhour histogram illustrates that the current schedule dates would require 160 manhours in week 23 which is a major overload and not realistic/possible.
If we switch on the Resource leveler with its default configuration, you’ll notice that Safran has ‘postponed/placed’ activities 00020 – 00040 within their total float which will then result in a resource requirement of 40 manhours per week which is within the resources availability.
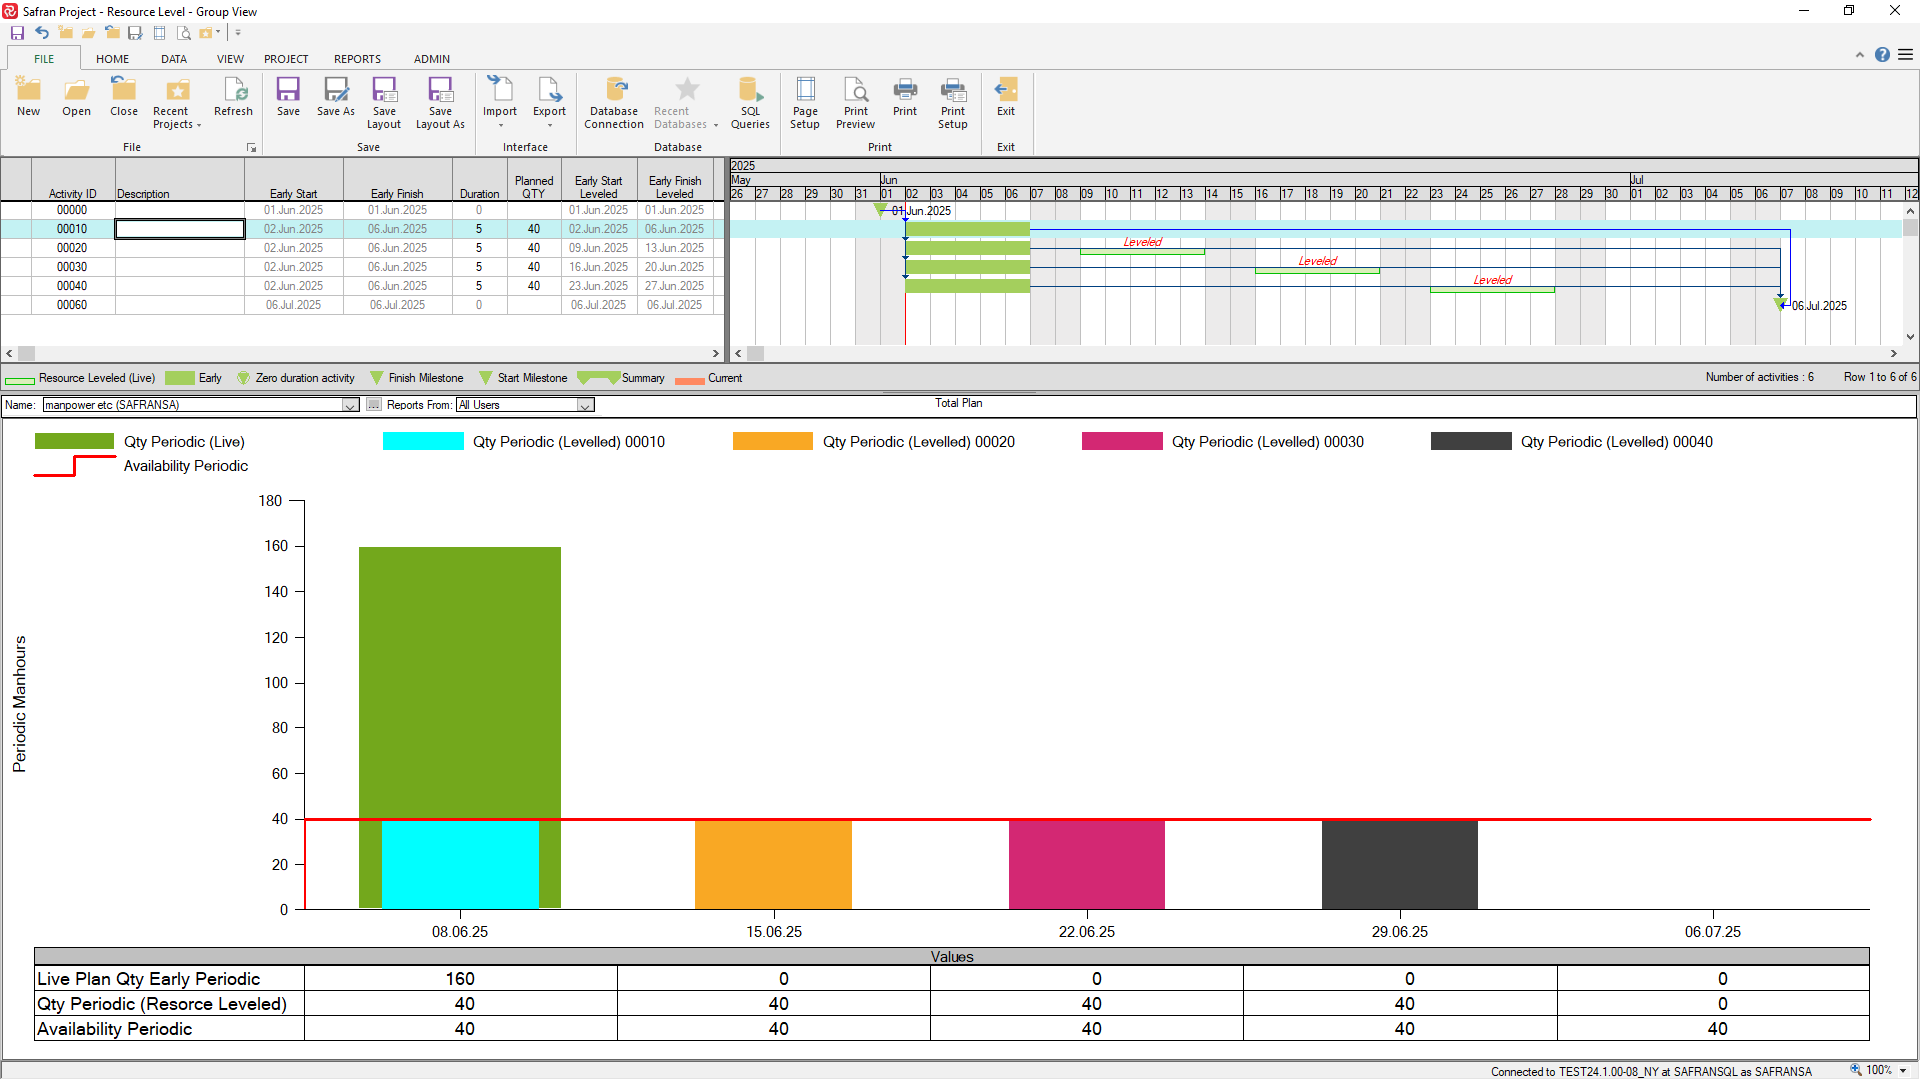
The resource leveling process does not have any effect on the ‘Live’ plan set (Early Start/Early Finish) as the process has its own schedule dates (Early Start Leveled/Early Finish Leveled).
If the suggested resource leveled schedule is acceptable, the Live plan might be modified by copying the Early Start Leveled dates for the leveled activities to the relevant Start No Earlier date which would align the Live plan with the Leveled schedule.
Using the Resource Leveler
In order to use the Resource Leveler there are a few pre-requisites.
-
To start with, you need to have one or more resources defined.
-
Next, you have to define the availability of the resource(s).
-
Finally, you need to switch the resource leveler on as this is initially switched off.
It can however be switched on/off at any time and is most often switched on when doing a leveling exercise and then switched off.
When switched off the ‘leveled fields’ (ie. ES/EF/FF/TF Leveled etc.) are 'frozen' with their latest values for the duration of your current session. If you then close the session and re-open the project the fields will be blank/null.
Any modified Resource leveling configuration options however will be stored for later sessions.
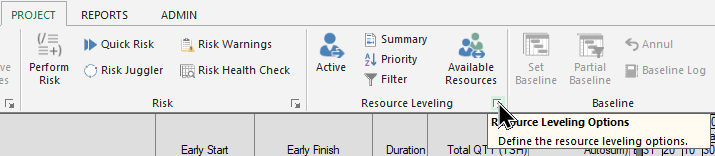
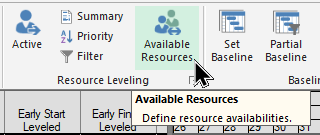
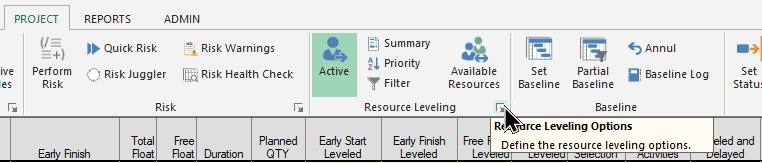
The 'Resource Leveling' facilities are located on the PROJECT ribbon as shown below:
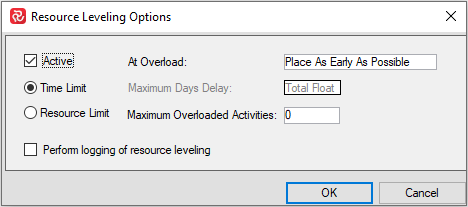
The resource leveler is highly configurable, however it does have a set of ‘sensible defaults’ so that it will work without the need to re-configure.
The leveling options have to do with which type of leveling to carry out, either Time or Resource limited, and which availability basis to use. The latter is only relevant when doing a leveling exercise for a project group.
A filter may be applied to limit the leveling exercise to certain/or a group of activities.
You may also specify a priority, or order, in which activities or groups of activities are leveled first, second, third etc.
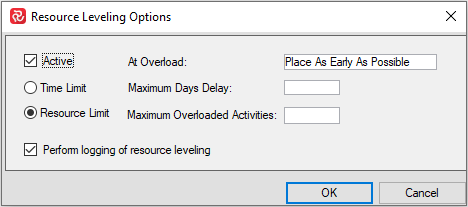
The default Resource Leveling Options for a single project and project group respectively are shown below:

Note that, when working with Project Groups, the leveling options also allows you to choose which availability to use when leveling either project group or project group plus the member projects availabilities.
Resource Availabilities
Details of the availability for all required resources are entered separately from the resource data.
To access the resource availability register press Available Resources on the Resource Leveling tab:
The Available Resources panel will open:
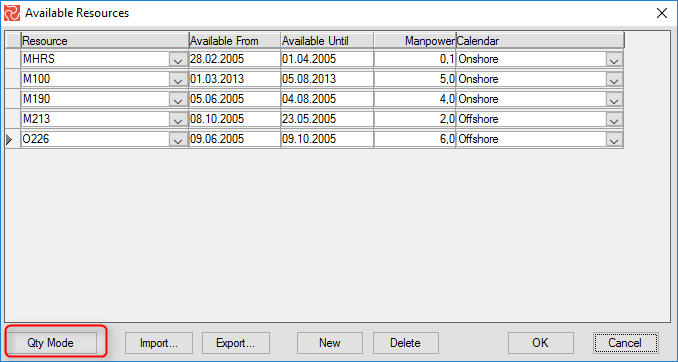
An availability entry consists of a resource code, a timespan, a quantity and (optionally) a calendar. If a calendar is specified, the resource will only be available on working days/periods. If a calendar is not specified the resource will be considered as available at all times.
| Fields | Description |
|---|---|
| Resource | The resource code (Short Name) for which availability is entered. Select from the drop-down list. |
| Available From | A Date field. Available from. Optional. If missing, Safran Project assumes availability from the Project start date. |
| Available Until | A Date field. Available Until. Optional. If missing, Safran Project assumes availability until the Project end date. |
| QTY (per Day) or Manpower | QTY: Decimal field. The maximum quantity available between from-date and until-date. Manpower: Decimal field. Enter availability as Manpower. Safran Project uses the man-hours per day from the specified calendar to compute QTY if manpower is entered and vice versa. |
| Calendar | Uses a Calendar to configure more complex resource availability if resources are unavailable according to a calendar, such as during vacations and holidays. If no value is entered, Safran Project uses a default work pattern with seven working days per week. Work patterns available are those defined for the calendar associated with the current project. |
The resource code must correspond to the resources defined in the resource set for the project.
A resource availability can be entered either in terms of QTY per day or as manpower. You can toggle between these two modes by clicking the QTY/Manpower mode button found in lower left corner of the dialog window.
If manpower mode is selected the manpower value entered will internally re-calculate this to QTY based on the 'Hours/day' value entered for the calendar selected for the resource availability.
Adding a New Resource Availability Record
Press the New button in the window to add a new resource availability. Safran Project enters a new line into the availability window allowing you to enter the availability characteristics..
Deleting a Resource Availability Record
Select the resource availability record to delete and press the Delete button in the window. Safran Project prompts you to confirm the deletion of the resource availability record.
You cannot delete the entire availability table in one operation, as this must be done by deleting row-by-row.
The resource availability content may be modified at any time.
Exporting/Importing resource availabilities
The resource availability table may be exported/imported to a tab separated text file by using the Import/Export buttons.
Complex resource availabilities
Complex resource availabilities may be modeled by entering multiple resource availability records for a single resource category.
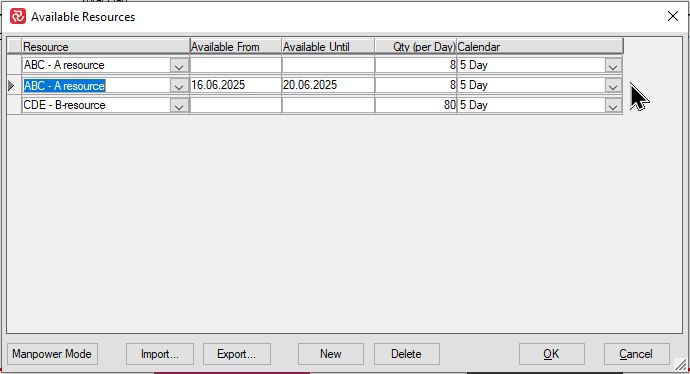
Note in the example above that an additional 8 hours of work per day has been added for week ending with 22.6.25.
Below, the red line in the histogram depicts the resulting availability. At this moment the resource leveler has been switched off to focus on the extra availability.
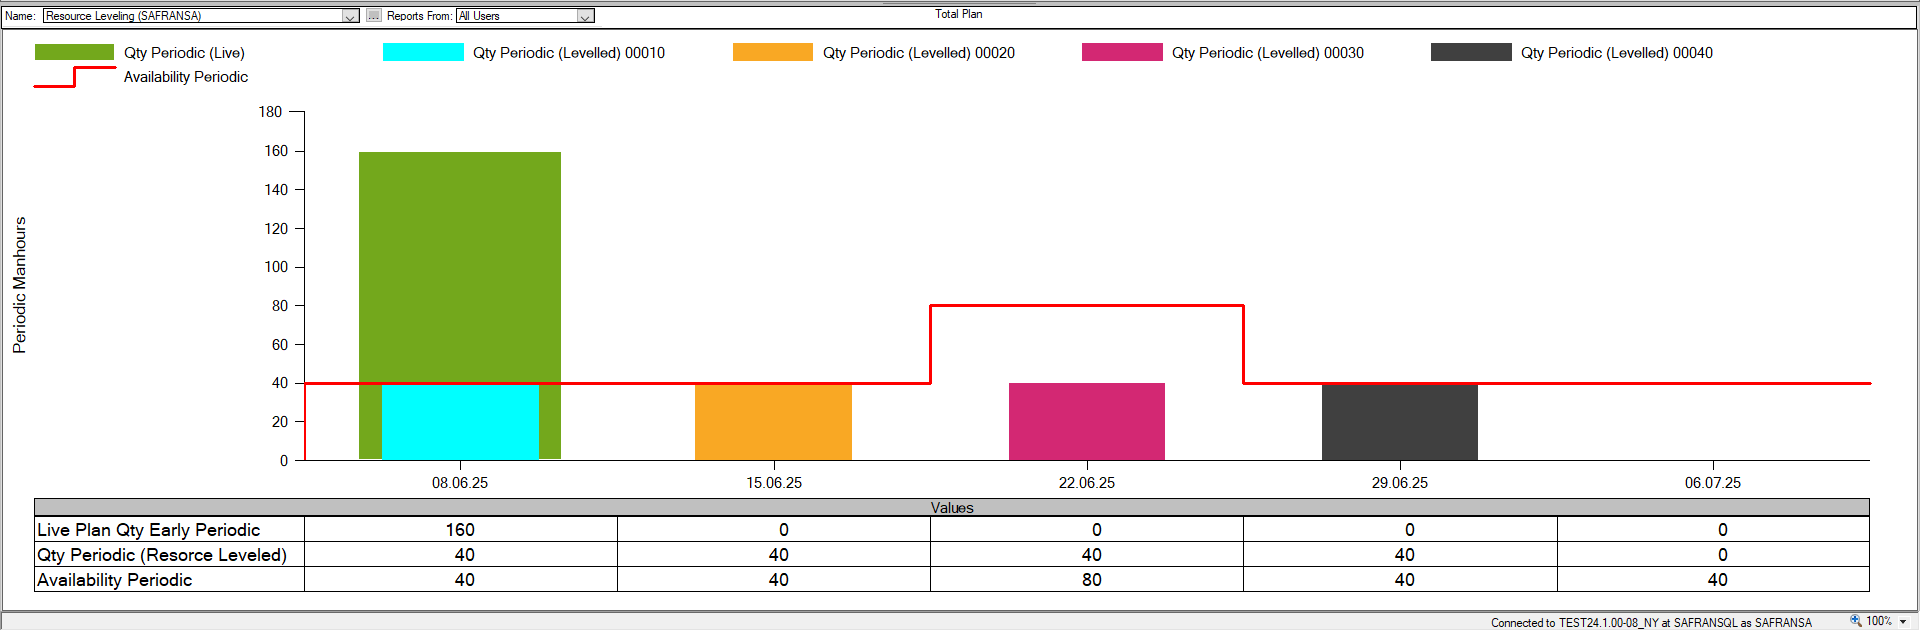
When the resource leveler is switched on again, Safran takes the extra availability into consideration allowing activity 00030 and 00040 to take place in parallel in the same week.
The availability line is available in all Safran histograms, both in the Barchart editor Resources (Availabilities Visible) and Histogram sub-panels (Availability), as well as in the Histogram & S-Curve report (Entries/Availability Profile On).
Note that the Barchart editor Resources subpanel will always consider all available resources/categories in the project when presenting availability.
Both the Barchart editor Histogram and the Histogram & S-Curve report have resource filter capabilities that allows you to select activities with specific resources which will in turn limit the availability presented to contain only the filtered resource(s). Both reports additionally support the Page On 'resources' allowing you to focus on one or more specific resources.
Resource leveling information fields
As a part of the resource levelling system a number of resource-leveling specific fields are made available that may also help to understand what actions the leveling process has taken.
The fields are available as columns in the barchart editor and may also be used in filter expressions as well as sorting elements as shown in the snapshots below:

Leveling fields are available as columns in the Barchart Editor.
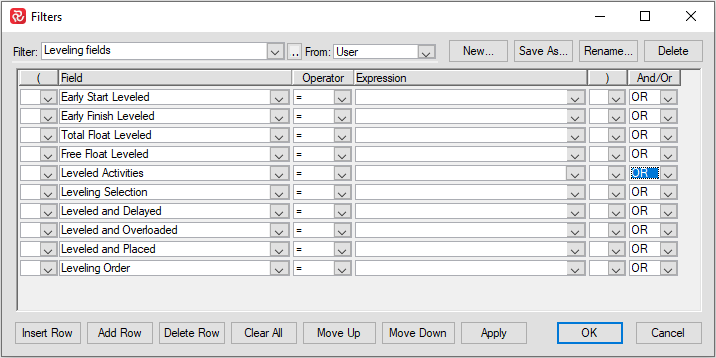
Leveling fields are also available for use in filters.

Leveling fields may also be used for sorting.
Leveling information fields and their descriptions:
| Fields | Description |
|---|---|
| Leveling Selection | Yes if activity has been selected to be leveled. By default all activities are selected, if a filter is applied only selected activities will be designated Yes. |
| Leveled Activities | Yes for activities that are eligible for leveling, ie. selected, containing a resource and a corresponding availability. |
| Leveled and Delayed | Yes for activities that have been leveled and delayed compared to their Early Start date. |
| Leveled and Overloaded | Yes for activities that have been leveled and exceeded a resources availability. |
| Leveled and Placed | Yes for activities that have been leveled and placed at their Earlt Start date. |
| Leveling Order | Order number in which activity has been leveled. |
Filtering activities
By default all activities, constraints and resource requirements are selected by the leveling process.
It may often be unnecessary or inconvenient to involve all the different resources or activities in a project at the same time.
Leveling only a few resources can be useful when the resources in question have an availability which cannot be increased in any circumstances, while timescales and targets are of crucial importance to the project as a whole.
It may also be useful to level only a few activities - for example, all those which are the responsibility of a certain manager.
You can select which activities and resource requirements are to be considered by the placement phase of the scheduler. Selection means that the resource requirements cause the availabilities to be decremented, and activity positions may be influenced by the availabilities. Activities and requirements that are selected to be considered in the placement phase are called "schedulable". Changes made during the schedule to fields in the selection condition do not affect selection.
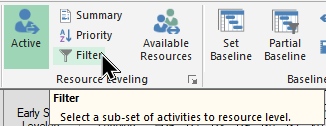
You'll find the Filter icon on the Resource leveling section as shown below:
You can use this filter in the usual manner and base the filter on any Safran system or user-defined field.
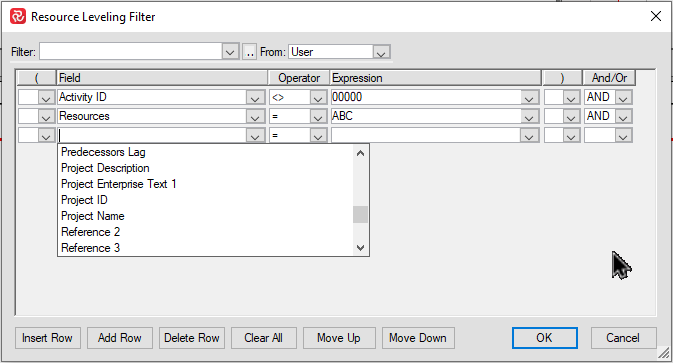
You can also easily filter on one or more specific resources as shown below:
The barchart will still show all activities/honor any applied filter, however you'll notice that the 'Leveling Selection' field identifies which activities have been included in the leveling process:
Prioritizing activities
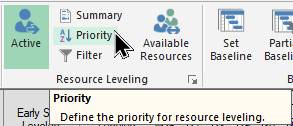
You can control the order in which activities are considered for leveling by using the Priority function found in the Resource Leveling section. Use the drag and drop technique to select the fields you would like to order by.
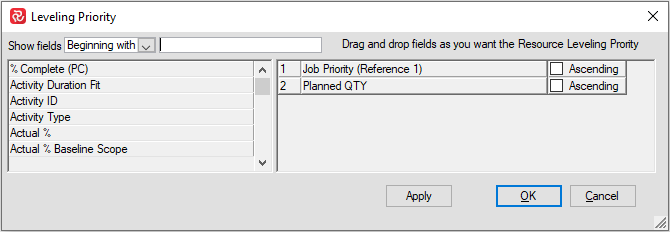
The Priority function specifies the order in which activities appear in the leveling list. It does not specify the order in which the leveling of activities will necessarily be performed.
The order in which they are actually levelled will comply with network logic. Ie. your network logic will always have first/highest 'priority'.
The leveling process maintains a list, called the leveling queue, of activities that may currently be processed. The list is maintained as follows:
- An activity is added when all its logical predecessors have been leveled.
- At the start of the level process, the queue contains only the logical start activities.
- At each stage, the top activity in the queue is removed and leveled/placed. Any new activities with no outstanding predecessors are then added to the queue.
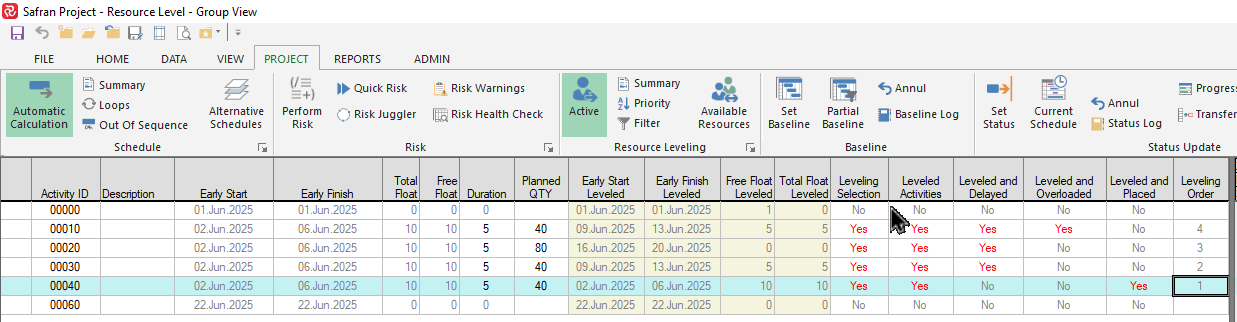
The snapshot below helps clarify the Priority concept:
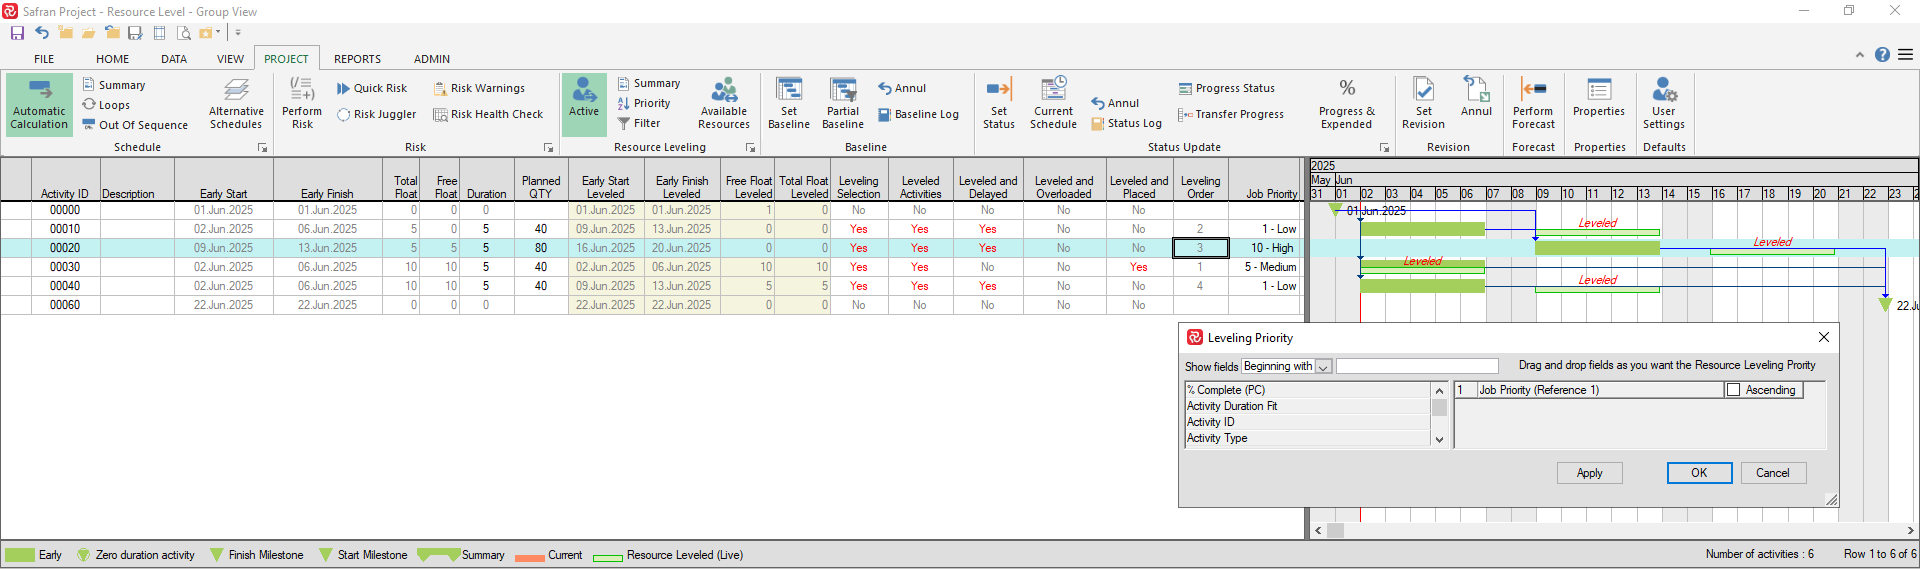
We have defined/added the field 'Job Priority' to identify Low/Medium/High priority activities, further we have added the field in the Leveling Priority list.
The column 'Leveling Order' contains the order in which the activities are leveled.
Note that even though activity 00020 has been given 'High' priory, it's leveling order is still '3' as it's predecessor must be leveled first in order that the activity is entered into to the leveling list.
Activity 00030 is however leveled first as it's priority is higher (Medium) than both activities 00010 and 00040 (Low).
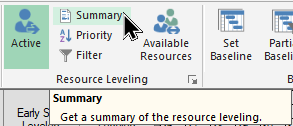
Summary
You’ll find the ‘Summary’ function quite useful when working with the resource leveler as it provides a summarized overview of what the leveler has done giving an insight as to which activities have been affected and how they have been treated as a result of the process.
It also provides various filtering capabilities easing access to leveled activities.
The Summary tools may be accessed by pressing the Summary icon on the Resource Leveling section of the Project ribbon:
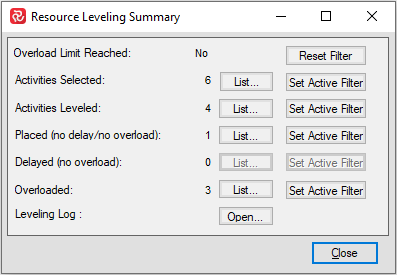
The summary function groups activities into five different categories according to which actions have taken place additionally counting how many activities there are in each group as shown below:
| Fields | Description |
|---|---|
| Activities Selected | Counts the number of activities included in the resource leveling process. If a leveling filter is applied/active this is reflected. If no filter is active this reflects the total number of activities. |
| Activities Leveled | Counts the number of activities that have resources with availability and thus will run when resource leveling is on. |
| Placed (No delay / no overload) | Counts the number of activities that have been identified so that analysis ES / EF will be calculated without overload. |
| Delayed (No Overload) | Counts the number of activities that have been placed without overload but have been delayed. |
| Overloaded | Counts the number of activities that have been both delayed and overloaded. |
| Leveling Log | Opens new window that shows detailed information of the leveling process for each activity. |
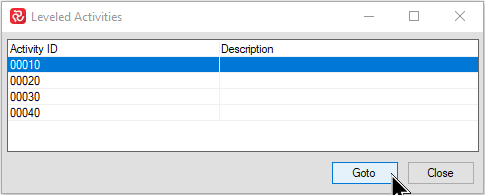
List
By Pressing the ‘List’ button for a specific category, a new window appears showing the activities in the group. If you If you press the 'Goto' button or double-click on an activity in the list, Safran will jump to/set focus on the activity in the barchart editor.
Set Active Filter
By pressing the ‘Set Active Filter’ button for a specific category, the barchart editor will use this as a filter and limit the editor to show only the activities for the group.
The ‘Set Active Filter’ button provides even more powerful filtering as it applies the relevant group/list of activities as a filter for the barchart editor.
Note that this will however, replace/override any current filter applied.
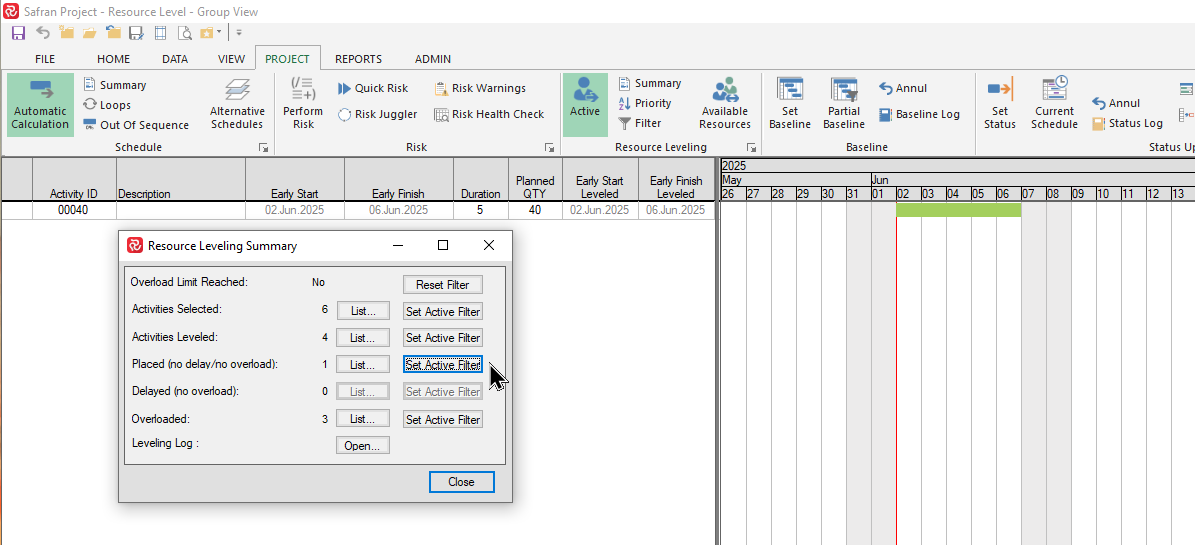
By selecting the ‘Set Active Filter’ button for the ‘Placed (no delay/no overload)’ category shown above, Safran will enter this as a filter statement that can be viewed in the ‘Filter’ dropdown.
By pressing the ‘Reset Filter' button, any ‘Active Filter’ is removed and the Barchart Editor reverts to its previous state.
By pressing the ‘Reset Filter’ button any active resource leveling filter will be removed setting the filter to ‘no expression’ presenting all activities.
Leveling Log
The leveling logging function stores highly detailed information for each activity and each step the leveler takes during the leveling process. The leveling log helps you analyze the results of the resource level for your project.
In order to access the leveling log, it must be switched ‘on’. This may be done on the Resource Leveling Options window shown below:
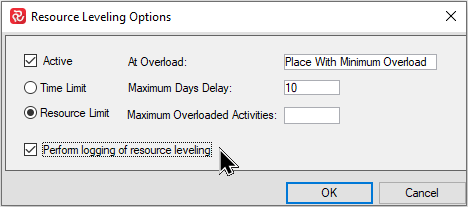
If the logging option is switched On, you’ll notice that ‘Leveling Log – Open button’ on the Summary panel button is now active:
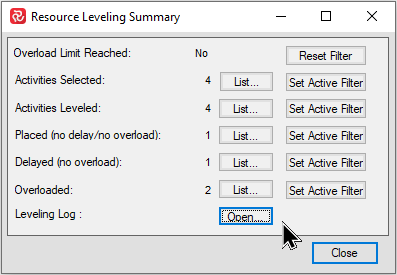
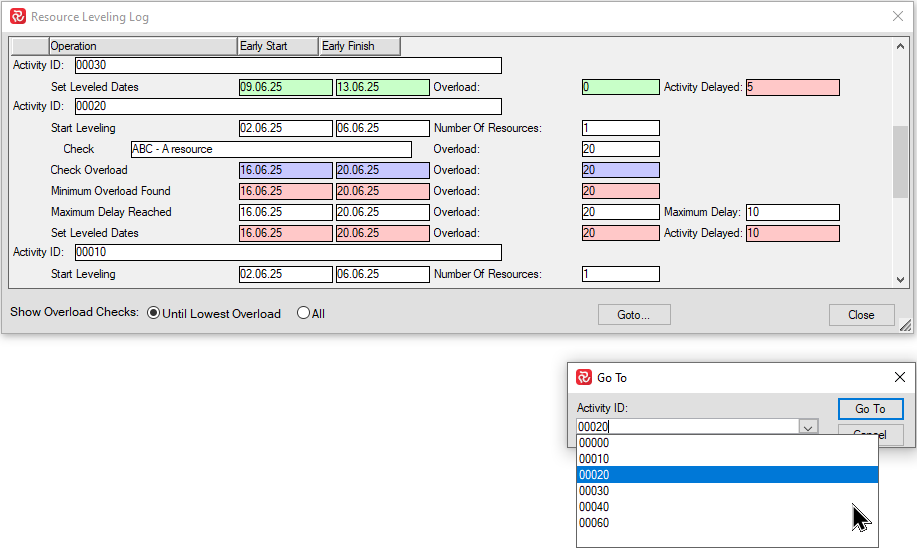
When you press 'Open' the the resource leveling log window appears:
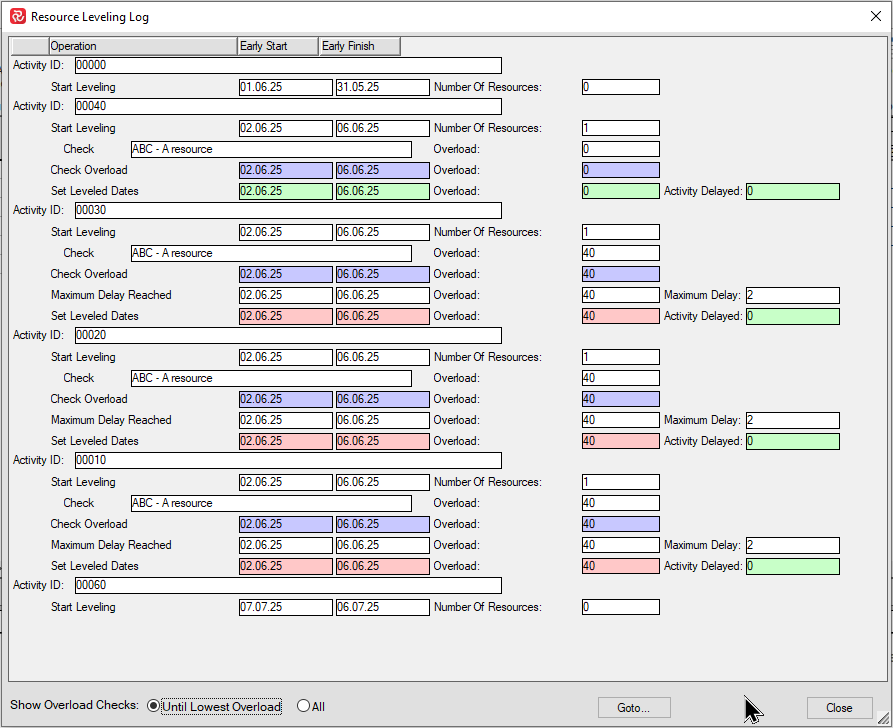
Note the varying information for each activity.
Activity '00000', which is a milestone has been included in the leveling process, however no actions have taken place since it has no resource requirement.
Activity '00040' is the first activity to be processed and since there is a 40 hour availability in the week starting 02.06.25 this activity has no overload and is therefore given an Early start levelled of 02.06.25
Activity '00030' is the second activity to be processed. Since there is no more resource available that week and the leveler is set to do a time-limited level, the activity goes into overload the week starting 02.06.25 even though it is allowed to be delayed 2 days (Maximum delay = 2 from the configuration panel).
The remaining two activities with resources are also treated in the same way.
This schedule therefore results in a total overload of 120 hours that week.
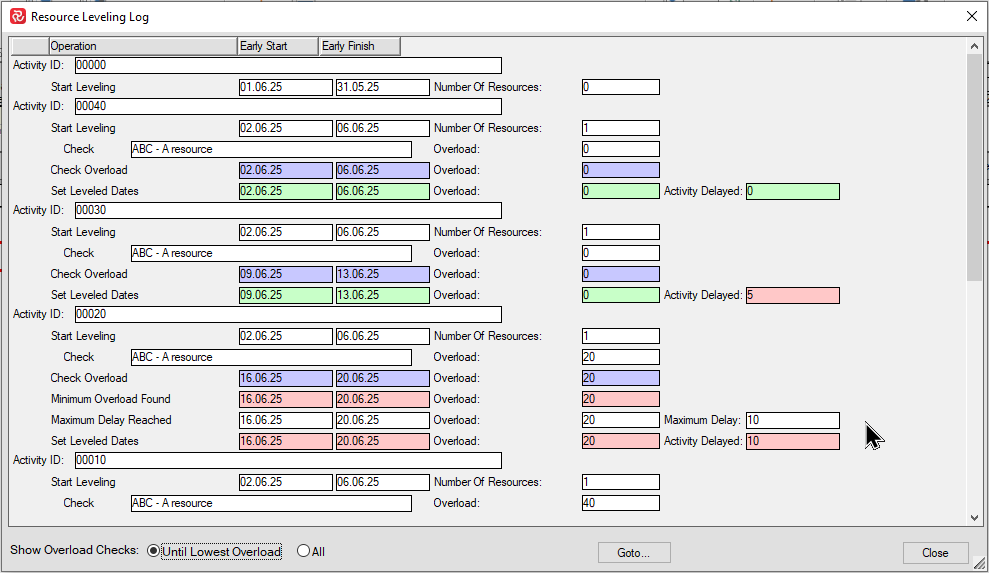
The above example shows even more details as the leveler has been configured to allow both a certain amount of delay and overload.
Activity '00030' has been delayed 5 days and now starts on 09.06.25 with no overload.
Activity '00020' is still in overload even though it is delayed to the maximum of of 10 days delay and also allowed maximum of 20 hours of overload.
The resource leveling log can obviously become quite extensive. By default the log limits the visible overload checks 'Until Lowest overload', however you can choose to present the complete list of checks by choosing 'All' overload checks at the lower left corner of the logging window if needed.
In the same general area you'll also find a 'Goto' dropdown list where you can select and jump to a specific activity.
Resource leveling process and configuration options in detail
Please note that only the activities that have resources that have been defined and have available units will leveled. During the resource leveling process, two main steps take place:
-
The process starts with all the activities in the project schedule. These activities will be placed in a leveling queue and sorted by sort criteria.
-
After leveling each activity, a forward pass will be run to the first successor. The results will be analyzed, sorted, and placed in a leveling queue.
The leveler processes one activity at a time. Activity processing is a combination of a forward pass and a placement phase.
The leveler forward pass is a subset of the analysis forward pass. It calculates the first possible date on which an activity can start, taking into account its predecessors.
The placement phase is optional since only selected activities are placed against availabilities. It compares the activity resource requirement, represented by the network, to the resource supply, represented by availability. The best possible placement date is calculated, giving the time by which the activity can be delayed to produce a better fit for supply and demand.
Resource leveling options
There are two different types of resource leveling, a Time-limited and a Resource-limited.
The time-limited schedule aims to have the project finished on time even though some activities will be in overload. With time-limited leveling no activity may be placed later than its late date as this would violate the project end date. Thus the scheduler will keep trying a delay of one time unit until the total float has been used up.
The resource-limited schedule delays activities until enough resources are available to complete them and no overloads are caused, even if this means the project end date must be postponed.
After leveling you can see from the overloads what extra resources will be needed to finish on time.
By clicking the small arrow on the lower right corner of the resource leveling area in the PROJECT ribbon, you will find the two main options: Time Limit and Resource Limit.
Time Limited Resource leveling
In the Time-Limited example below you'll notice that the leveler has been able to place and delay the activities within their Total Float and Resource availability thus still meeting the final milestone.

If we move the final milestone two weeks earlier the leveler is no longer capable of moving the activities within their total float and still honor the resource availability. The resulting resource requirement now illustrates the extra amount of resource required in order to meet the modified finish milestone.
Once the available resources have been 'consumed', the leveler has no more resources available to work with and the process stops. In the example below you'll therefore notice that activities 00020 and 00030 have not been Leveled (Leveled Activities=No).
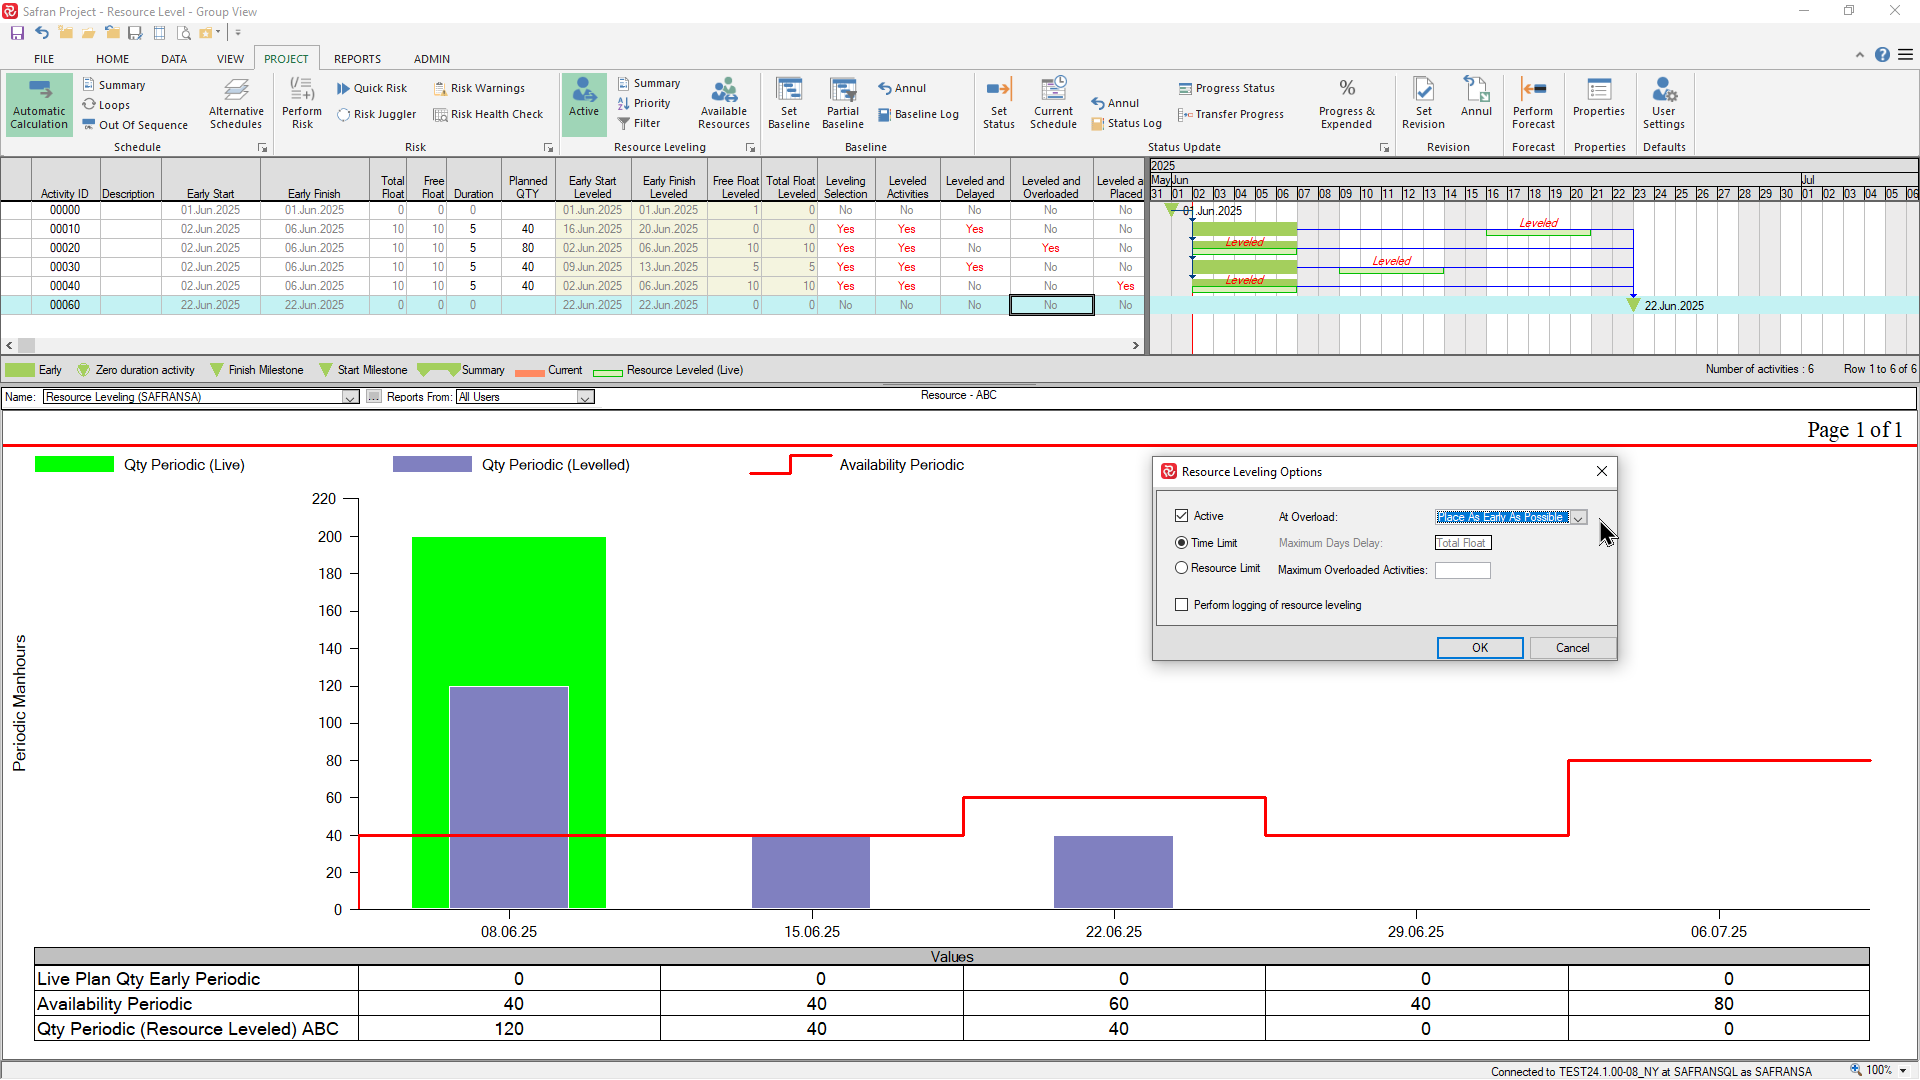
The Time-limited level may provides you with two options as to where to place any overloaded activities, either 'As early as possible' which is the default, or 'With minimum overload'.
The example below shows the effect of the default option:
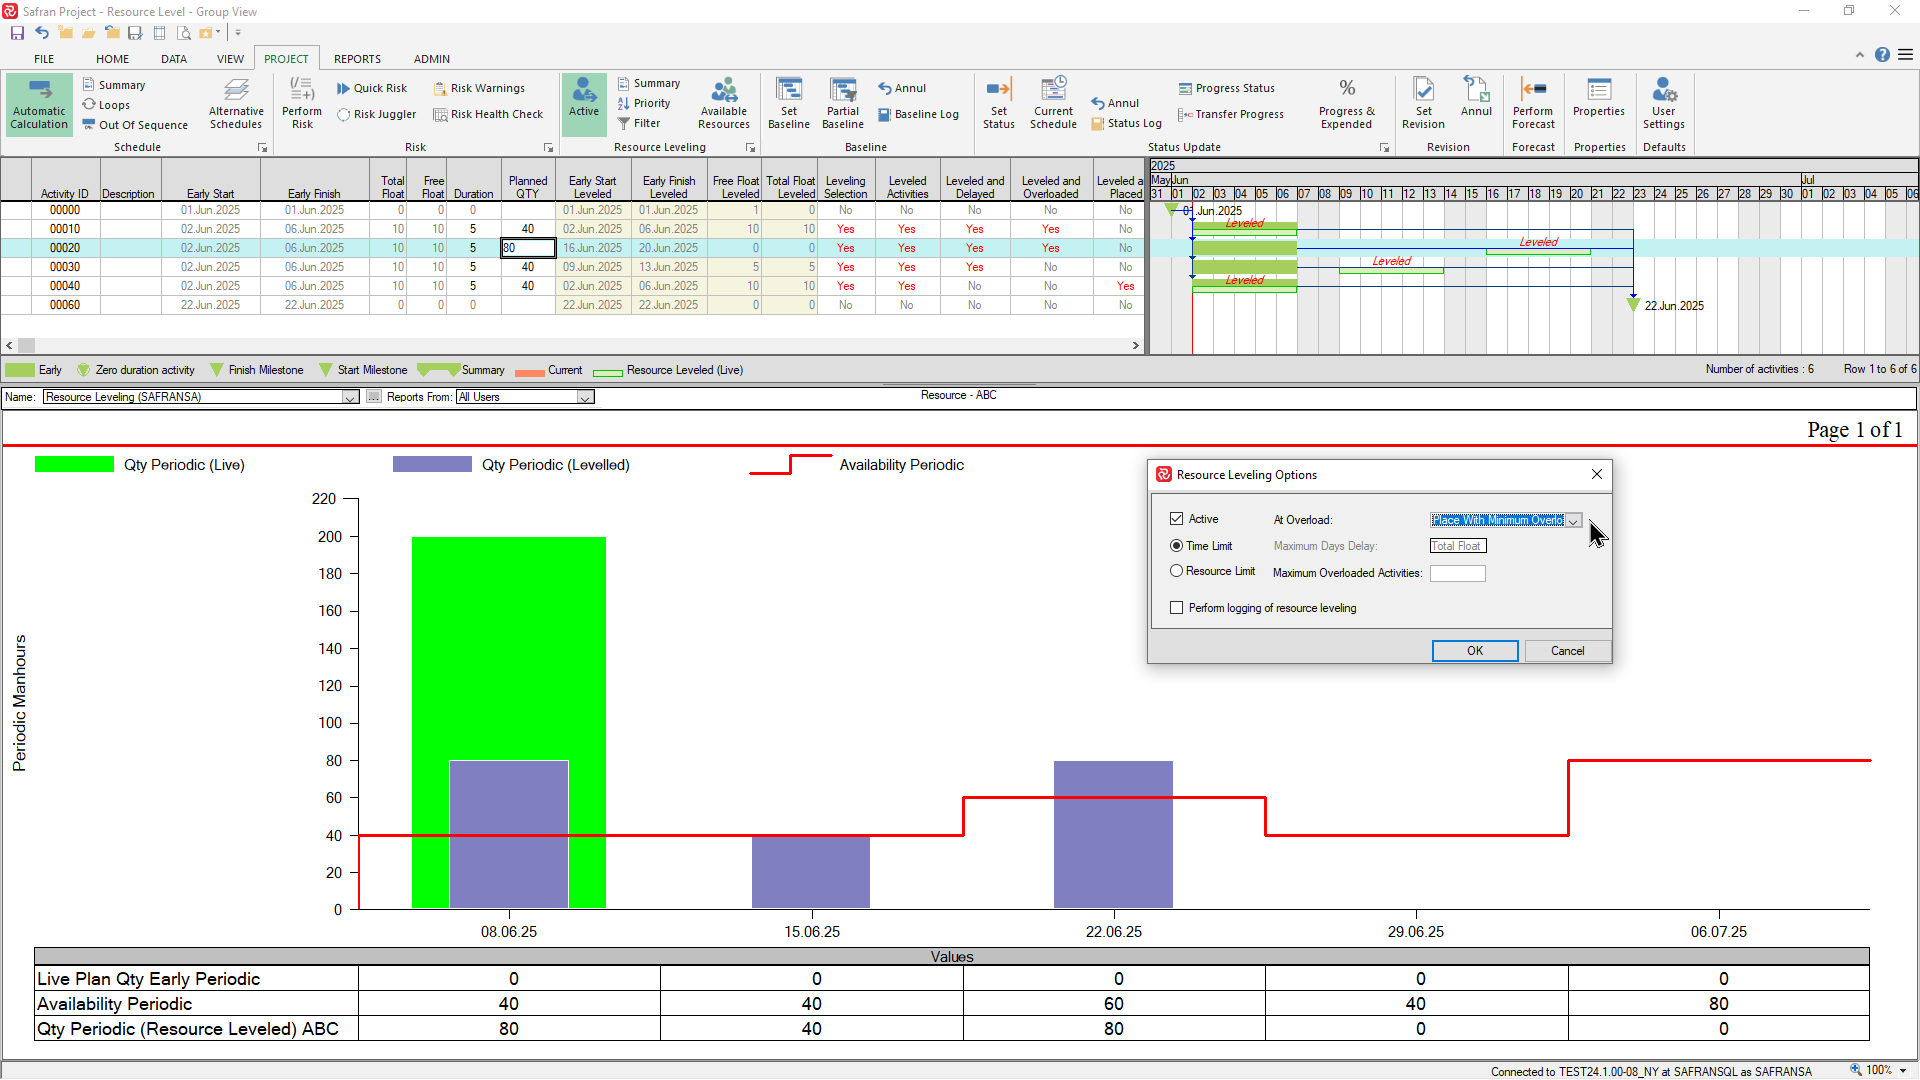
The next example shows the effect of the 'With minimum overload' option. Note that activity 00020 with 80 manhours has now been moved to the week ending 22.06.25 where there is a higher availability but still not enough to meet the requirement:
You can also configure the time limited level to limit the number of activities in overload by entering a number in the 'Maximum Overloaded Activities' box as shown below. In this example you'll notice that, since the limit is set to '1', the leveler can no longer level activity 00010 since this activity exceeds the specified limit:

Resource Limited leveling
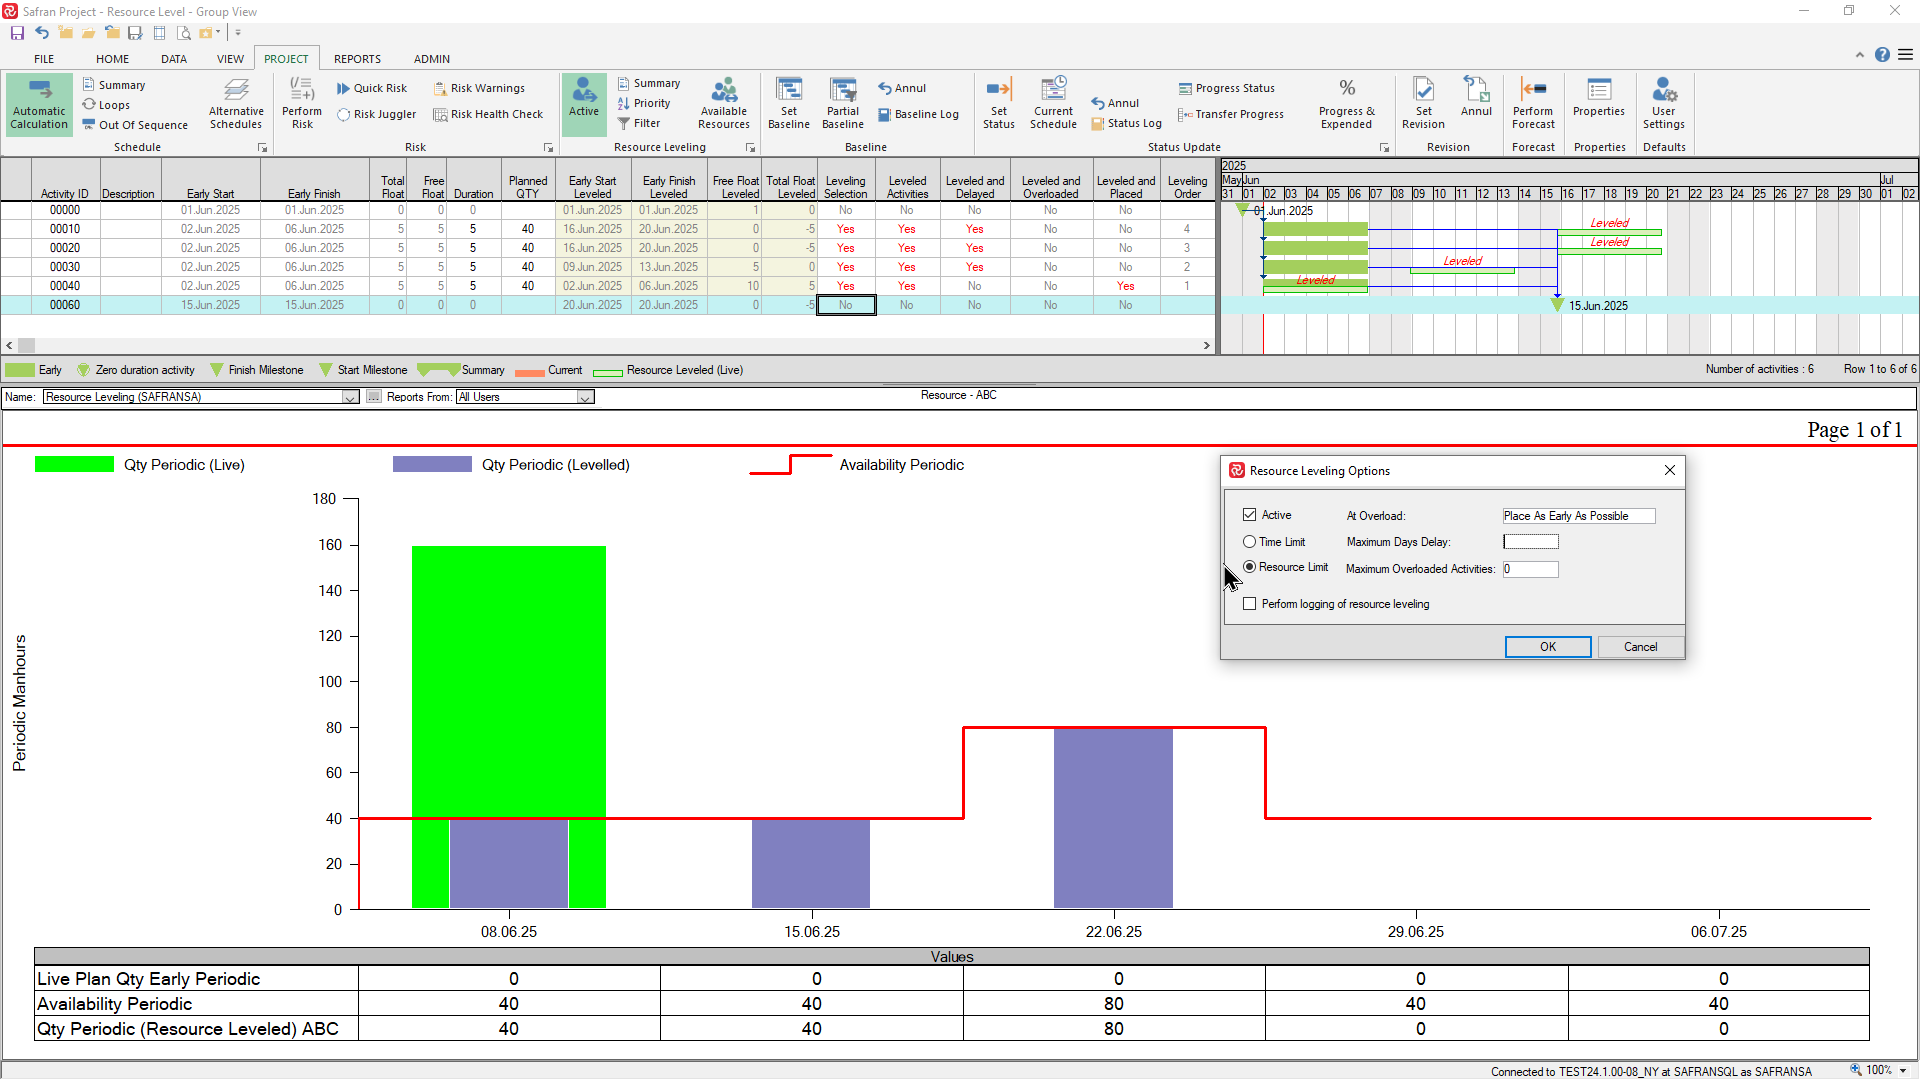
If we choose the Resource limited option/method with it's 'default' sub-options the, leveling process will disregard the 'time-limited' requirement and delay activities in order to match the resource requirement with the availability. In the example below you'll see that the leveler has delayed activities 00010 and 00020 beyond the final milestone in order to stay within the resource availability profile
In addition to the two sub-options At Overload and Maximum Overloaded Activities discussed earlier, the resource limited level also allows you to choose the Maximum Days Delay. This limitation applies for each single activity and not the total/project finish delay.
In the example below, where there is no delay limit, activity 00020 is delayed to the week ending 06.07.25 in order to meet the extra availability of resource that week.
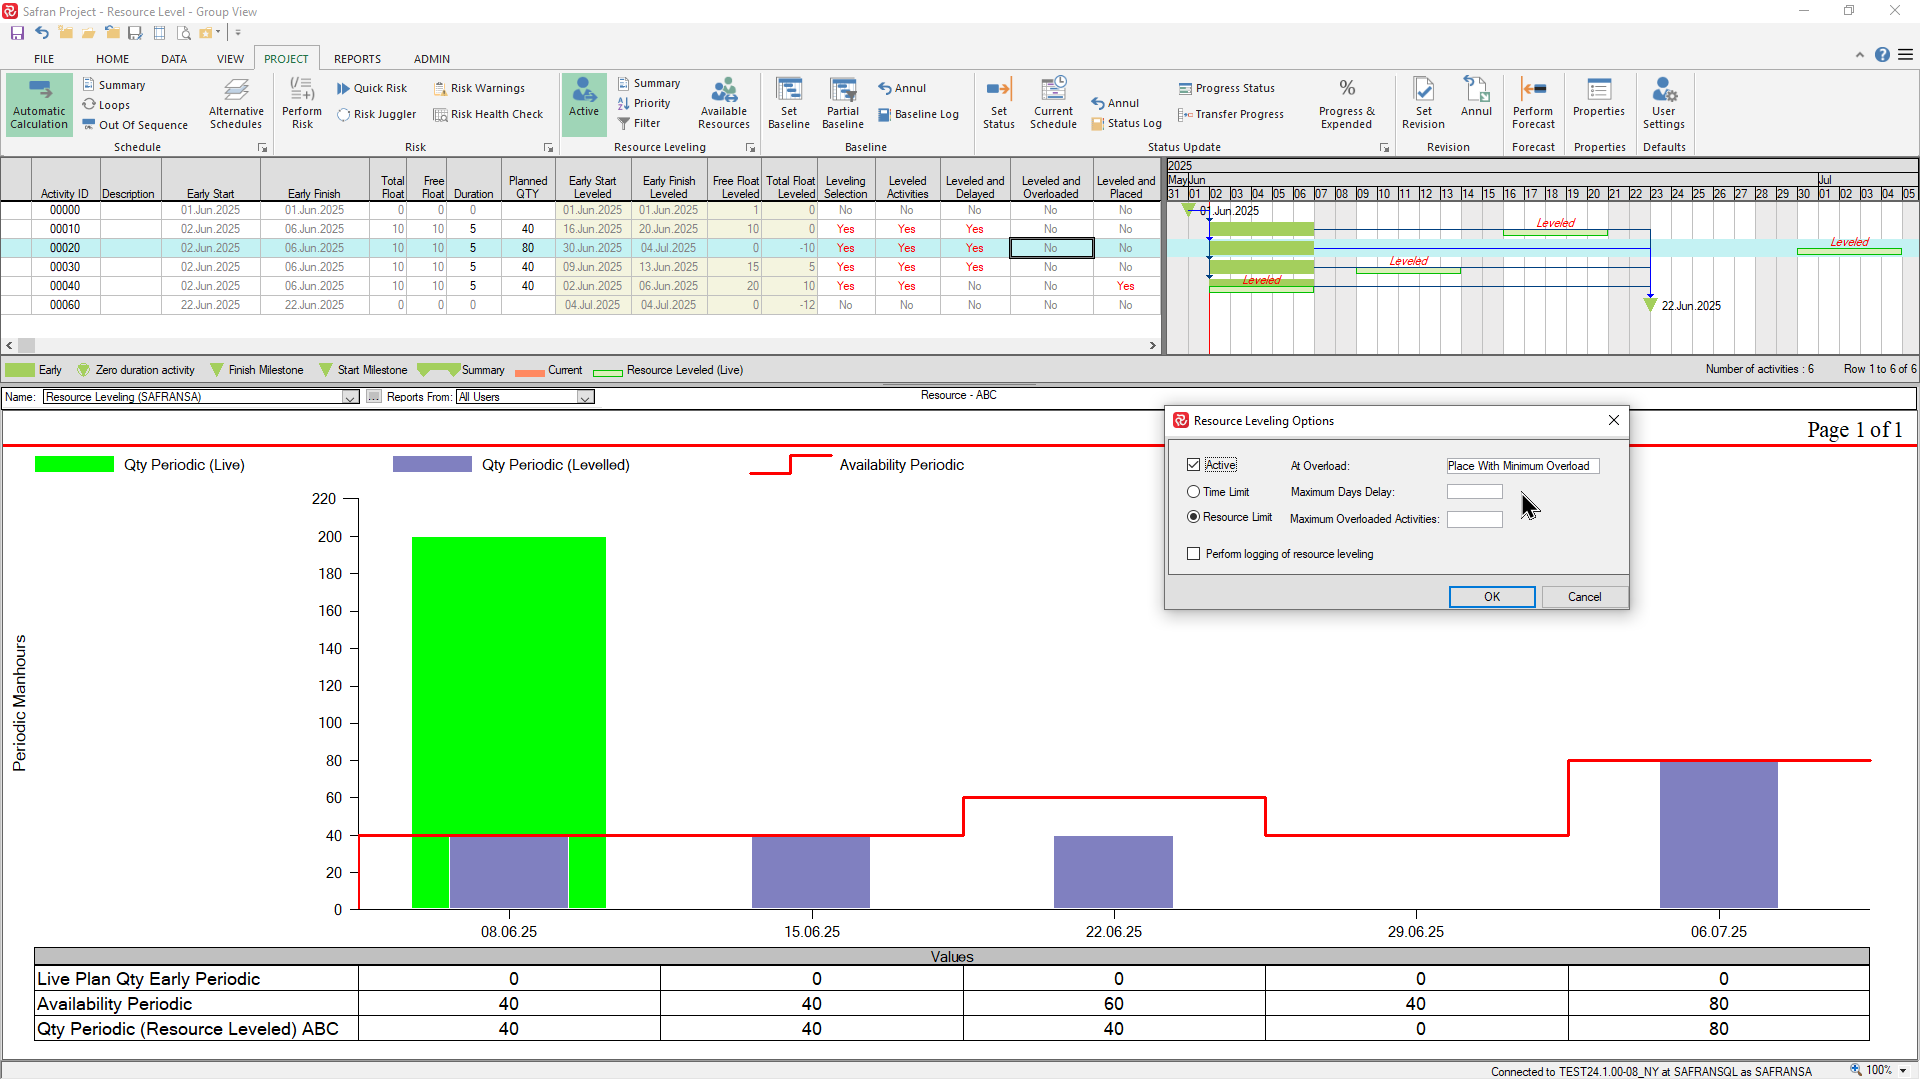
If we choose a delay limit of 10 days and and an At Overload = Minimum Overload, activity 00020 is placed in the week ending 22.06.25 which is within the finish milestone date.
Both options will help you find the location of available resources for all activities that are selected for resource-leveling.
The main difference between Time and Resource limited leveling is that Time-Limit will set the Maximum Delay to the activity's Total Float.
At the same time, the Resource Limit allows manual input of Maximum delay. Maximum delay is the number of time units permitted for each activity to be delayed.
The ‘At Overload’ comes with two different options, ‘Place As Early As Possible’ and ‘Place with Minimum Overload,’ available for both Time and Resource Limits.
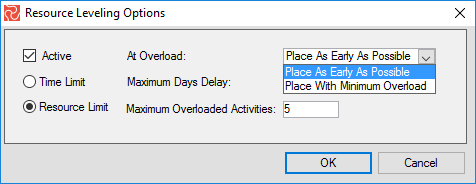
Place As Early As Possible: Moves to the earliest possible date and does not consider the overload's size.
Place with Minimum overload: Move the activity to the minimum possible overload date.
Maximum Overloaded Activities: The number of overloaded activities can be accepted before resource leveling is canceled.