Activities and Milestones
The main building blocks of your schedule are activities and milestones.
An activity is a task (or many tasks) in a project plan with a distinct beginning and end. In Safran Project, the start date of an activity is based on how it's connected to other activities and other logic in the schedule. If an activity isn't linked or set to start on a specific date it will always start on the project's Timenow date which is defined in PROJECT > Setup. The end date of the activity is calculated from its start date, the duration of the activity, and the calendar the activity uses.
A milestone is a tool to mark specific points along a project timeline. These points may signal anchors such as a project start and end date. In Safran Project, a milestone may be a Start or Finish Milestone, depending on where you want to place it in your plan. This can be selected in the Activity Information > General tab. A milestone can only be completed when its predecessors are completed. The duration of a milestone is always 0.
You may also need to create a hammock activity. A hammock is a particular type of activity measuring the time between two points in the project. The start and finish dates of a hammock activity are directly related to the activities linked to the hammock activity. It will stretch and shrink between those points dynamically as the schedule changes. The hammock must be linked up using an SS link for the start point and an FF link for the endpoint.
You can select what activity you need by using the Activity Type drop-down list in the Activity Information > General tab.
Add/Remove activities
With Safran Project, you have the flexibility to add and remove activities, milestones, or hammocks in several different ways. The software differentiates between adding and inserting an activity, giving you full control over your project plan.
When you add an activity, it will always be placed at the bottom of the plan (after the last activity). When you insert an activity, it will always be placed into the plan on the line above the activity you have selected, and it will inherit values from the group into which it is inserted.
Adding or inserting an activity is as simple as clicking the HOME ribbon and finding the Rows section. Within the Rows section, the Insert button allows you to add or insert activities, milestones, and hammocks with ease.
To remove an activity, click the HOME ribbon and find the Rows section**.** Within the Rows section, the Delete button gives you options to remove activities.
It is also possible to add/remove activities by keyboard shortcuts or right-clicking. You can import activities from a text file using the FILE > Import menu if you need to add several activities.
Start – Finish – Duration
Safran Project holds several different predefined date sets for every activity. You can use several of these to draw symbols for the activities in the Gantt chart. The most frequently used date set is the live plan which uses Early Start (ES)/Early Finish (EF).
ES/EF are calculated dates. You cannot directly edit the 'Early' dates. The software's robust calculations consider duration, links, dependency types, constraints (must start on), reported progress, Timenow date, and more, ensuring accurate scheduling and planning.
Use as few constraints (must start on, start no earlier than, etc.) as possible in your schedule. Using many constraints will restrict Safran Projects's scheduling algorithm when analysing the project and updating plan sets.
Activity Information
When adding new activities, the most basic information is presented to you in the columns visible in the default layout. You can add a lot more information and make several more adjustments to each activity if you use the information panel 'Activity Information' view. Go to the VIEW ribbon and the Information section, and click on 'Activity'. Most fields in the Activity Information can be added as columns in the Barchart Editor.
The General tab shows the activity ID number, duration, calendar, description and type. If this activity has any constraints to dates it must start on or any other schedule options you can edit this on the Constraints/Schedule Options tab. The Progress tab shows basic progress info, and you can also choose to set it to 'Always On Schedule'.
Always on schedule is typically used for administrative tasks or other similar work that progresses naturally with time. When an activity is set as always on schedule, it is impossible to add progress. It will automatically be calculated during status updates. Activities set to 'Always On Schedule' will not be considered when productivity and other indices are calculated. In the EVM method, 'Always On Schedule is called Level Of Effort (LOE). The scheduled tab holds all the calculated dates for all the plan sets related to the selected activity.
The rest of the tabs in the activity information panel are related to the userfields defined in the project and is split up into one tab per userfield type.
Linking activities
Related activities should be linked together. Linking activities together is the core of project planning. Linking activities automatically update ES/EF dates based on reported progress. If you report less progress than expected on an activity, that delay will be considered when calculating the ES/EF on succeeding activities.
Adding and removing links
Click the HOME ribbon to add or insert a link and find the Rows section**.** Within the Rows section, you can link activities using the link button. Select the activities you want to link first, then click the link button. You can select several activities by holding down shift and selecting or specify a link chain by holding down ctrl and selecting activities in the order you want to link them.
Removing the links between activities is just as easy as adding them. Select the activities you want to unlink and click the Unlink button next to the Link button, as mentioned above.
Dependency types/Link types
There are four different dependency types to choose from when linking activities.
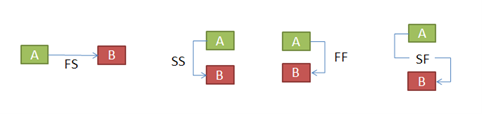
FS - Finish to Start
This is the most common type of dependency. After the predecessor task finishes, the successor task can start. Most of your tasks should be linked with this dependency, as it reflects real life. For example, you can only begin to print the manual once it is completed.
SS - Start to Start
The successor task cannot start before the predecessor task starts. They are often used to mark the beginning of phases of work or work packages.
FF – Finish to Finish
The successor task cannot be finished before the predecessor task is completed. It is often used to link activities to milestones.
SF - Start to Finish
The successor task cannot be finished before the predecessor task starts. An example is a security shift change, whereby the first security guard can only leave (finish) once the second guard has begun their shift.
Excessive use of Start to Finish dependencies in your project can lead to unexpected results. This unusual relationship can often be better modelled by adding an extra activity. The example above accomplishes this by adding a "handover" activity and two FS links.
At least 90% of your logic should comprise FS links. Avoid using SF links wherever possible.
Delay
You can use delay on links to set a planned delay on a link between two activities. There are many reasons for using delay, for example, where an FS relationship links two activities together, and the first activity is casting a wall while the successor is painting the wall. We know that the cast needs to dry for five days before we can paint it. In this situation, we set the five days of drying as a delay on the link. The result is a recalculation of the ES/EF dates for the painting activity where it takes the planned delay into account.
A delay can be set for all dependency types (FS/SS/FF/SF). It is also possible to enter a negative delay on a link.
Split target
Split targets are used where a natural break occurs in the schedule. Suppose a split target value is entered on a link. In that case, it is a barrier between the preceding and succeeding activities, making the two sets independent. The preceding activity cannot be completed later than the split target date, and the succeeding activity cannot start before.
Split targets between different sub-projects can be helpful in the plan or between different phases. By doing this, you get control over the available float. Sometimes, the problem can be that one phase eats the total float of the plan. Setting a split target can avoid this problem and make the "float eaters" visible to the management.
It is possible to turn split target impact on the schedule analysis on or off. Go to PROJECT > Properties > Schedule Options and check or uncheck "Include Split Targets."