Multi Project Management with Safran Project
Introduction to Project Groups
Safran Project provides a wide range of flexible facilities that enable effortless management and control of any number of single projects. In most ways, working with a Project Group is just like working with a single project.
The Project Group concept is easy to set up and has few limitations. Single Projects may be added or removed anytime, enabling precise resource management.
Multiple Project Groups may be created, and single projects may be added to multiple Project Groups to model various scenarios, enabling efficient Multi-project Resource Management or Project Portfolio Management.
Safran Projects’ Project Group concept also lends itself to large-scale development/construction projects where each major contractor plans and controls its project with its attributes and potential cross-project links to activities in other contractors’ schedules. This provides efficient interface planning. At the same time, the project owner uses the Project Group to get insight into the project as a whole and manage and report on its status.
Using each source project’s data ensures that what is seen in a Project Group is continuously updated with the latest changes and status information.
Setting up a Project Group
Although the Project Group utilizes most of each source project’s attributes and properties, such as the Calendar, Schedule Options, and Progress Method, a few details must be standard or synchronized across all source projects. These attributes are:
- Userfield set
- Resource set
- Symbol set
- Cutoff dates
The Scope configuration should also be given some consideration, both the content of each scope (Baseline/Current/Total) and specifically which scope is used for progress lifting.
Ideally all member projects should have the same scope for Progress Lifting in order to achieve consistent Progress percentages for both member Project and Project Group.
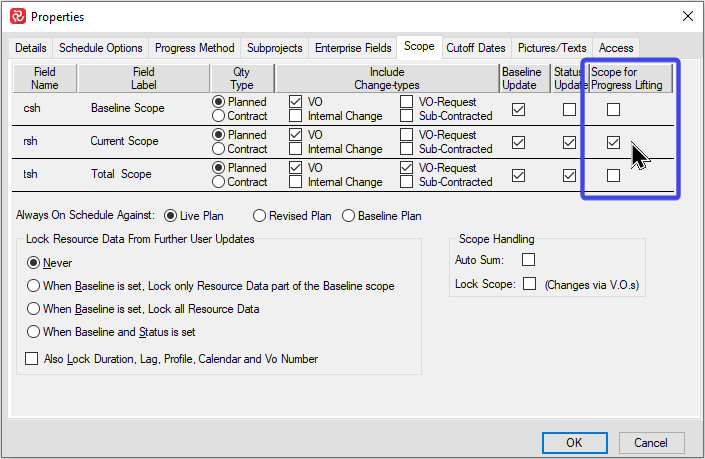
If this is not the case, Safran will select a scope for progress lifting according to the following rules/priorities:
- If at least one of the member projects has nominated the Baseline scope for Progress lifting, the Baseline scope will be chosen for the group.
- If none of the member projects has nominated the Baseline scope for Progress lifting and at least one has nominated the Current scope for Progress lifting, the Current scope will be chosen for the group.
- If none of the above is true, this implies that all member projects have nominated the Total scope for Progress lifting and this will therefore also be used for the Project Group.
We therefore highly recommend that you check that the scope for Progress Lifting is the same for all member projects in your project group in order to ensure consistent progress reporting.
A new project group may be created by selecting 'New' from the File tab of the ribbon.
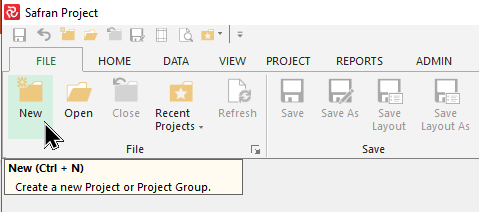
Select 'Project Group' from the New panel and press Next to establish and configure your project Group.

Project Group Properties - 'Details' tab
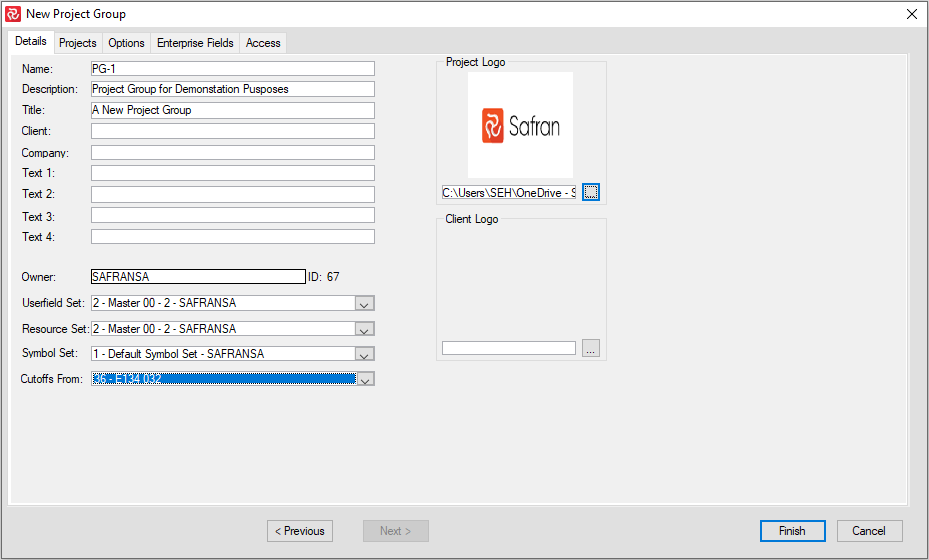
The New Project Group/Details sub-panel allows you to configure the Project Group’s properties such as Name, Description, Title, etc., and Project/Client Logo files. These properties are readily available as Header/Footer information on all Safran Barchart layouts and report configurations.
The two most important Information Sets that need to be ‘connected/associated’ are the Userfield set and Resource set that the Project Group will utilize.
The Userfields defined are used extensively in Group, Sort, and Filter project activities in both Barchart Layouts and Report configurations and must be considered.
This type of information is often standardized in larger organizations or produce-to-order environments, so choosing a common Userfield/Resource set for a Project Group usually is not that difficult.
Finally, suppose you use Project Month as an interval in your Histogram & S-curve. In that case, Editor Histogram or Progress Summary reports, nominating a Project containing a set of Cut-off dates encompassing the entire project duration in your Project Group is essential. Remember that the project, including the cut-off dates, does not have to be a group member; in some cases, creating a dummy project without activities containing a 'perpetual' set of cut-off dates might be helpful.
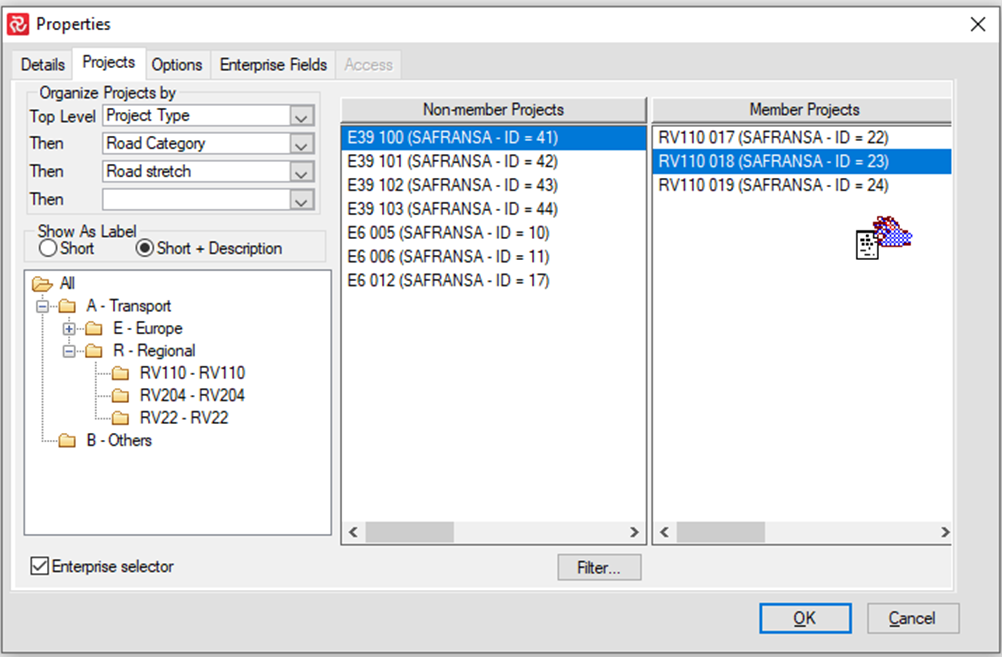
Project Group Properties - 'Projects' tab

The next step is to add projects to the Project Group. The project selector panel has two panes. To add a project to the Project Group, select it from the ‘Non-member' Projects pane and move it to the ‘Member Projects’ pane using the ‘Drag n Drop’ technique.
Alternatively, if you want to remove a project from the group, select it and move it back to the ‘Non-member Project pane.
Select member projects using the Enterprise selector.
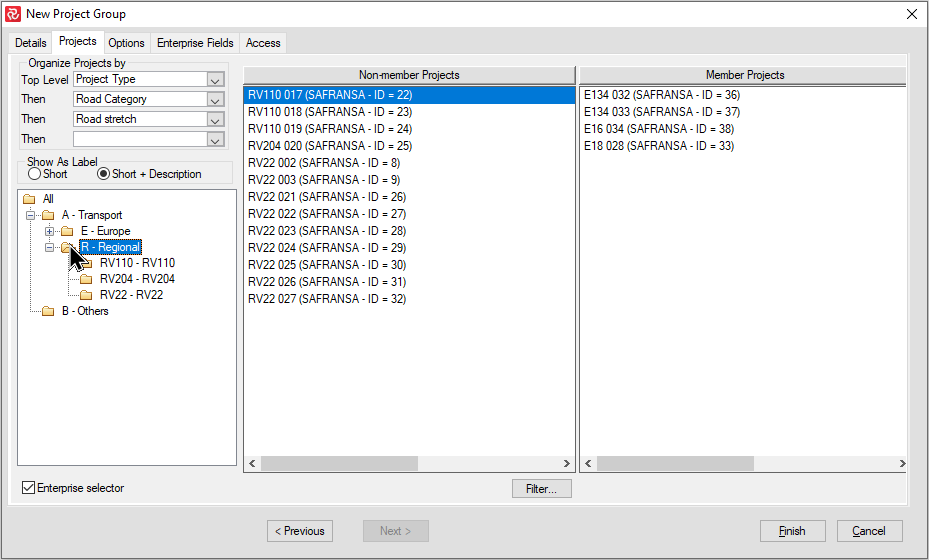
If your database contains many projects, it might be easier to find projects using the 'Enterprise Selector.'
The enterprise selector allows you to build a tree structure of up to four levels and organize your projects based on each project's Enterprise Codes and values.
To define your Enterprise selector/groups, drop in and choose the enterprise fields you want to group your projects in the ‘Top Level/Then’ dropdowns. After establishing the structure, you can use the nodes to navigate the system. When you select a node, the list of projects in the ‘Non-member’ pane will consist of the projects for that group/node.
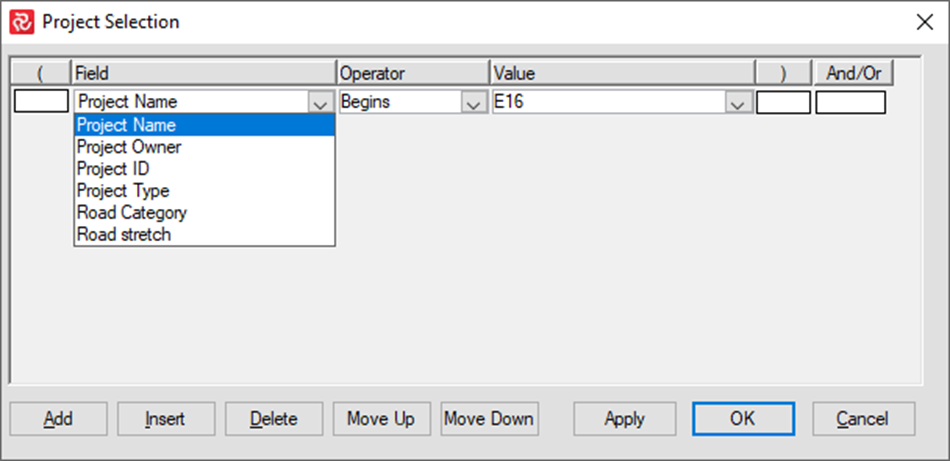
Another facility that eases the search for projects is the Filter/Project selection. The project selector allows you to filter on a project’s properties such as Name, Owner, or any of your defined Enterprise Codes. Press the Filter button to open the Project Selection window shown below:
Filter/Project Selection
Project Group Properties - 'Options' tab
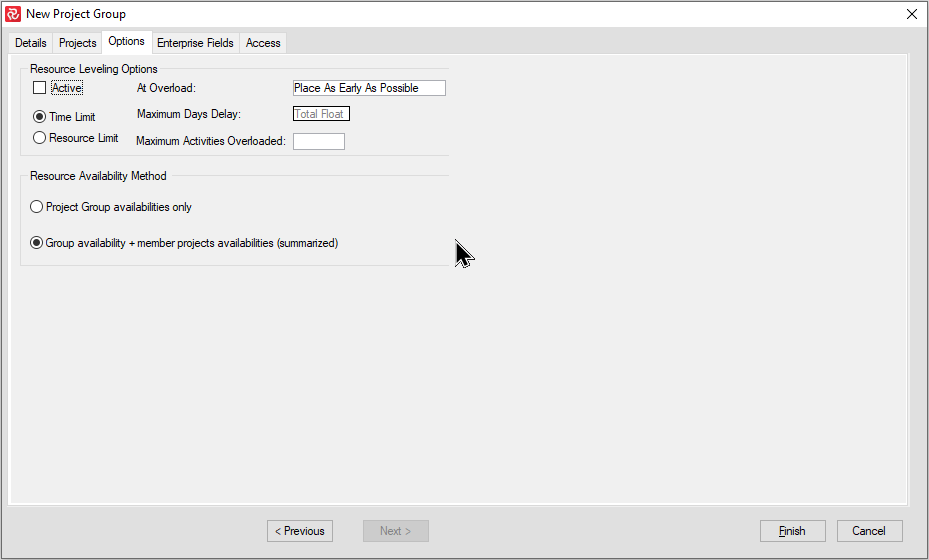
The Options panel allows you to configure Safran’s resource leveling algorithm.
Resource leveling may be switched on/off by checking the Active checkbox.
Safran’s leveling offers two basic concepts:
- Time-limited
- Resource limited
The 'Time limited' option will attempt to postpone activities within their Total Float to match the resources' availability. When this is no longer possible, i.e., the activity is delayed to its latest position, an overload situation will inevitably occur.
The 'Resource limited' option will adhere to the resource availability and will delay activities beyond their Total float until sufficient resources are available. When using this option, you may limit the maximum delay allowed for activities (in days) and the maximum number of activities to go into overload.
In both cases, you may also specify where activities are placed when overload situations occur, either time-focused (as early as possible) or resource-focused (with minimum overload).
The resource availability used for the leveling process may be the availability defined for the Project Group alone or combined with the availability from each source project. The latter is often helpful in a multi-project environment to visualize a company’s ability to take on additional work in addition to ongoing projects.
The resulting schedule dates will be found in the Early Start Levelled and Early Finish Levelled fields. As a part of the leveling process, both Free and Total float values are calculated and made available within the Barchart Editor (Total Float leveled/Free Float Leveled).
As with the standard schedule dates in Safran, the resource leveled dates are also available for both symbols in the Barchart Editor and the basis for histogram/s-curve elements in all Safran reports.
Project Group Properties - 'Enterprise Fields' tab
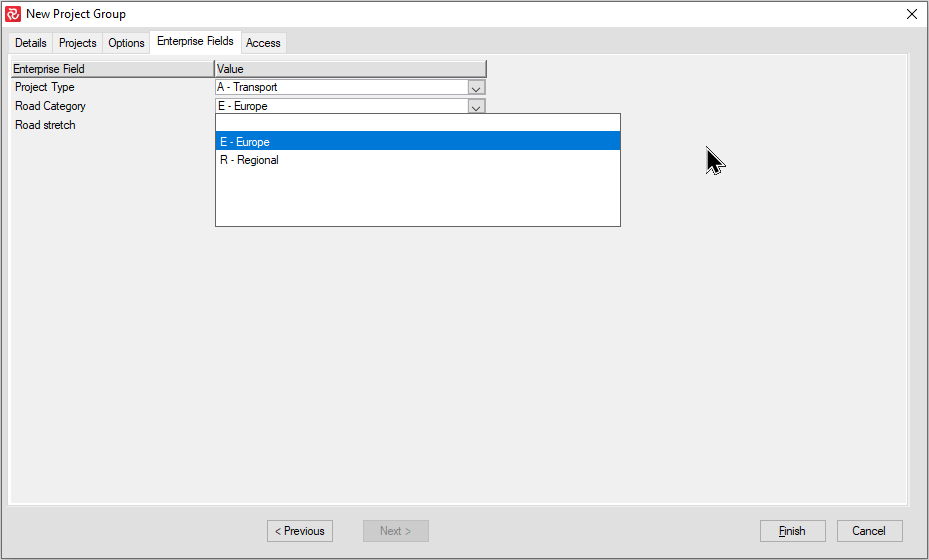
In the same way as a single Project, Project Groups may also use Enterprise fields to help categorize Project Groups by using the Enterprise Selector. Choose the relevant value for each Enterprise field from the adjacent dropdown. To learn more about this, check out the chapter on Enterprise Fields.
Project Group Properties - 'Access' tab
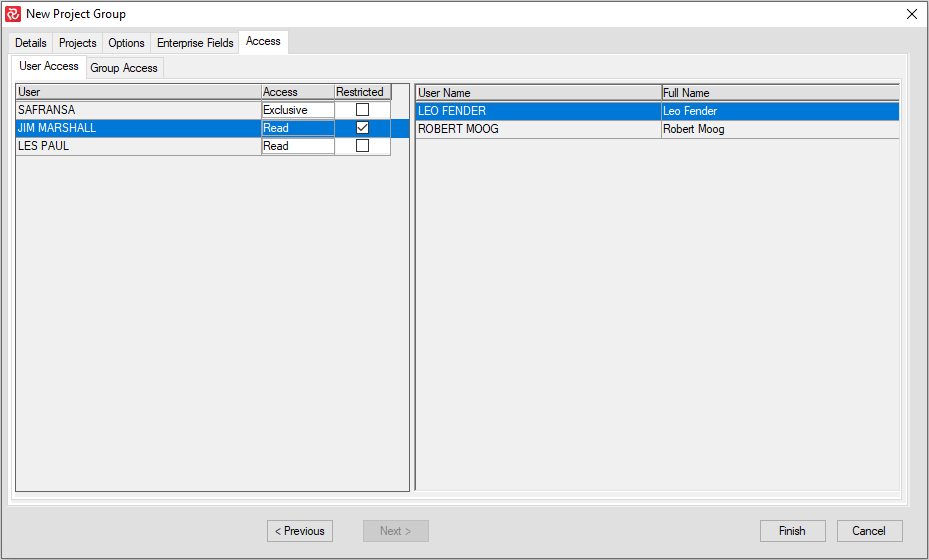
Access to the Project Group may be specified on the 'Access' tab using the drag ‘n’ drop technique. Please select the relevant user and move it to the left to give access to a user. Once the user is placed to the left, select the required Access Level using the Access dropdown. In the same way, you may also give access to a Group of users if User Groups have been defined.
Keep in mind that a user will also have to have access to all or relevant projects at the project level in the Project Group. That access to project activities will be established as a combination of the project and project group accesses.
Consider the following:
A project group comprises four projects: A, B, C, and D. A user is given updated access to the group. The user also has updated access to Projects A and B and read access to Project C but no access to Project D.
When users open the project group, they can update Project A and B activities from Project C, which would only be readable. In contrast, Project D activities would not be presented even though the user has Update access to the project group. (The user would be able to see potential 'Interface Activities' from Project D).
If we consider a similar case where the user has the same access at the project level as discussed above but only has read access at the Project Group level, the resulting access would be access to projects A, B, and C and no access to projects D.
'Restricted' is a special access type pertaining only to project groups. Restricted access limits a user’s ability to run reports in Safran as all the reports on the Reports tab will be in-accessible (grey) in addition to the Histogram panel in the Barchart Editor, as illustrated in the picture below.

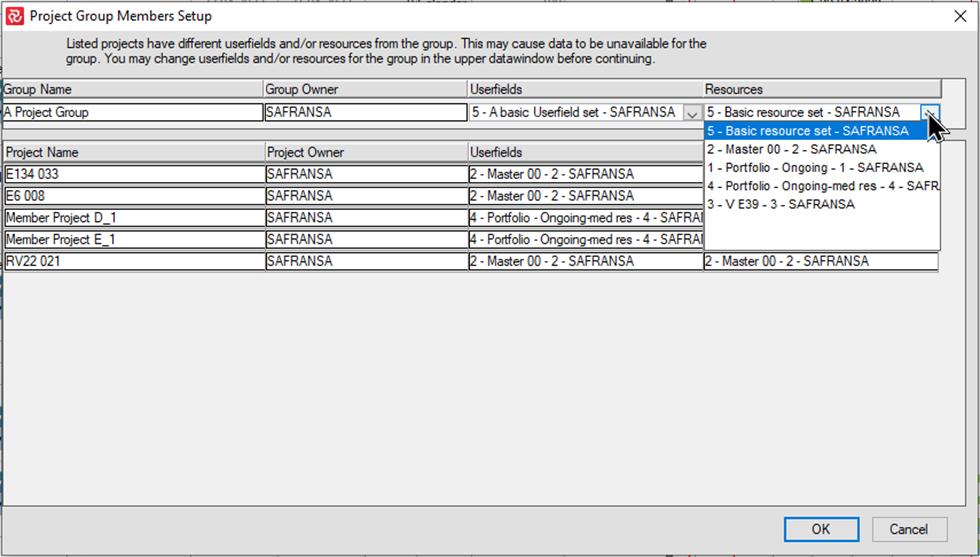
When you are finished configuring your Project Group, press the 'Finish' button to create the Project Group. If all single projects in the group use the nominated Userfield/Resource sets, the Barchart Editor will open presenting activities from all single projects in the group.
Suppose the nominated Userfield/Resource sets are not used in all the single projects. In that case, a warning message will be displayed showing an overview of the data sets used by each project, allowing you to change the relevant dataset if required.
Working with Project Groups
Using Safran in a multi-project environment is, in most cases, just like working with Safran on a single project. Most of the tools and functionality for single projects are also available when working with multi-projects.
The tools and functionality that are not available are usually not relevant or practical to use in a multi-project environment. Examples are the Baseline generation and updating processes, some of the Status Update functionality such as the tabular Progress and expended tool, and the ability to Swap History between Projects and Annulling cut-offs.
You may, however, import Progress and Expended information and Set Status for all member projects in a Project Group that you have Update access to.
Most Barchart Editor layouts and Editor Histogram configurations may be used in a Project Group, while the available project report styles on the Reports tab are:
- Histogram & S-curve
- Performance Chart
- Bull’s Eye Chart
- Bubble chart Chart
- Progress Summary Report
Using enterprise fields in Project Group reports might be helpful, depending on your setup.
Report Packages and Package Lists may also be executed when working with a Project Group, simplifying project reporting.
Finally, you may export and import all projects in a Project Group to file, making backup and interchange of project information easy.
Opening a Project Group
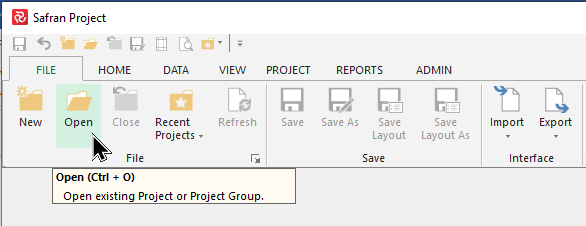
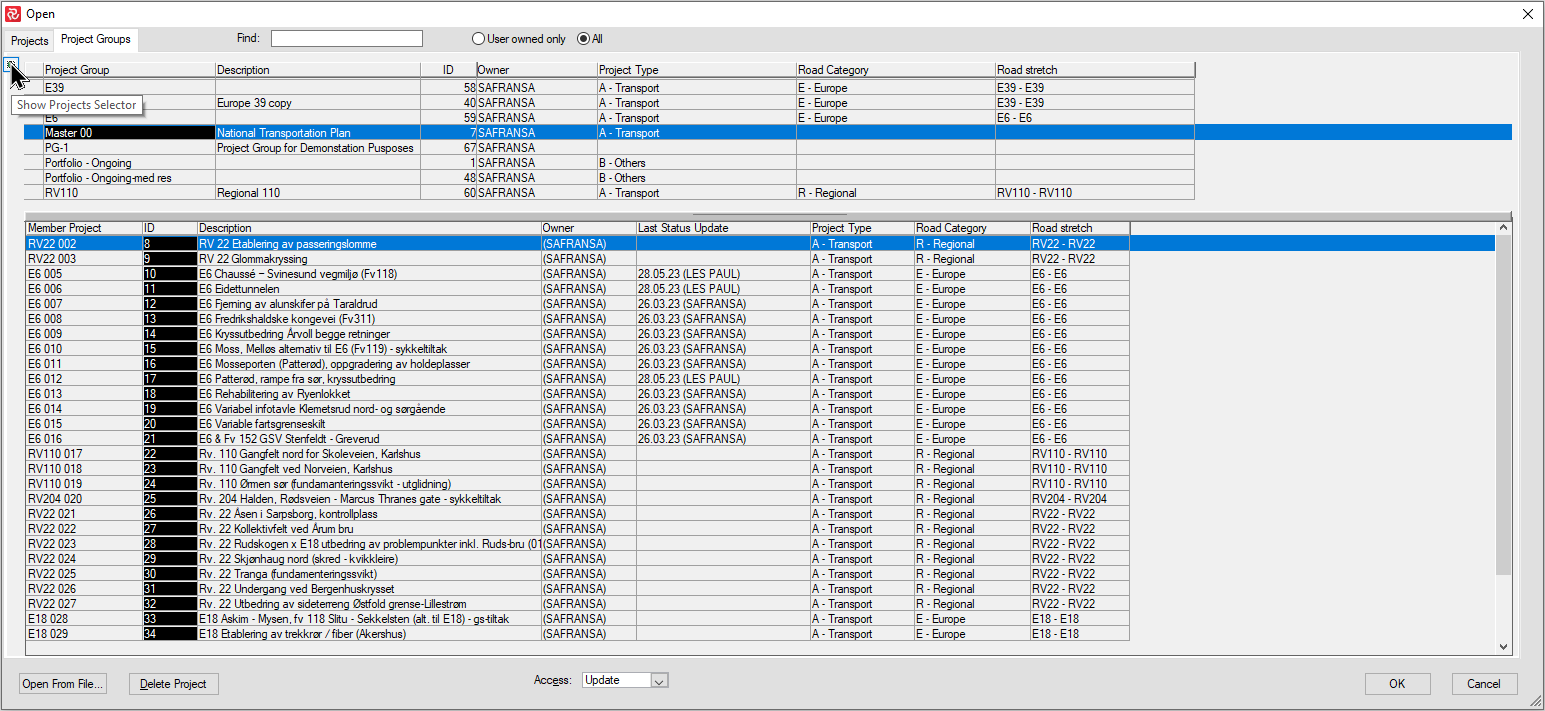
To open a project group, select File/Open from the ribbon.
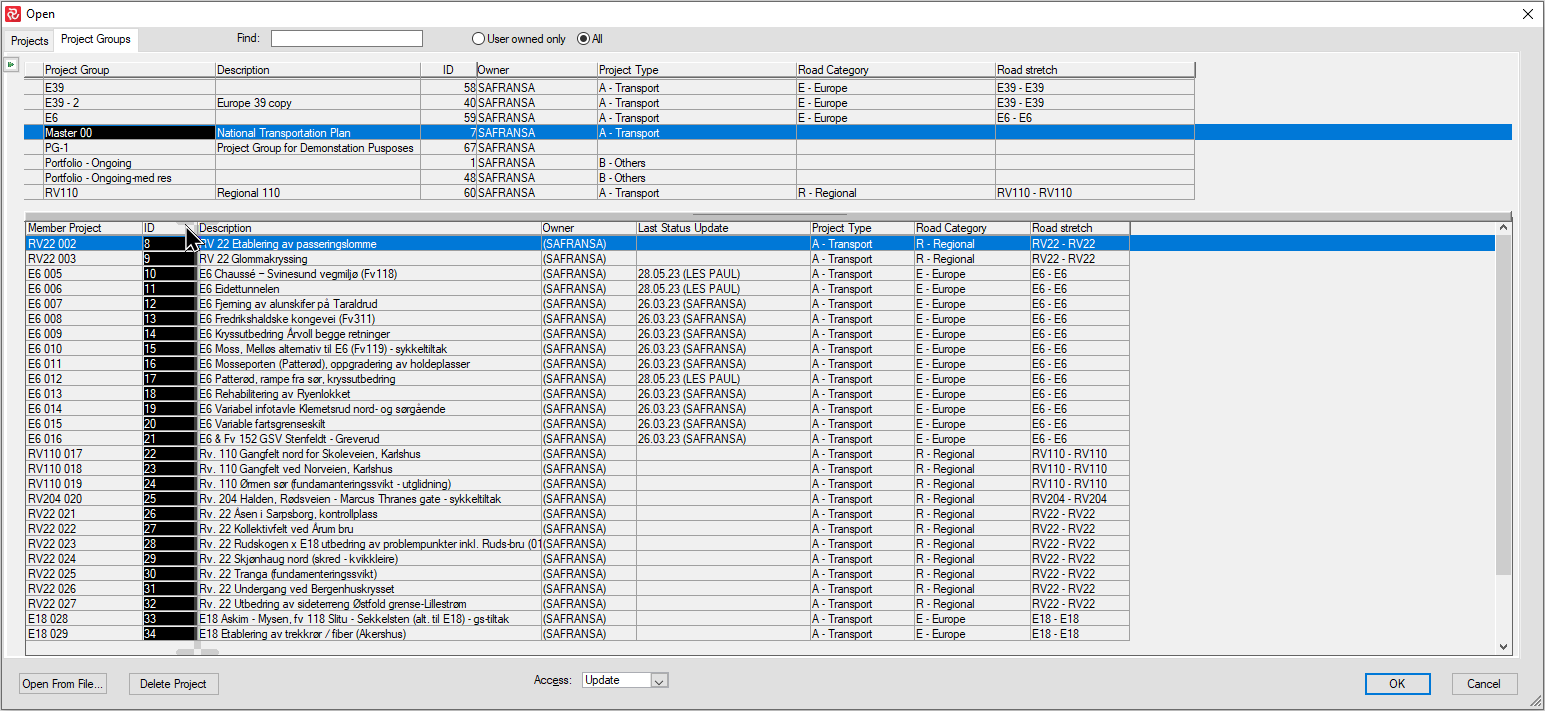
A list of existing Project Groups will be presented when selecting File/Open and the Project Groups tab. If you set focus on a Project Group, a list of Member Projects for the group will be listed.
If your selected Project Group contains many Member Projects, you can expand the lower portion of the window by ‘lifting’ the grey bar above the field headings to show more Member Projects. A scrollbar is also available to the right if your window is not large enough to list all member projects.
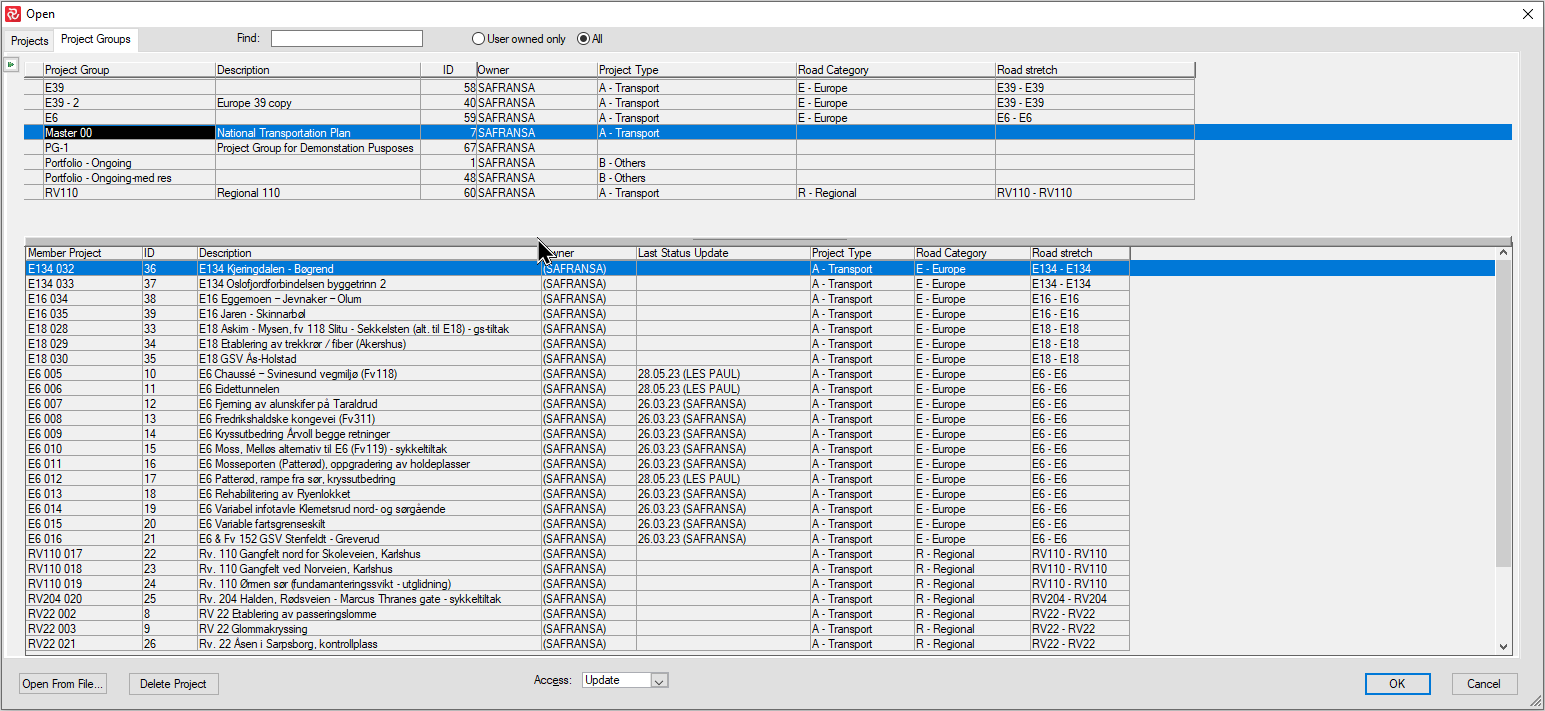
In both portions of the window, both Project Groups and Member projects may be sorted by any of the fields presented by clicking the header for the area. The initial sort will be ascending, while a subsequent click will invoke a descending sort.
Field widths may also be adjusted by hovering between field headers and then clicking and moving your pointer left/right.
The order in which fields are presented may also be re-arranged by clicking and holding a field’s header and moving it to the left or right.
If you have adjusted any of these properties, these will be stored and used the next time you use the File/Open panel, though only if it is unchecked in 'User Settings.'

Projects Selector
When working with large numbers of Project Groups, it is often easier to navigate using the 'Projects Selector.' The Projects Selector is invoked by pressing the small icon to the left of the Project Group column.
The Project Selector allows you to choose up to four Enterprise fields to organize Projects according to. This will result in a tree structure that may explode/collapse. The relevant subset of Project Groups will be presented when clicking on a node in the structure. Double-click on the appropriate Project Group or press OK to open a Project Group.
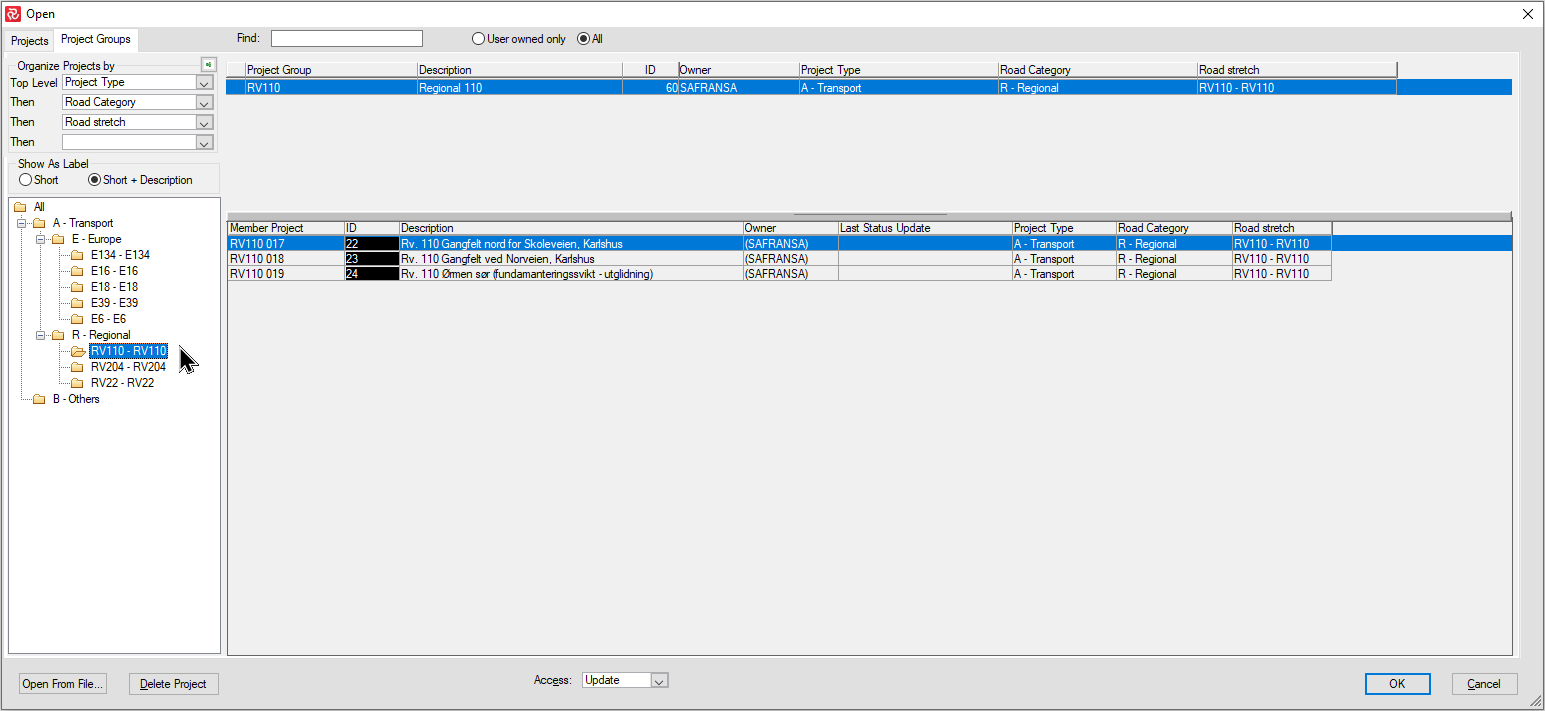
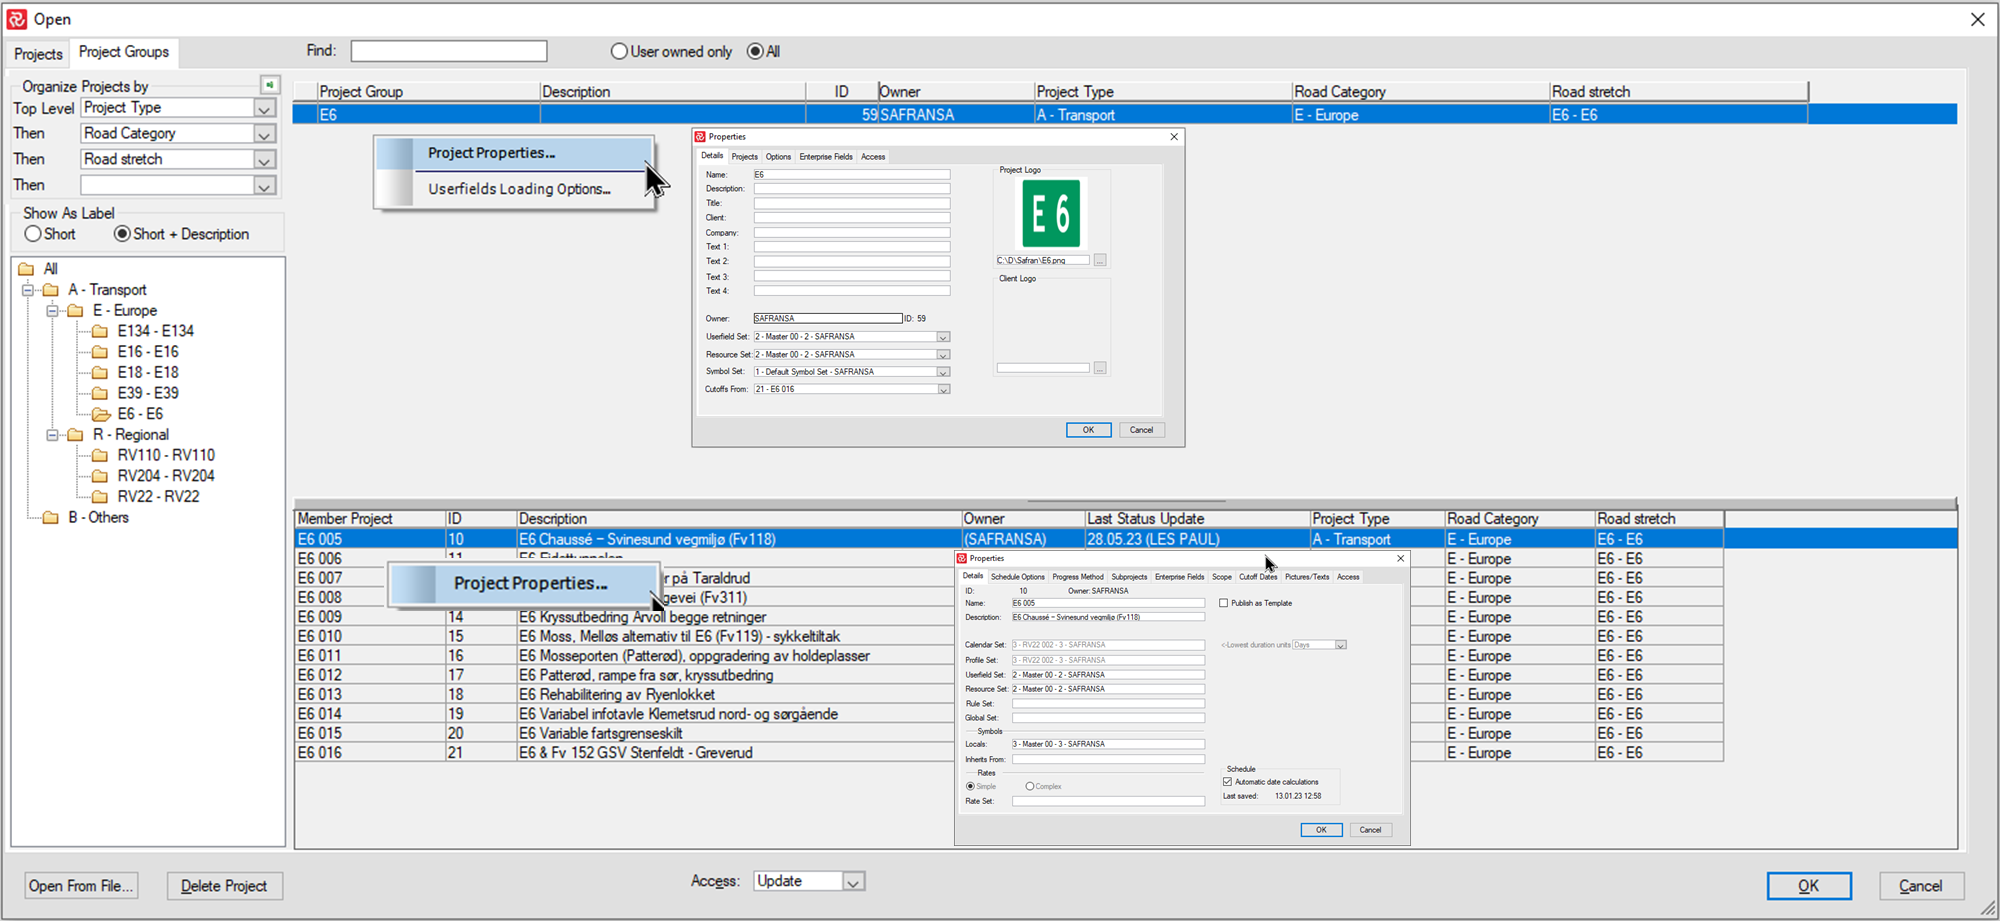
By right-clicking on a focused Project Group or Member Project, you can also open the relevant Properties window to examine or modify any of the Group Project/Member Project properties.
Userfield Loading Options
When working in large organizations or projects, many of the Reference or Outline userfields often consist of very large lists of valid values considering the entire organization's needs.
By default, when opening a project, Safran will load up all valid values for all userfields, which may be time-consuming.
To speed up the open project process, you may reduce the userfield data Safran has to load by specifying Userfield Loading options. This is done by right-clicking a Project Group and selecting Userfields Loading Options.

In the panel above, you can load Codes in Use for reference fields or Paths in Use for Outline Codes on a field-by-field basis or for all fields in one click by using the relevant button in the lower part of the panel.
Adding/Removing member projects - Access and Cross Project Link considerations
Adding or removing member projects is always done from the 'File Open' panel.
Remember that this may only be done when the Project Group you want to add to/remove from is closed, i.e., you are not 'logged on' to the Project Group.
You can access the Project Properties panel if you have the Project Group open. However, the Projects tab lists of projects will be grey/non-editable.
To add or remove projects within a project group, you must have Update or Exclusive access to the project group. You must also have Read or higher access to the project you intend to add or remove.
The screenshot below shows a user attempting to remove a member project. When you click on a project and move the cursor, the 'Drag n Drop' symbol appears, telling you you can make the removal.
If you click on a project and notice that the symbol doesn't appear, you have insufficient access and cannot remove it.
Additional considerations exist when adding/removing projects from a project group.
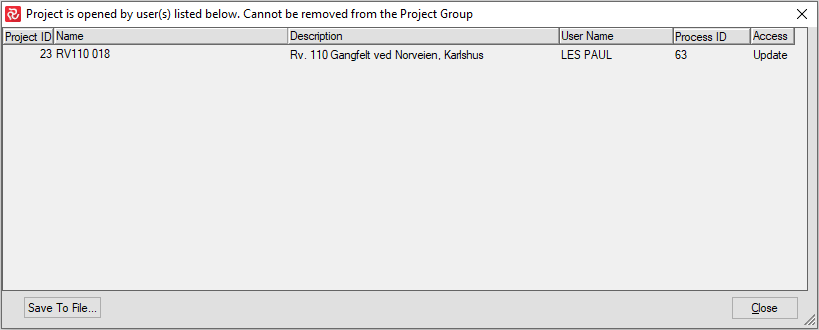
One is whether or not other users are accessing the project group when you add/remove a project. You will always be allowed to add a project to the group even though another user is accessing the project group. If you try to remove a member project from the project group when one or more users are accessing the group, you will be warned that the project group is ‘locked’ and be presented with a list of the relevant users and that the project may not be removed. If needed, the list of blocking users may also be saved to a file for later reference by pressing the 'Save to File' button and specifying a filename/location.
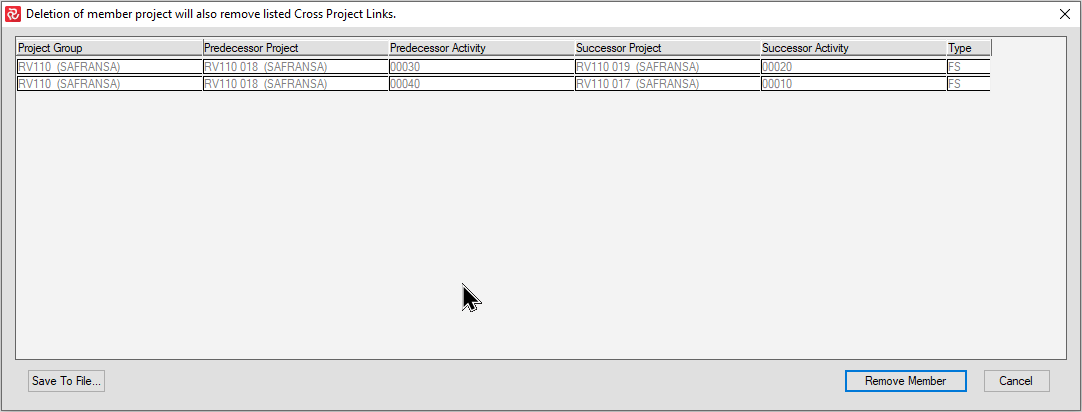
The other has to do with whether or not cross-project links exist in the project you intend to remove. If cross-project links should exist in the project you intend to remove, you will be warned and presented with a list of the links.
At this point, you will be given the option either to continue deleting the links and removing the project or to cancel the removal. In some cases, the list of links might be relatively long, so that you can save the list to a file.
Cross Project Links
When working with multiple projects, dependencies between projects are often required. Safran allows you to create links between activities in differing projects within a Project Group.
There is no limit, other than practical, on how many links you can have between differing projects.
Cross-project links are always considered when working in both a single project or project group as a part of the Live analysis (Early Start/Early Finish) and the Current analysis (Current Early Start/Current Early Finish).
Links may be created in the usual manner in Safran either by ‘drawing’ links graphically or identifying/focusing on relevant activities in the column area and selecting Link Activities or by using the Link Information/Logic Navigator sub-panel. The various methods of creating and working with links are discussed in detail later in this chapter.
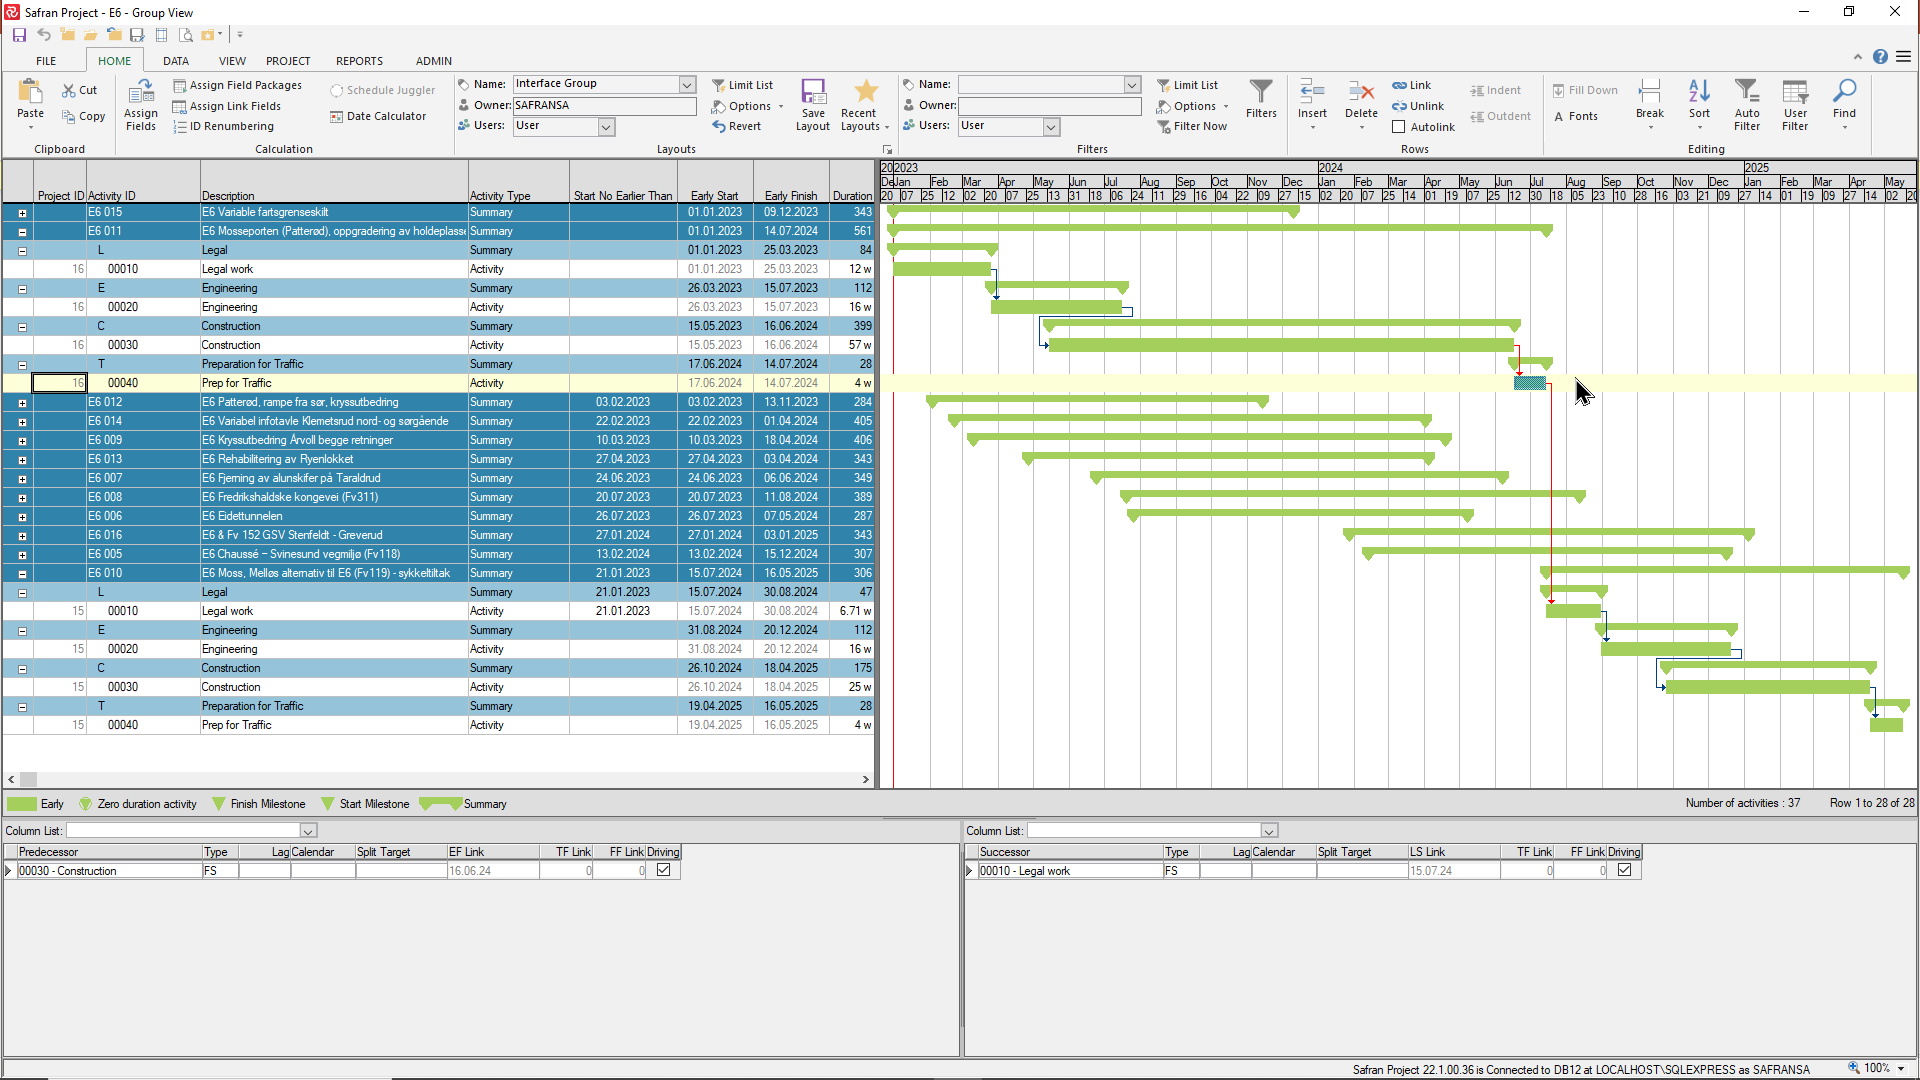
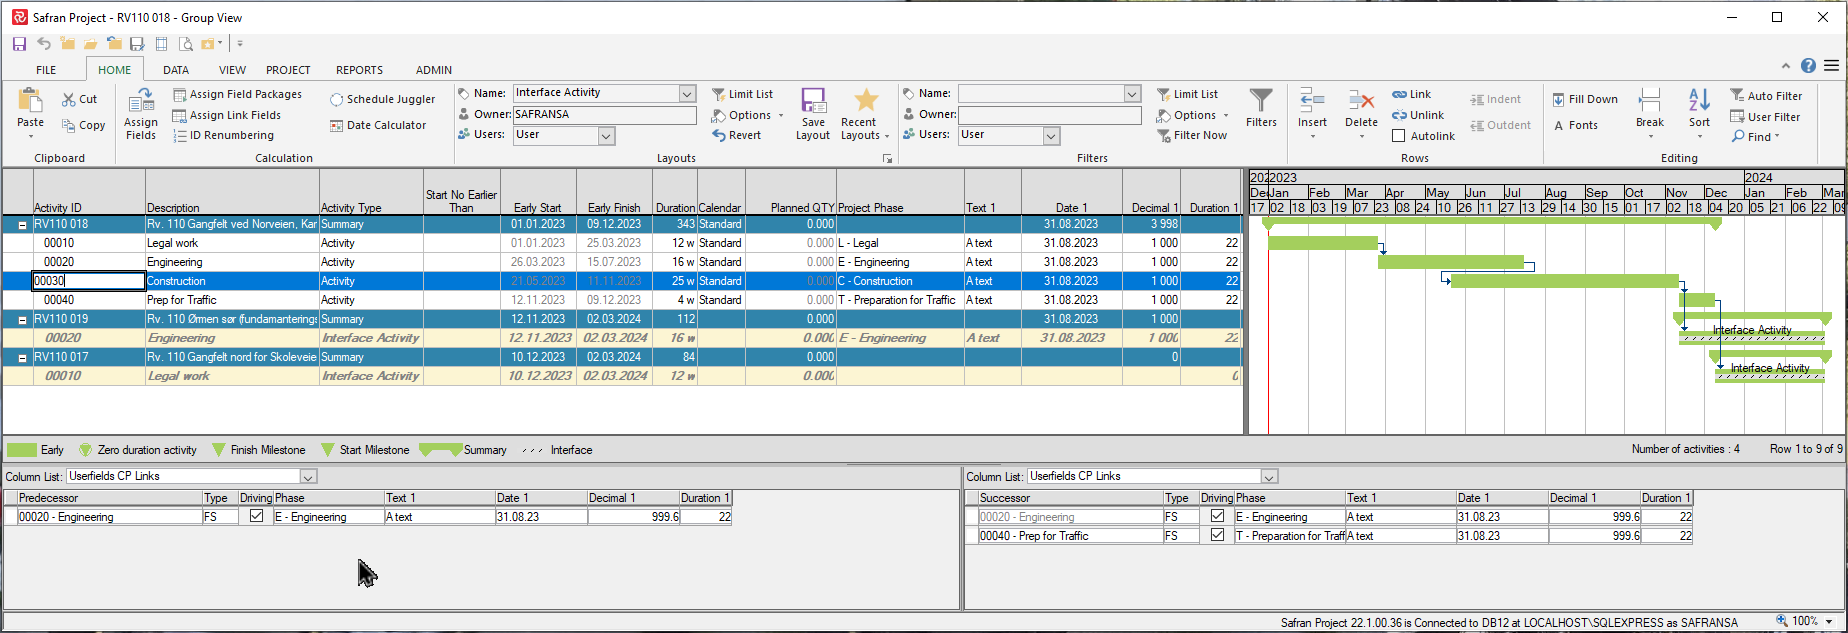
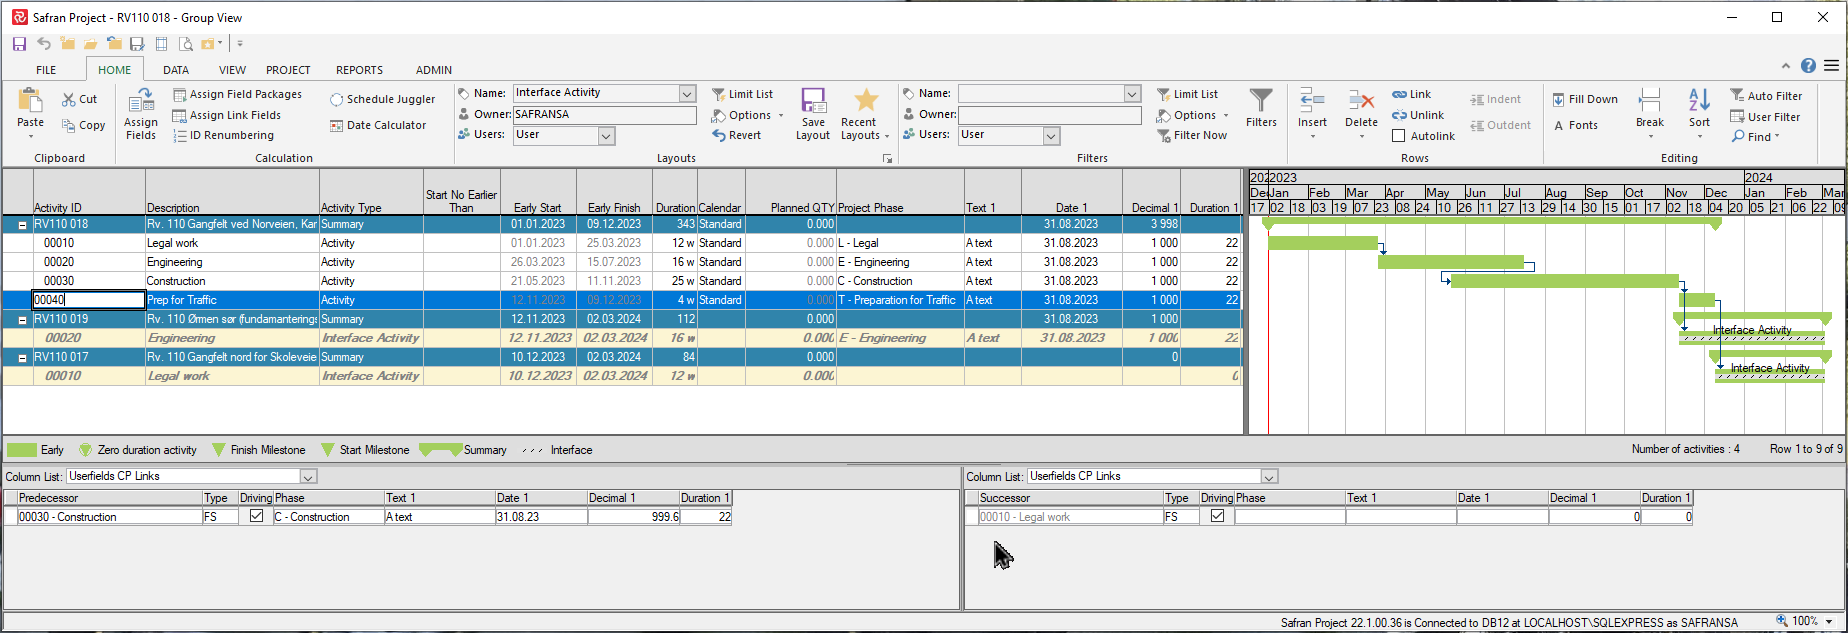
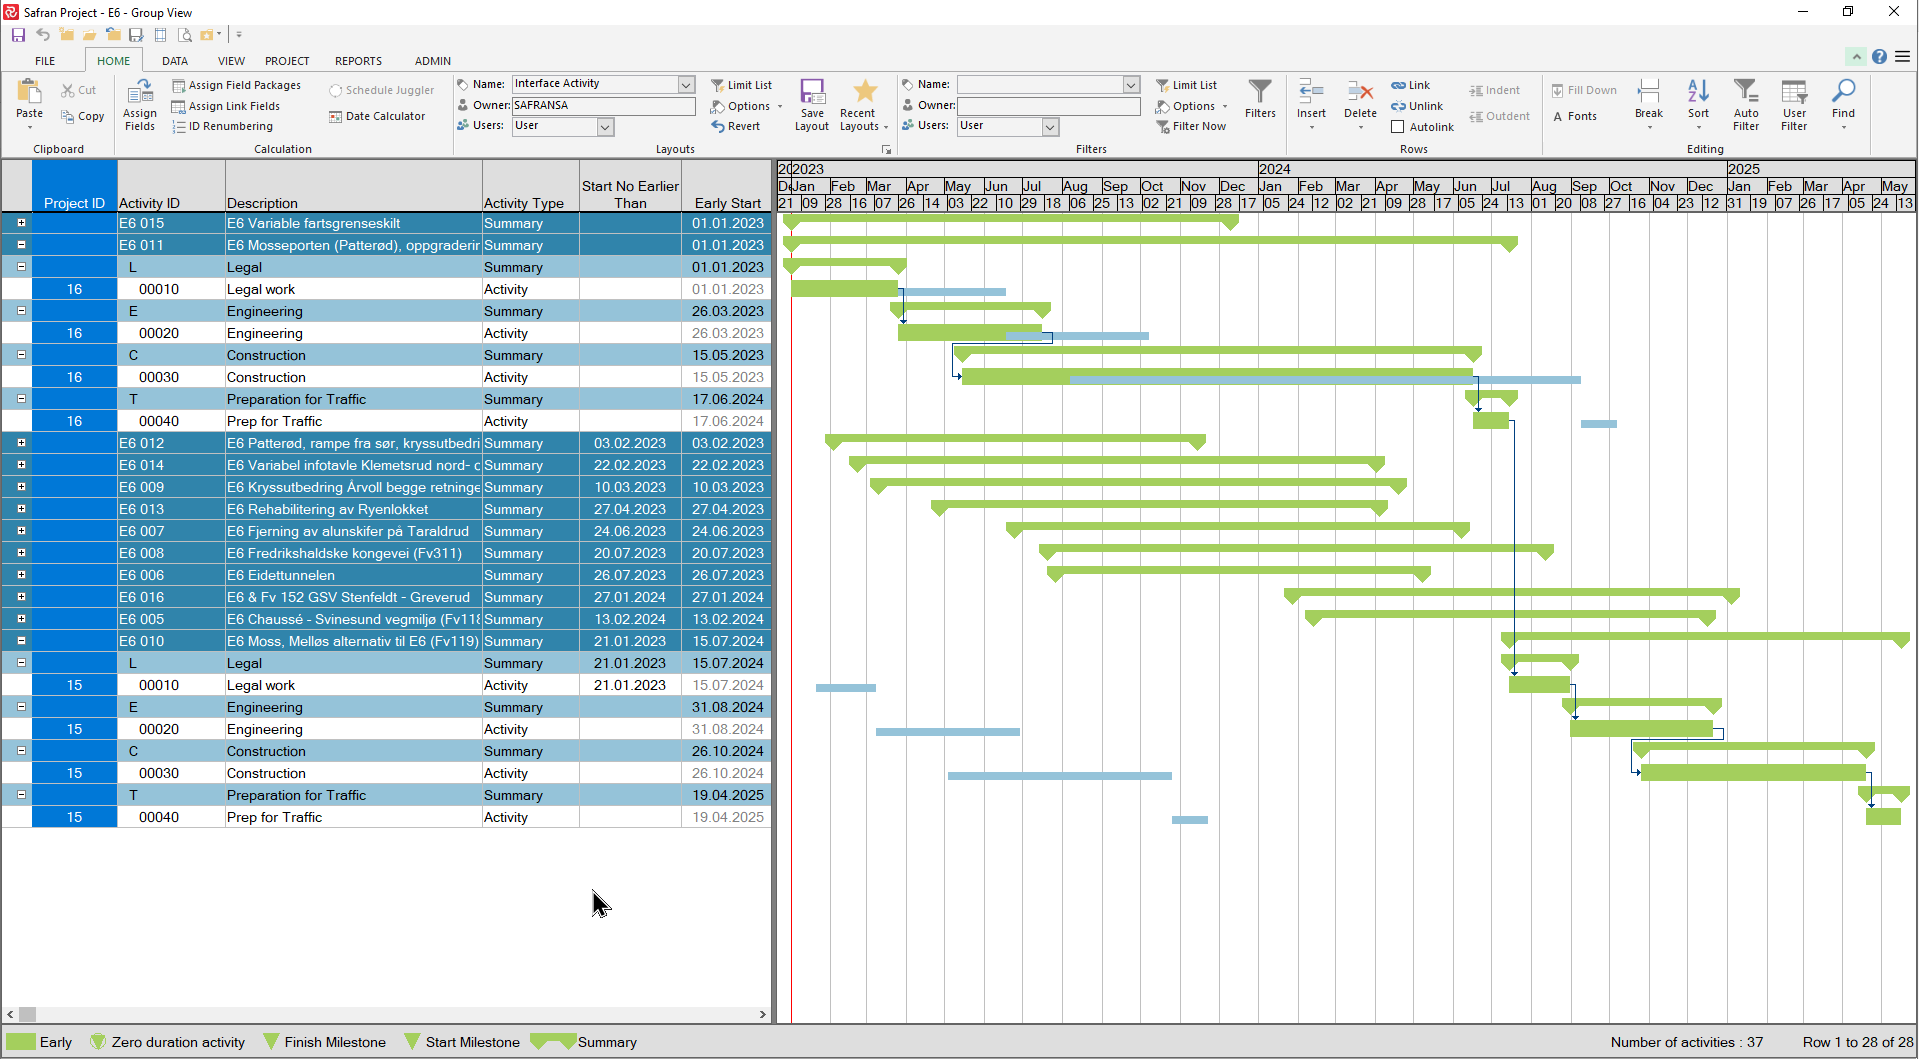
When working within a Project Group, activities that are linked between projects appear as ‘regular’ activities, i.e., their ‘Activity Type’ is set to ‘Activity’ as shown in the example below:
However, when opening a single project containing a link to/from an activity in another project, Safran will, by default, also present the activity from the project it is linked to/from.
The external activity will be determined as an ‘Interface Activity,’ Safran will temporarily change the activity type to ‘Interface Activity.’ This is done to emphasize that links to other project activities exist.
The two pictures below illustrate this concept.
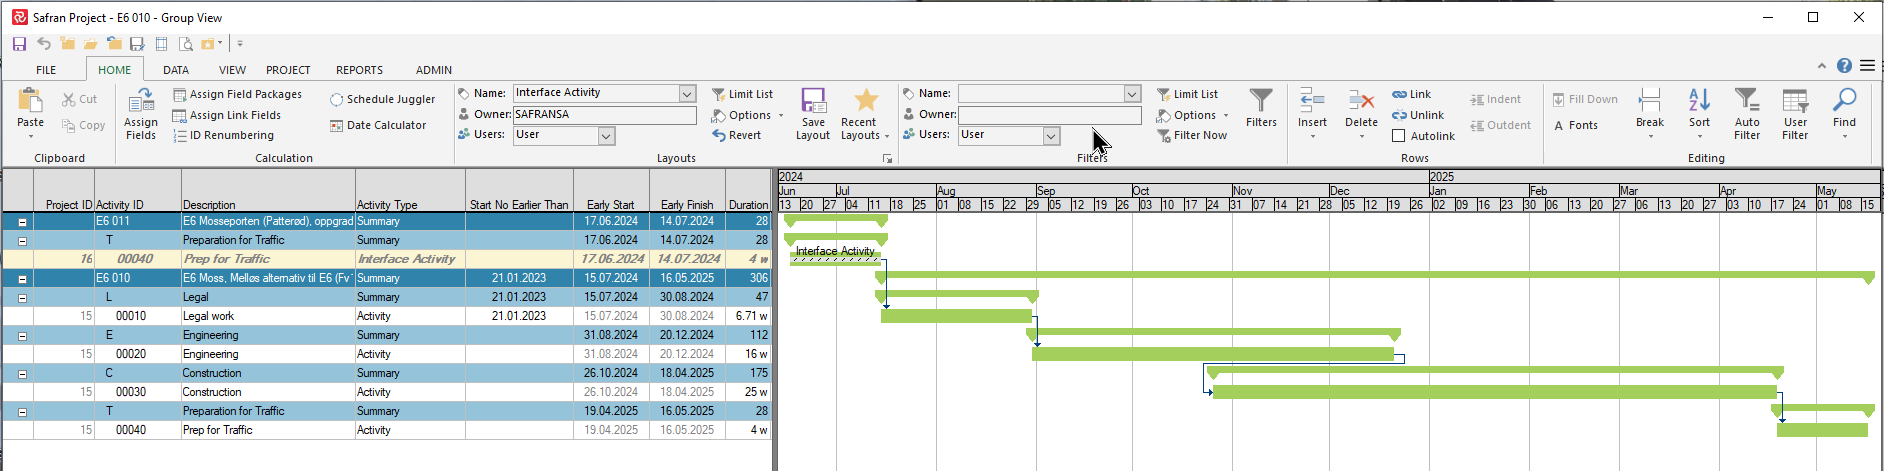
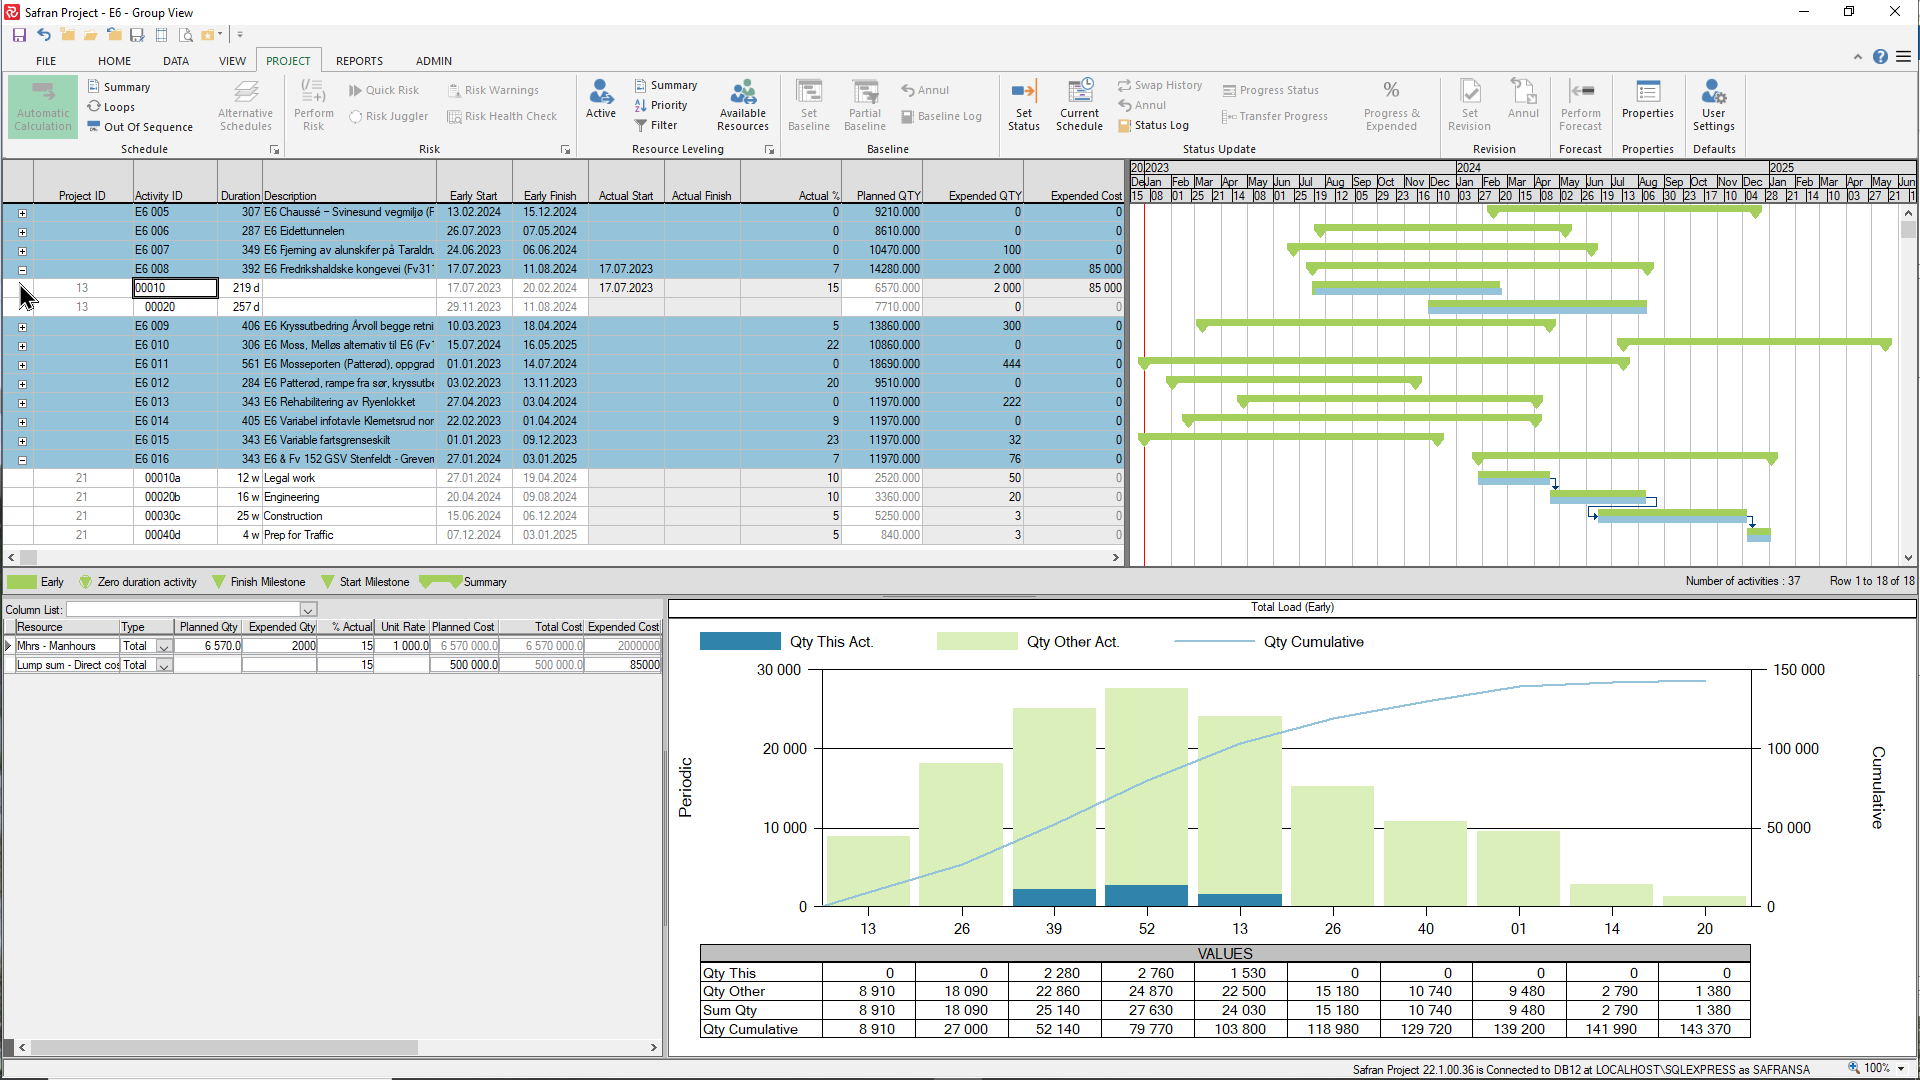
When opening the single project 'E6 010' that contains a link from project 'E6 011,' the activity from the 'external' project is presented and called an 'Interface Activity.'

In the same way, when opening the single project 'E6 011' that contains a link to project 'E6 0110,' the activity from the 'external' project is presented and called an 'Interface Activity.'
By doing so, Safran makes it easy for you to highlight your interface activities by changing the ‘Fonts’ properties for the activity line and the ‘Symbol’ properties.
If you are not required to show the ‘external’ activities, you can also use a filter to ‘de-select’ the activities based on the Activity Type value.
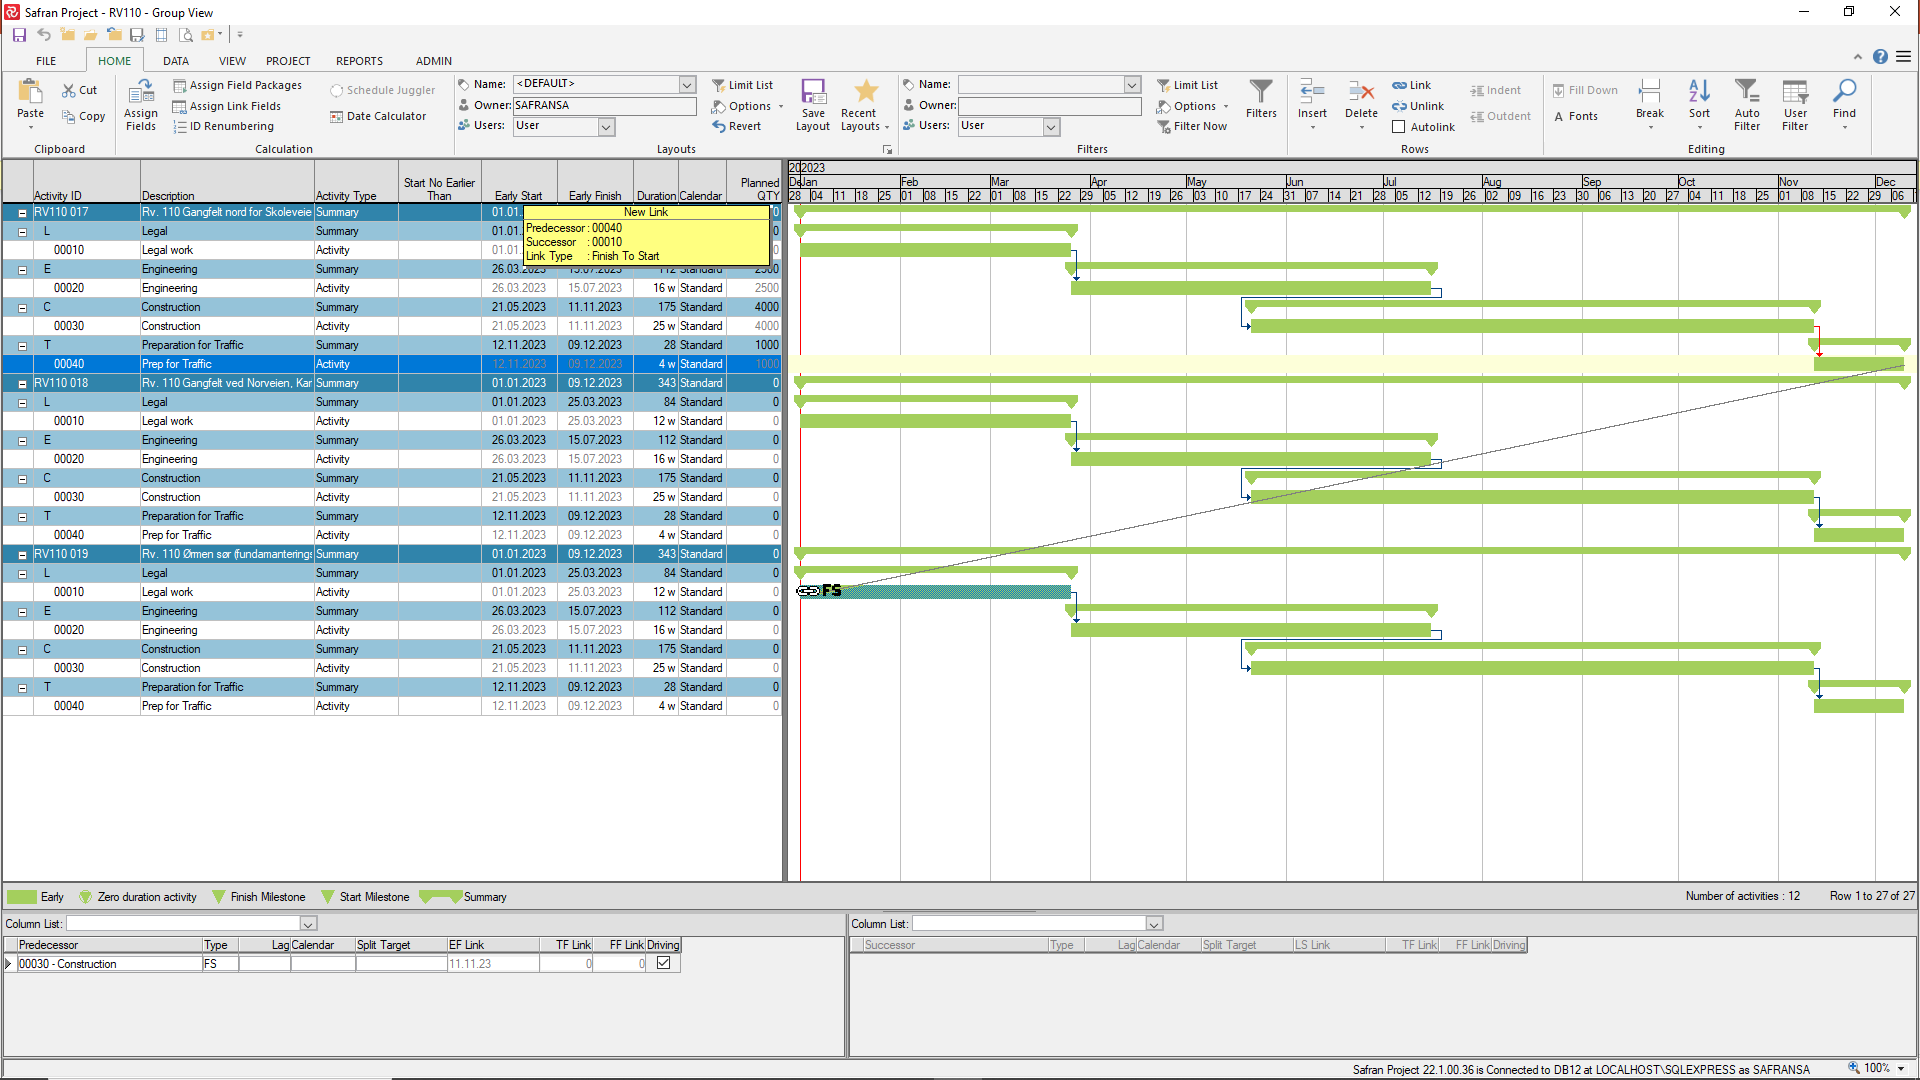
Under the assumption that a project containing an Interface Activity uses the same Userfield set definition as the Project Group it belongs to, userfield values for Interface activities will be presented. If this is not the case, Safran cannot link the correct userfield values, resulting in blank userfields.
Additionally, the user would obviously also have to have sufficient access (Read or higher) for the fields to be presented.
Consider the screenshots/examples below:
Userfields have been populated with values for all userfield types for all activities in all three projects.
Userfield values are presented for the interface activity in project RV110019, as this project uses the same Userfield set as the Project Group.
Userfields are also available in column lists in the Link Information sub-panel under the same assumption.
In the screenshot above, userfield values are not presented for the interface activity from project RV110017 since the project does not use the userfield set specified for the project group.
Linking methods
The various methods of linking activities are discussed in detail below.
Graphic Linking
To draw a finish-to-start link, go to the activity you want to link from and hover over the right end of the activity bar. You'll notice an 'F?' symbol telling you that you may draw a link. While holding the left mouse button down, move the cursor toward the left end of the activity bar you want to link to. You will then see an 'FS' symbol telling you that you may enter a finish to start link. When you release the button, the link is entered.
Creating the other link types, SS, FS, and FF, is done similarly.
Linking using the Short cut menu
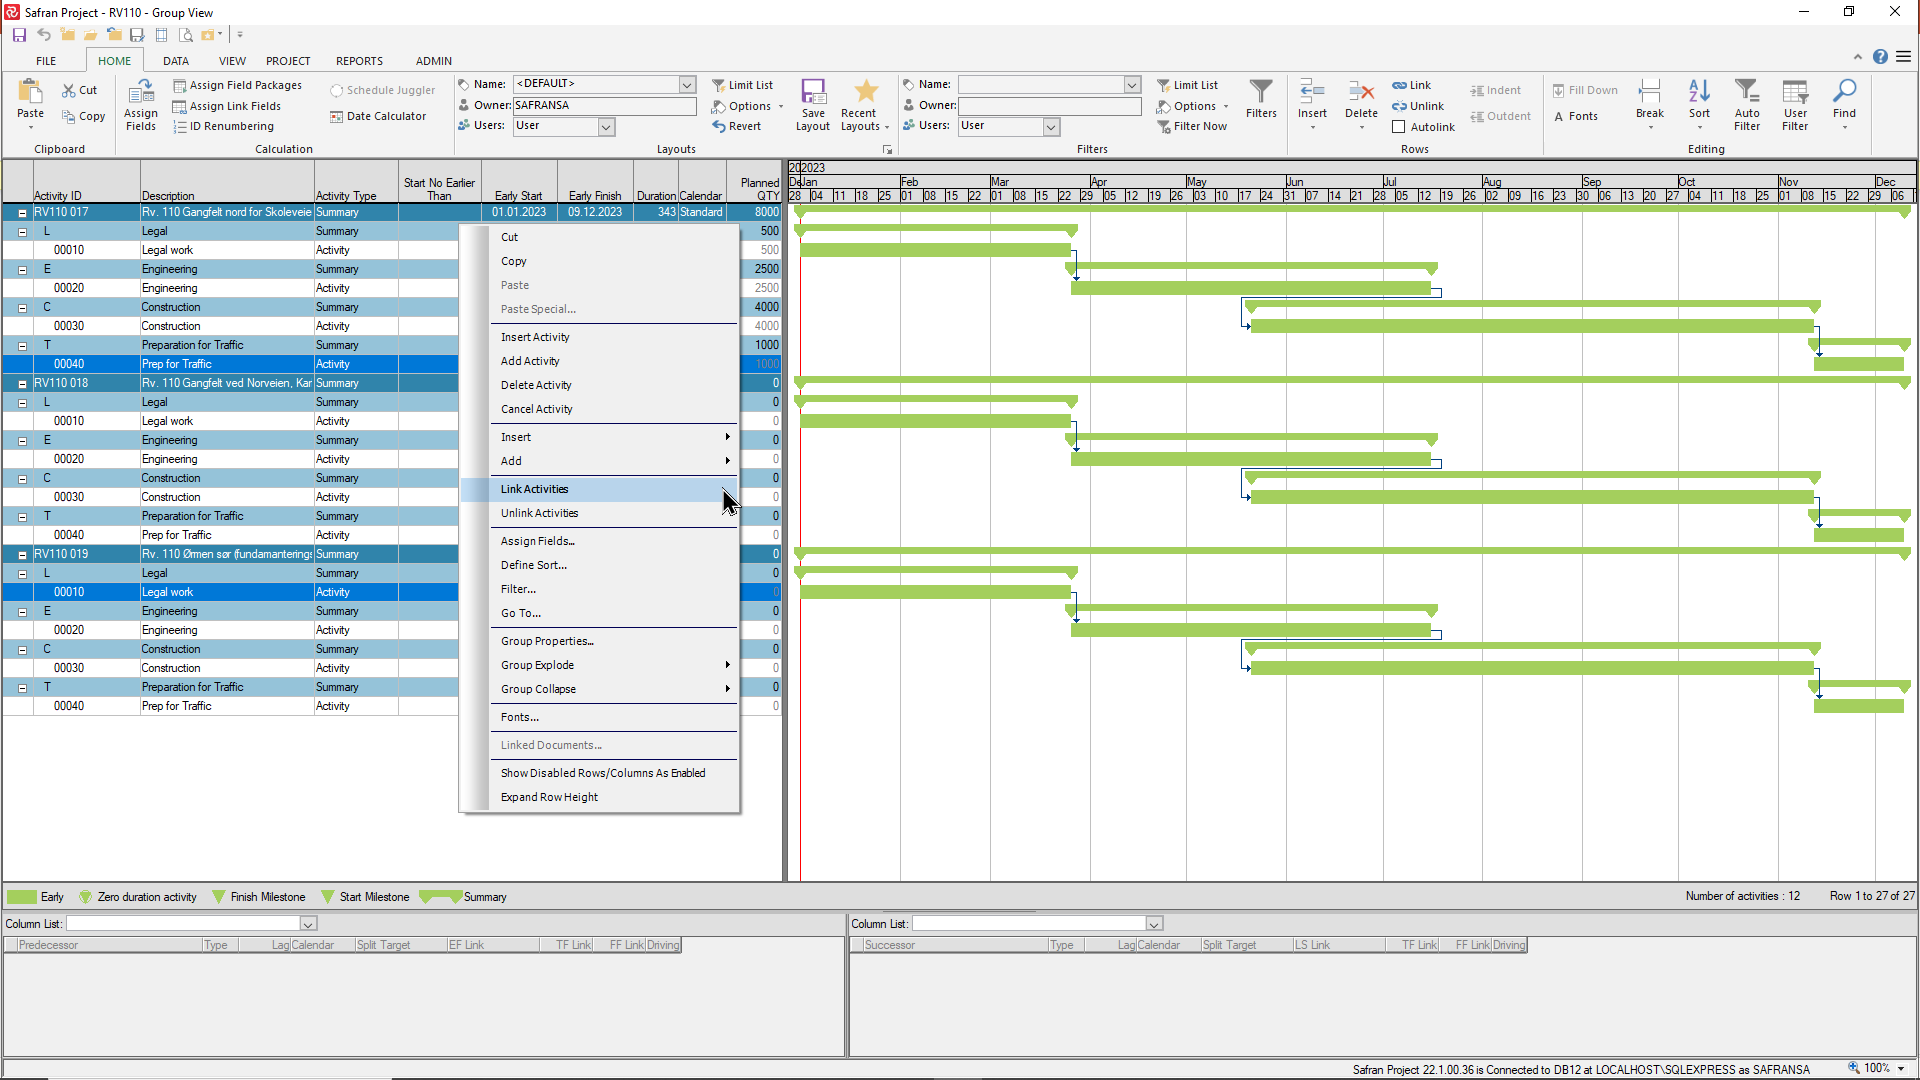
To enter a finish-to-start link using the short-cut menu, select the activity you want to link from by clicking on the activity in the column area, then hold the CTRL button down and click on the activity/activities you wish to link to. You will notice that both activity lines are highlighted in blue and are ready to be linked. Finally, right-click in the column area to see the short menu appear. Select the Link Activities option to enter the link.
Multiple links may be added simultaneously using this method. If you want to link a set of activities in a specific order, start as described above and continue highlighting additional activities without releasing the CTRL button. When you have selected your activities, remove the CTRL button, right-click in the columns area, and choose Link Activities.
Similarly, if you would like to link a group of activities in the order they are presented in the Barchart, focus on the first activity in the group, then press the Shift key and focus on the final activity. Then, right-click and select Link Activities from the shortcut menu to create the links.
Keep in mind that this method only supports entering finish-to-start links.
Link information sub-panel
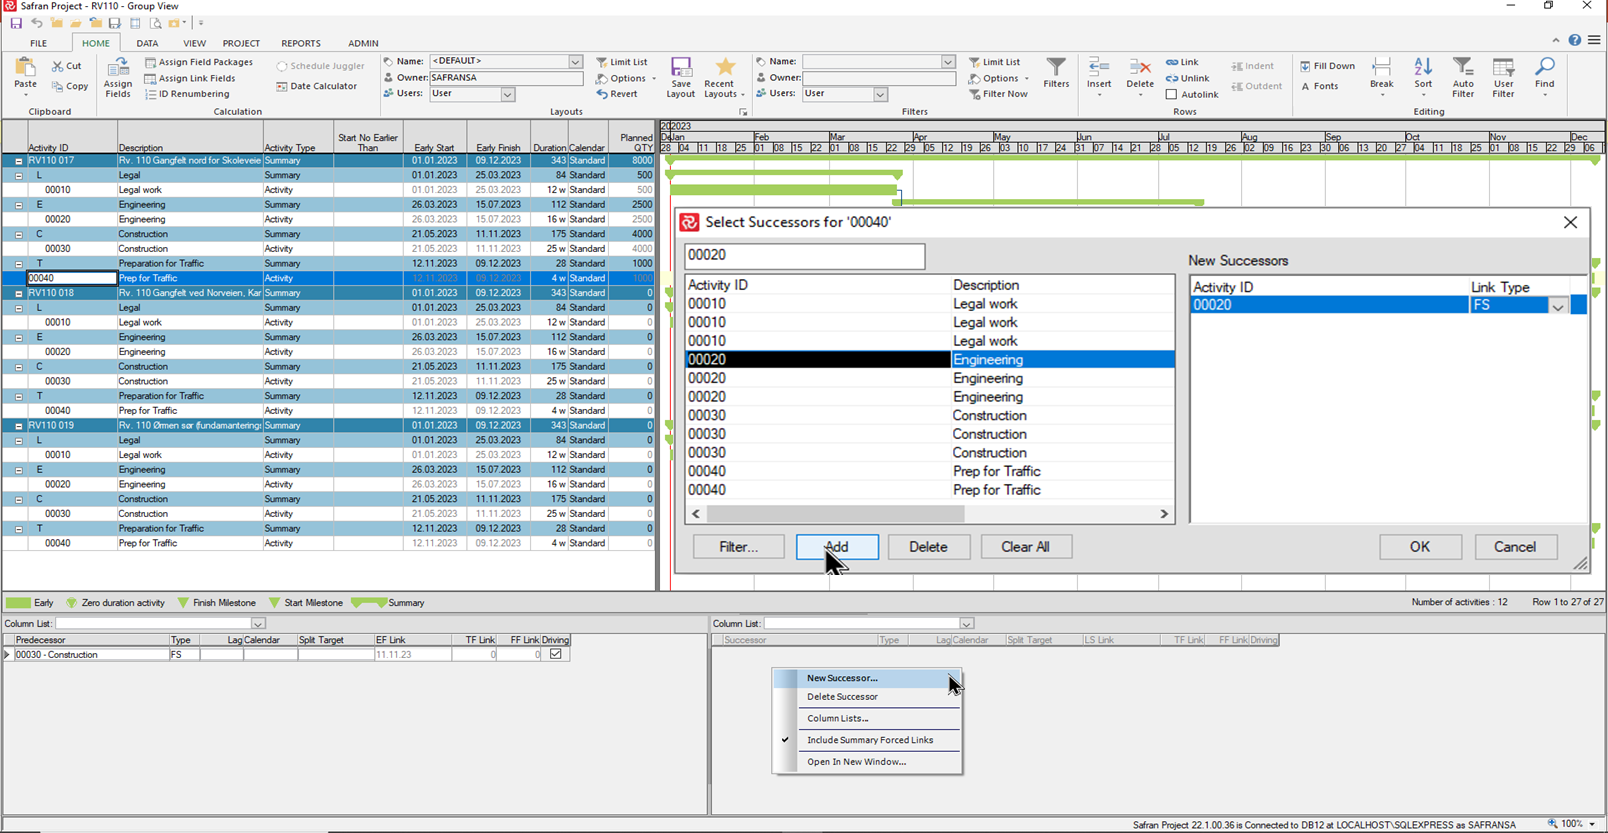
To open up the Link Information sub-panel, right-click in the legend area at the bottom of the Barchart Editor and select Link Information. Click on the activity you want to link from, then right-click in the relevant link area (Predecessor/Successor) for your link and select New Successor/Predecessor from the pop-up menu.
A linking window appears, allowing you to select and enter links. To add a link, find and select the relevant activity from the list on the left and press Add. To speed up the search for an activity, you can either enter the Activity ID in the search box in the upper left corner or use the Filter option.
Multiple links may be added simultaneously in the Select Successors/Predecessors panel by marking a group of successors/predecessors. This is done by selecting the first instance and then, while holding the Shift key down, setting the final instance and pressing the Add button. Multiple Links to specific activities may be added similarly by selecting the first activity, placing the remaining activities, and pressing Add while holding the CTRL key down.
The Link Columns presented may be modified and stored in so-called Column Lists. This is described in detail, and a suggested 'Link Column-list' list for Project Group users may be found in Column List Information Panes.
Entering Progress & Expended
When working with project groups, you can manually enter Progress and expended information for any member project using the Barchart Editor.
The relevant fields to update are:
-
% Actual
-
Expended QTY
-
Expended Cost
-
Actual Start
-
Actual Finish
The first three fields listed may be updated at the activity or resource level, while the Actual Start/Actual Finish may only be updated at the activity level.
However, the table/text-based method of entering Progress & Expended is not supported. You will notice this since the option on the menu is in grey, together with a few of the other more advanced functions related to the Status Update process.
Importing Progress & Expended
When working with multiple projects, it may be either impractical or irrelevant to import progress & expended information on a project-by-project basis for Member Projects in the group.
In the same way, as for single projects, Safran allows you to import this information from a file to one or more projects within the Project Group from a single import file.
Generally, when importing progress & expended information to projects within a Project Group, the field ‘Net_id’ should be included as a column to ensure that the status information is transferred to the correct project/activity.
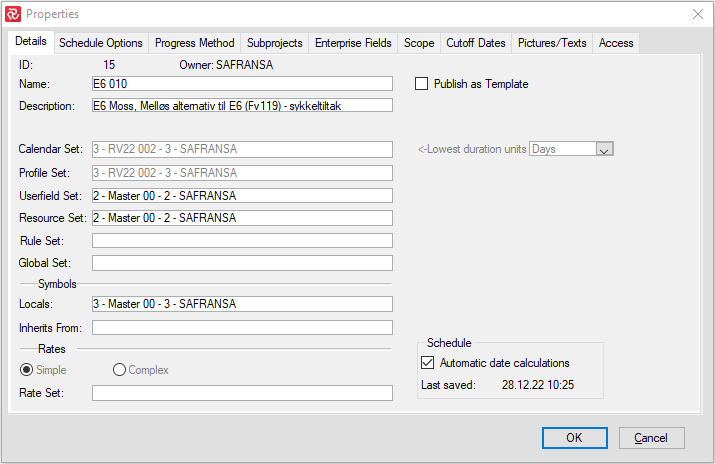
Your project's Net_Id may be found by selecting Project/Properties on the upper-left portion of the Details tab in the field ID shown below:
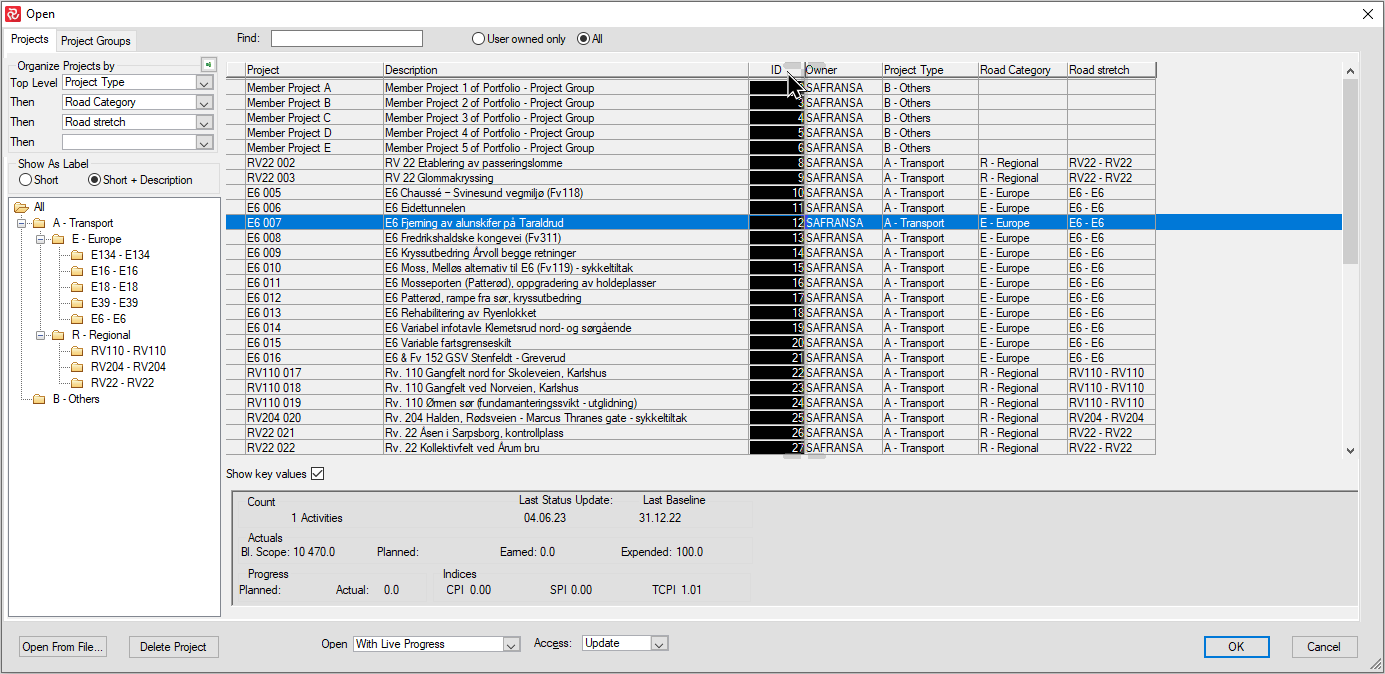
The correct ‘Net_id’ for multiple projects may also be found on the File/Open/Project Group panel in the ID column.
Alternatively, you could include the field Project ID in a Barchart Editor layout, which might be helpful when creating the basis for an XL progress import worksheet.
Example of a Progress & Expended Import file qualified with 'Net_ID':
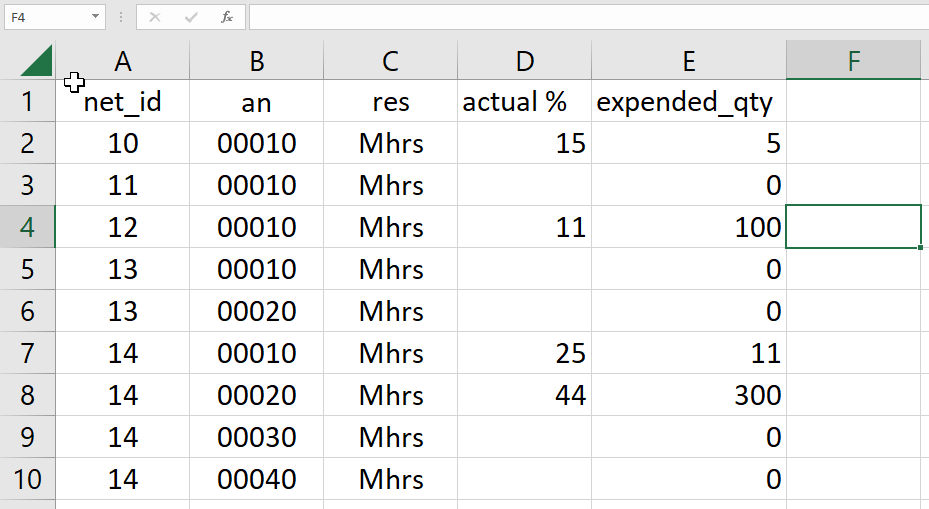
Including the field Net_id is, in fact, not mandatory, as Safran will produce error messages as a part of its validation process if the same Activity ID should exist in more than one project.
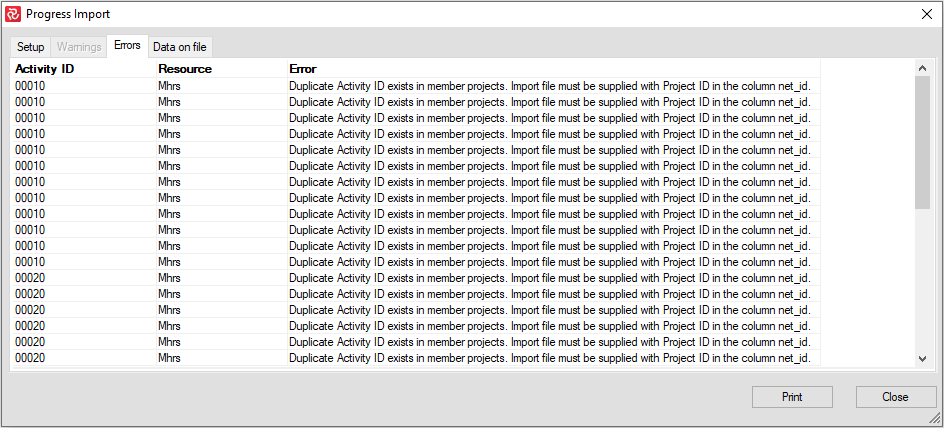
You can still import this information if your import file contains one or more non-ambiguous Activity IDs. However, the ambiguous Activity ID information will not be saved.
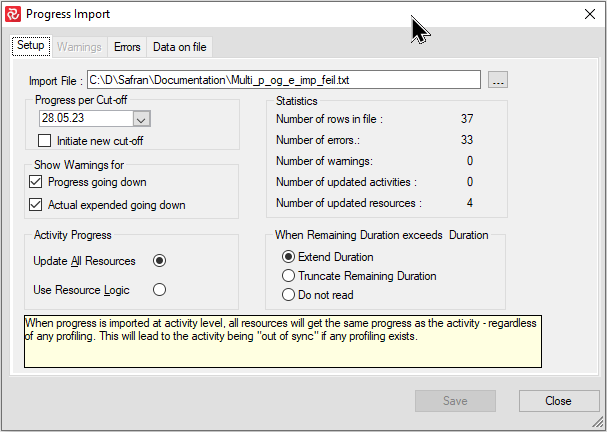
The Statistics from the saved progress & expended above show that 33 activity lines had errors, i.e., ambiguous Activity ID due to not including the Net_id field to qualify the information. Four activities did have unique Activity IDs and were therefore saved/updated.
Please refer to Importing Progress and Expended for detailed information on creating progress & expended files and importing them to Safran.
Status Updates for Project Groups
When working with large projects in a Project Group, particularly in cases where some projects are complete/historical and not customarily updated, it can be time-consuming to enter each project and Set Status.
Safran Project does not generally require that all projects are statused and updated to the current cut-off, and in many cases, it may not be relevant or necessary.
There are, however, a few things to keep in mind. Some status-related indicators may be inaccurate, such as the Cut-off date line in the Barchart. If multiple cut-off dates exist among the member projects, the cut-off date line will be drawn for the latest Cut-off date only.
Status information such as Progress %, Expended values, Current date sets, and Frontline-related information will also be inaccurate for projects not statused to the latest Cut-off date.
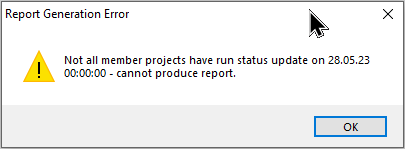
The Progress Summary report does, however, require that all member projects are statused to the same cut-off date. Failing to do so will produce the following error message:
To remedy the above and simplify the Status Update process, Safran allows you to 'Set Status' for all member projects while working within a Project Group.
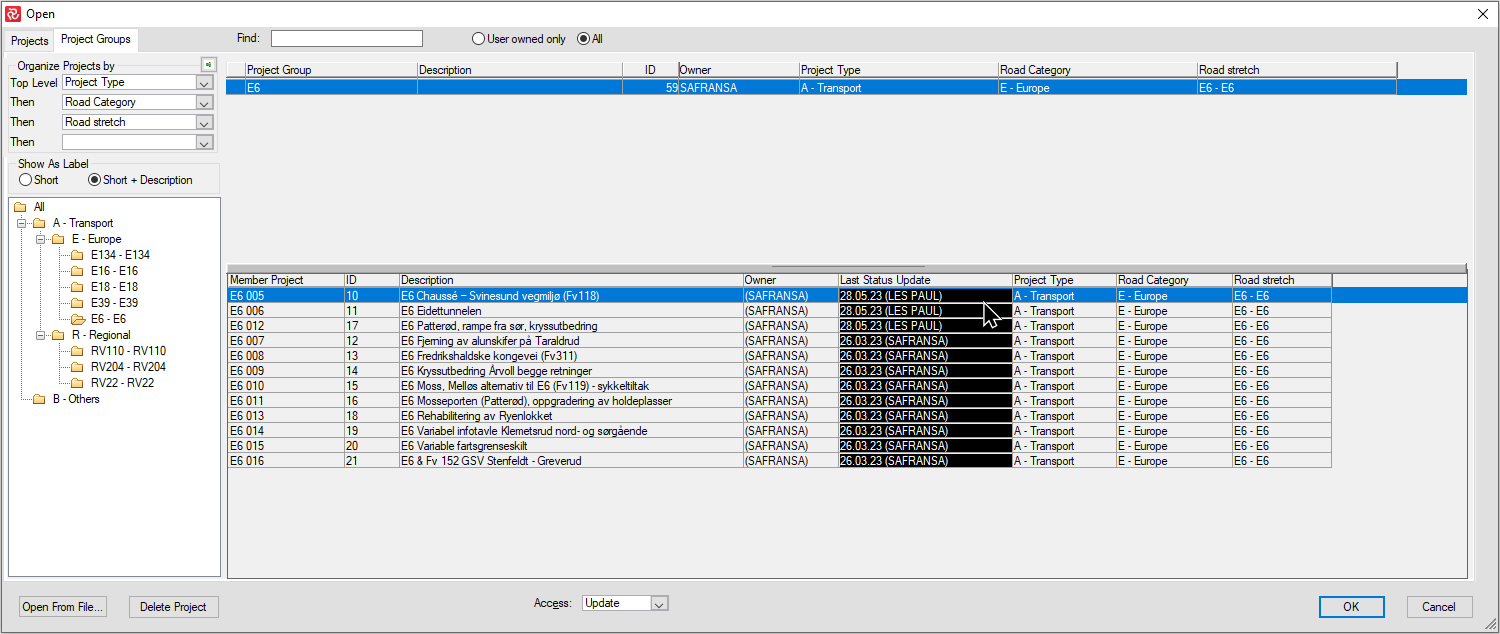
Alternatively, it's possible to open the File Open/Project Group panel and focus on your project group, which will present a list of all member projects and their 'Latest Status Update date' as shown below, and find which project triggers the error message.
Remember that you will have to have Update access for each Member Project in addition to having Update access to the Project Group itself to carry out the status update process.
If you don’t have Update access to one or more projects in the group, the status update process will execute. However, it will omit to update the projects you don’t have update access to.
Running a Status Update is done as usual by selecting Set Status on the Status Update portion of the Project tab.
By default, Safran will select the latest Cut-off date of the Member Projects. However, you may choose a later Cut-off from the dropdown, as shown below:
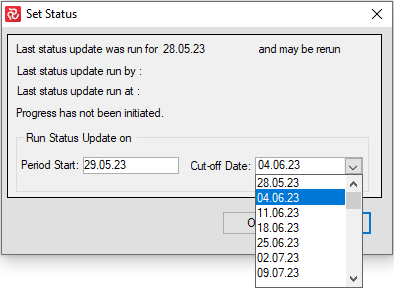
When you have chosen the correct Period Start/Cut-of dates, press OK to start the Status update process.
A Current Analysis is carried out as a part of the status update process. It is worth mentioning that the current analysis will consider any existing cross-project links.
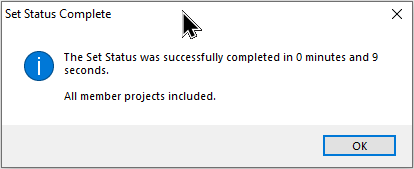
When the Status Update process is complete, Safran will present an update on how many of the Project Group’s member projects have been updated. If the user has Update access to all member projects, the following message is shown:
Alternatively, if the user only has Update access only to a selection of the member projects, the following message will be presented:

Exporting/importing Project Groups
Exporting and importing projects is a practical way to back up/archive, make a copy, or transfer project information between database environments.
When working in a multi-project environment with many projects, it can be time-consuming and complicated to do this on a project-by-project basis. Additionally, if cross-project links exist, these would not be included in the export and would have to be entered manually after importing the projects.
Safran Project's flexible processes allow you to both export and import all or a selection of Member Projects from a Project Group in one operation.
The Export and Import processes can transfer all project data apart from Enterprise fields to create an exact copy.
Exporting Project Group data
Select File/Export from the ribbon or enter CTRL+E to export your Project Group.
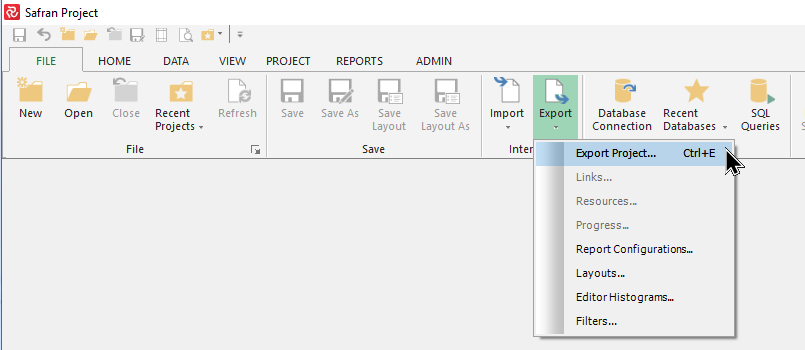
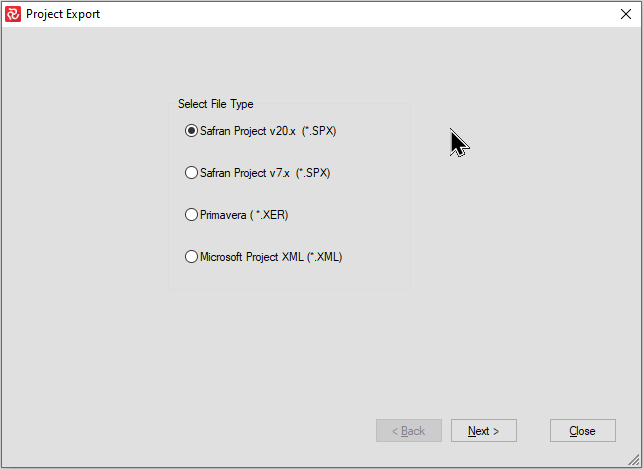
Select 'Safran Project v20x' (the other options are unsupported for Project Group export).
When the Project export panel appears, click 'Browse' and decide on your export's destination folder and file name.
Then, select the Project Groups radio button to see a list of your Project Groups. Select the Project Group that you wish to export.
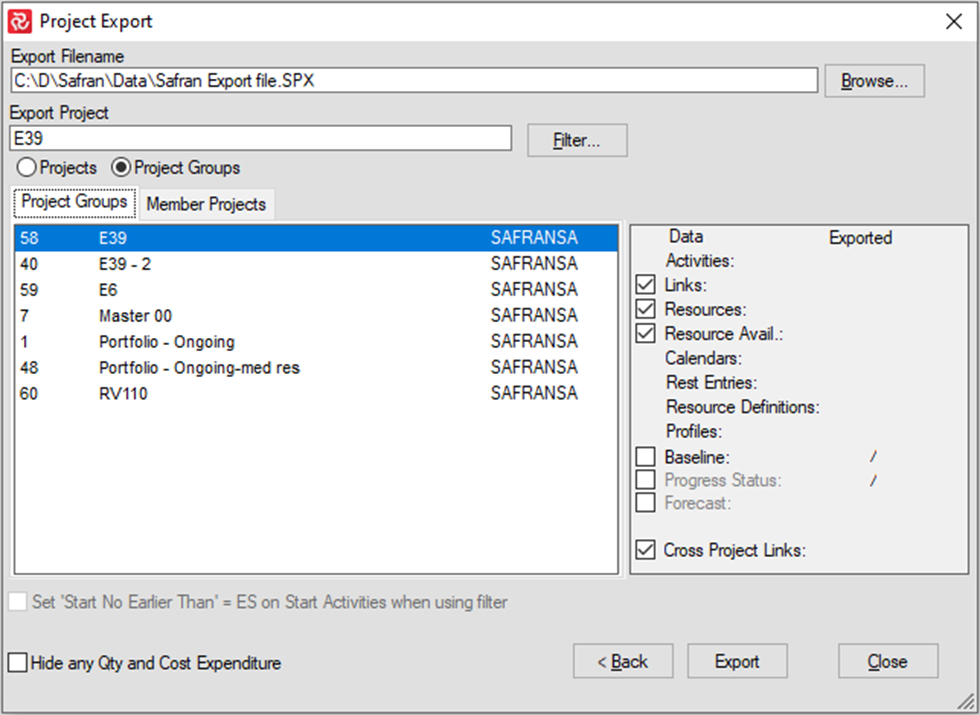
Then, click on the 'Member Projects' tab to select/unselect Member Projects for your export.
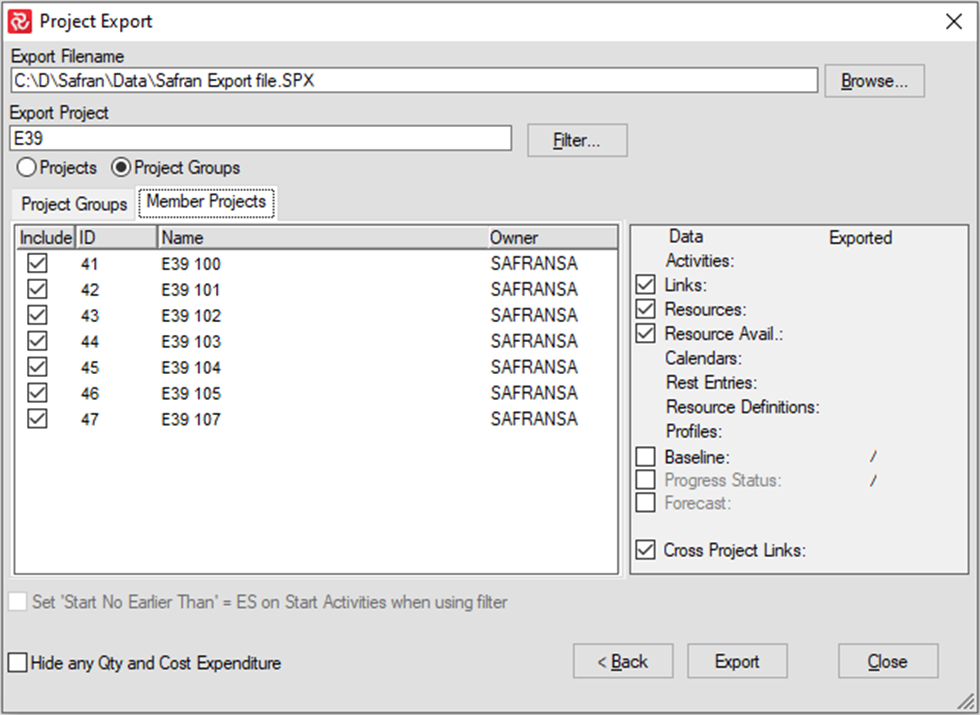
After you have set focus on/selected a Project Group for export, you can choose the Member Projects tab to get an overview of all the projects in the group.
Note that by default, all Member Projects will be exported. However, you may select a selection of Member Projects by removing the 'Include' check for the relevant Member Projects for your export.
You may also enter/apply a filter to include/exclude specific activities from your projects.
Remember that to do this, the Project Group you intend to export would have to be open while doing the export.
By default, the export file will contain all of the following Network related data:
- Activities
- Links
- Resources
- Calendars
- Cross Project Links
- QTY & Cost Expenditure.
Check the relevant tick boxes below to include Baselines, Status information, or Forecast data.
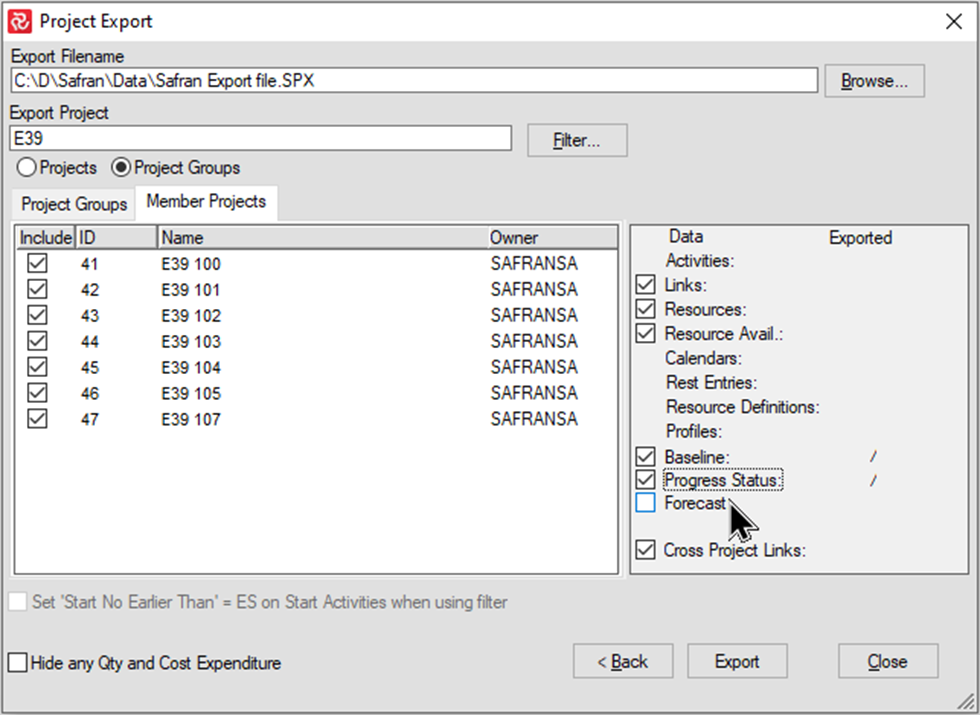
When satisfied with your Export configuration, press the 'Export' button to create the file.
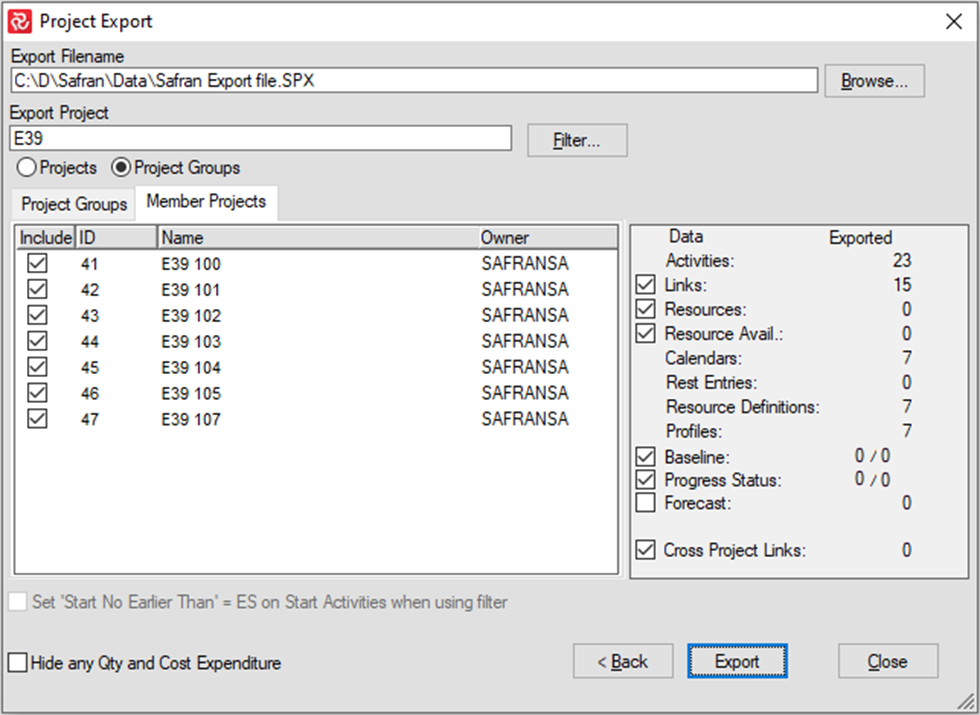
When the export process is complete, an overview of the amount of data that has been exported is presented.
Press Close to return to the Barchart Editor.
Importing Project Group data
In line with Safran’s ability to export a complete/partial project group, you can also import a Project Group.
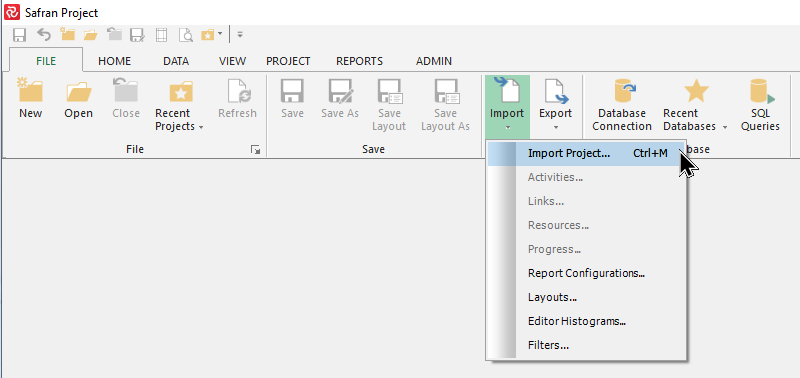
Select File/Import/Project from the ribbon menu to import a project group.
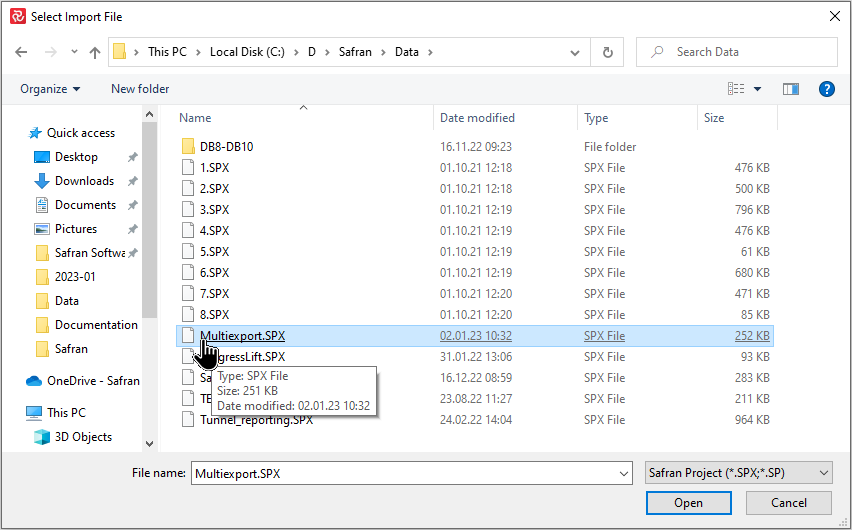
Select your import file from the Select Import file window and press Open.
When you select and open a *.spx file exported from a Project Group, Safran detects that the file contains data from a multi-project environment.
You’ll notice this when you open the file, as the import panel differs slightly from the import single project panel.
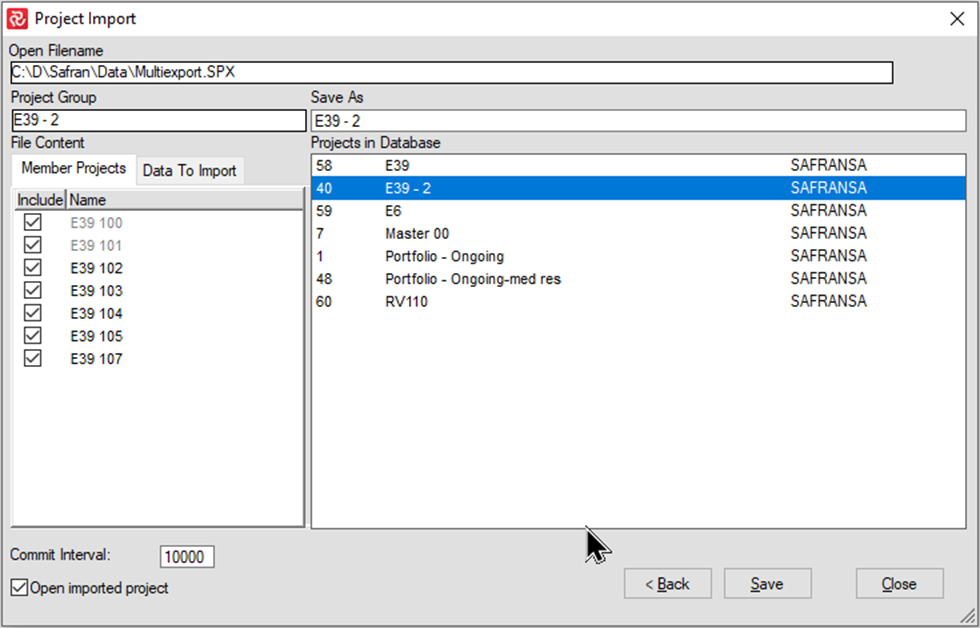
The Project Import window shows you a list of projects contained in the import file.
Unchecking one or more projects from the Member Projects panel allows you to choose which projects to import if all are not required.
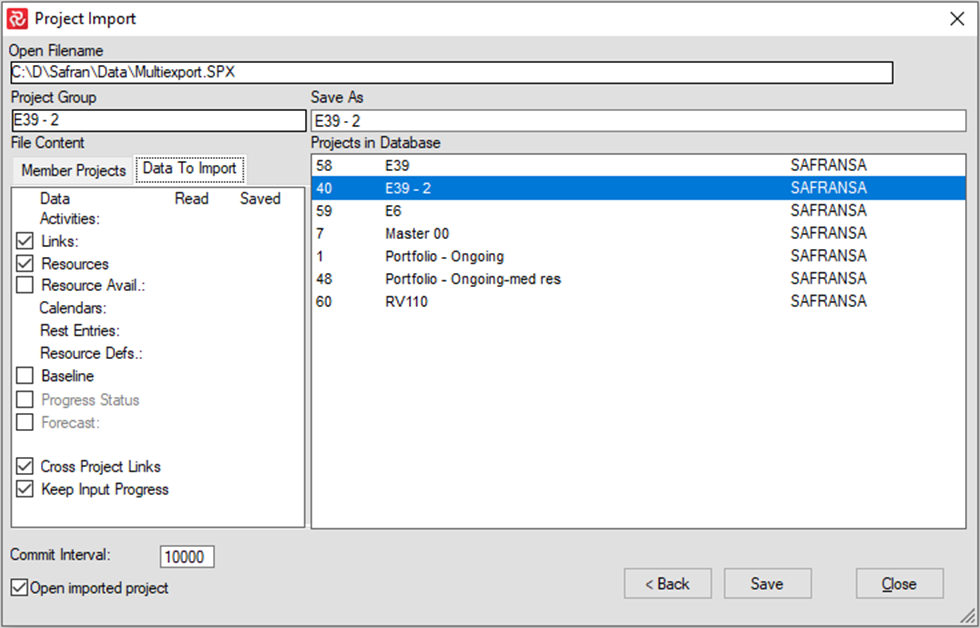
The Data to Import sub-panel allows you to choose whether or not to import the following:
- Keep Input progress – Includes the current value of Actual %. Unchecking will set Actual % to 0.
- Baseline – Includes all historic baselines (dates/scopes) for activities/resources.
- Progress Status – Includes all historical progress and expended information.
- Forecast – Includes Forecast information.
- Cross-project links – Includes links between projects.
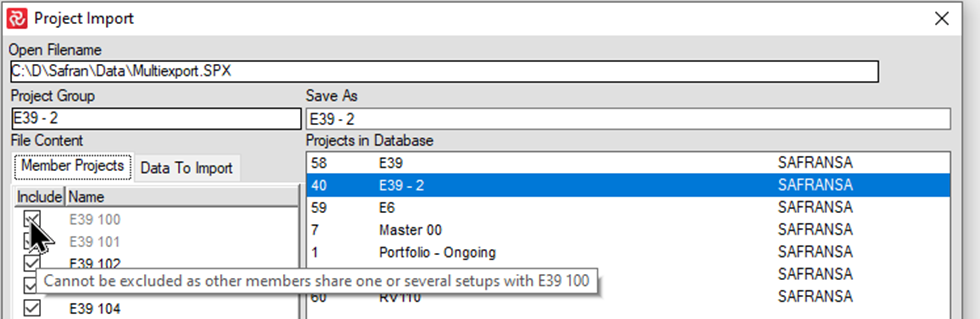
Make a note of the project names presented in grey above. This indicates that the projects contain either a Userfield, Resource, or Symbol set that is nominated to be used for the Project Group, requiring that project to be included in the import.
Safran will, by default, save the project to the same Project Group name as it was exported from. If you change the project name in the Save As area, Safran will create a new project group.
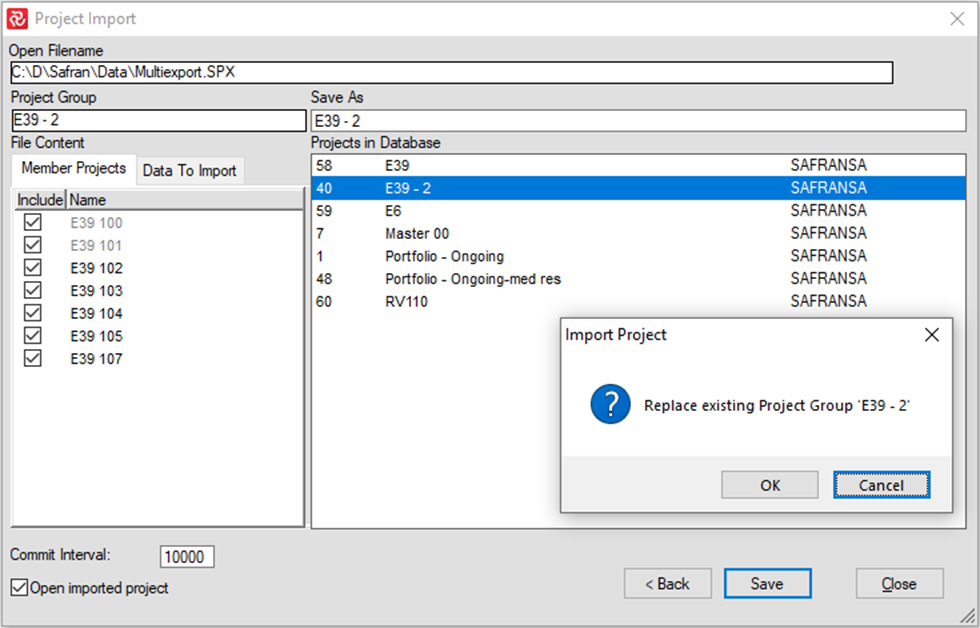
Suppose the default Project Group name already exists in the Project's Database. In that case, the import will overwrite the existing Project Group (unless open. If open, a new Project Group will be established).
Remember that you must have Update or Exclusive access to the Project Group and member projects to overwrite it. Additionally, you would not be allowed to overwrite a Project Group if other users are accessing the Project Group.
You will be given a warning to ensure that you want to proceed with the overwrite.
Best Practices
Synchronizing Userfields in large-scale multi-project environments
In large-scale multi-contract projects, synchronizing userfields will often be challenging as the various contractors and stakeholders have differing needs, resulting in countering userfields and configurations.
Each contractor will often have their own set of userfields and codes that, in many cases, do not have much in common from contractor to contractor.
In addition, the project owner usually has userfields/codes to combine/aggregate project information and present a coherent, navigable picture of the project.
One way of approaching the challenge regarding Userfield definitions is to decide upon a split of the available userfields, i.e., one portion (R1-R30) of each field type (Reference, Outline, etc.) could be allocated to the project owner to suit the needs for structuring across the complete project whereby the remaining portion (R31-R60) could be given to each contractor to do each contract’s requirements.
A ‘Master’ userfield set is then defined, containing the fields and codes the project owner determines.
Each separate contract will have its ‘own’ userfield set where the first/agreed portion of fields inherits its definitions from the ‘Master’ userfield set.
Contractors would then have the fields/codes to populate their activities with the project owner's required fields/codes.
Each contractor would then be free to define and use the remaining fields to suit their own internal contract requirements.
The project group definition would then select the ‘Master’ userfield set, allowing the project owner to structure, sort, and choose activities according to the overall project requirements.