Creating a New Project
The way in which Safran users create a new project will vary in a variety of ways depending on both project type and organizational maturity. In some cases projects might be created totally from scratch, others may make use of existing libraries, while in larger organizations with a heritage of previous projects, rich libraries of project execution models or templates may exist that can be used as the basis for a new project.
Safran offers two basic methods of creating a new project either as a 'new' project and configure the different options and associated information, or by using an existing Template where a variety of characteristics and attributes are already set up.
Additionally you can create a Project Group consisting of a number of existing projects. Safran Projects's multi-project management functionality is described in detail in the chapter 'Appendix C - Multi Project Management'.
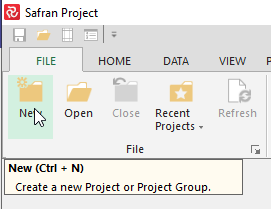
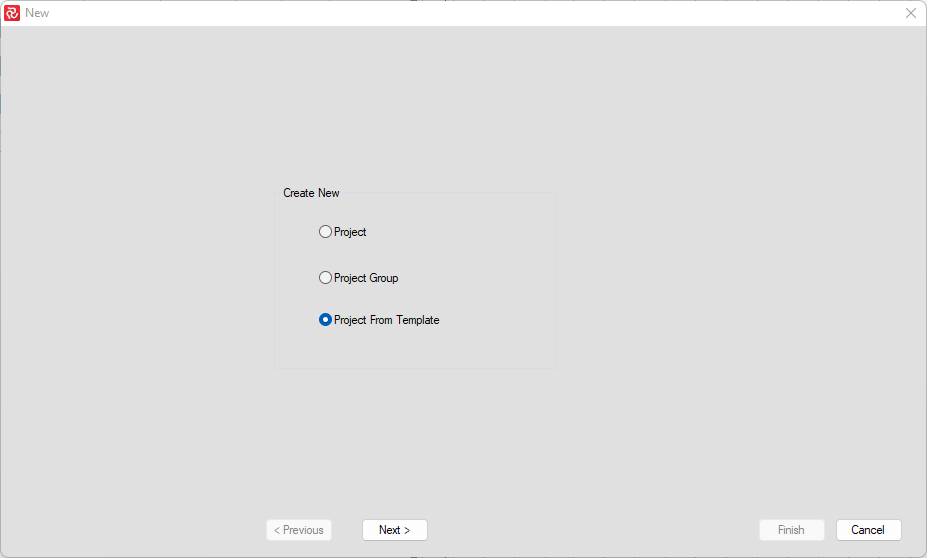
To set up a new project, click the 'New' icon on the File ribbon.
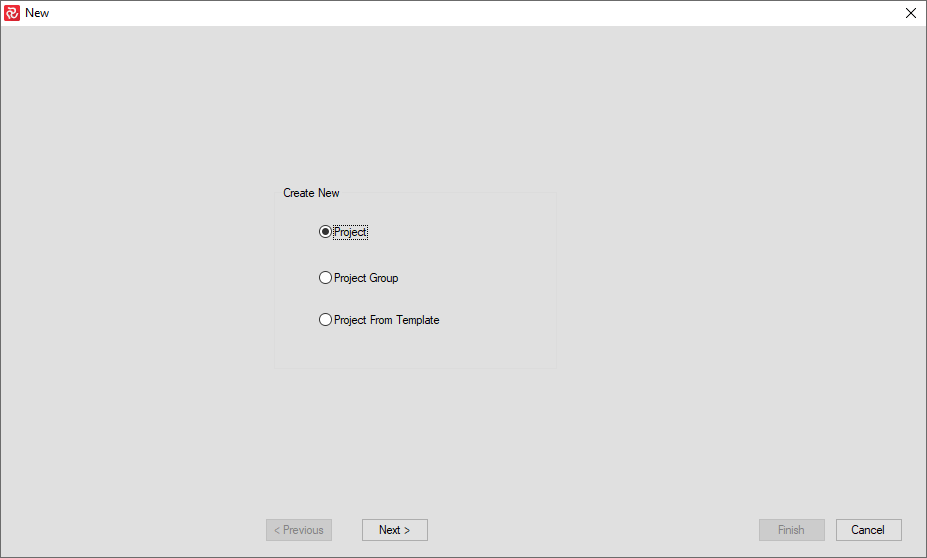
The New Project wizard will open with three options: Create a New Project, a New Project Group, or a New Project from a Template.
Note: The "Project Group" feature is not relevant and therefore unavailable when using Safran Risk.
If you choose 'New Project', by pressing the Next button you can start configuring your project.
You'll only see the New Project configurator once, however all options and associated libraries may be added/modified by selecting Properties from the Project ribbon once you have opened your project.
You also have access to Project Properties from the File Open window. In this case select and hi-lite your project then right click, you will then be able to choose Project Properties.
The following describes each separate tab in detail as to what is mandatory and what may be configured or added/modified at a later time.
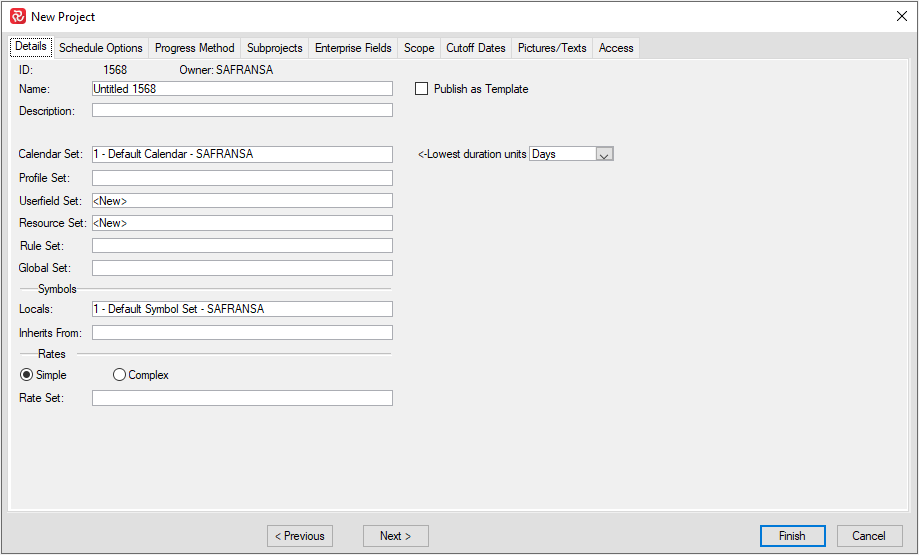
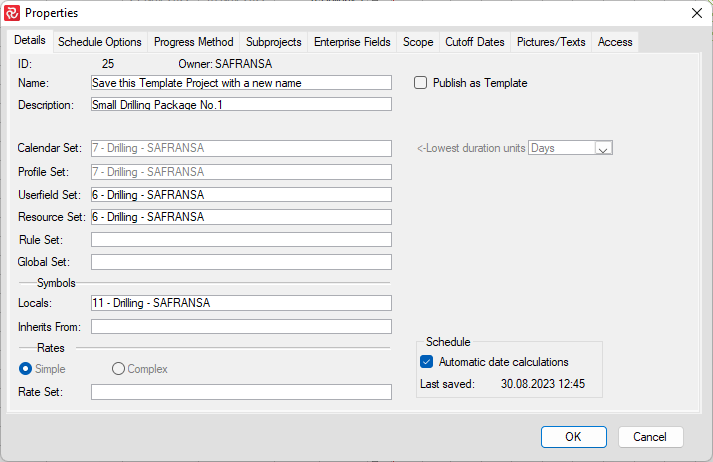
Details
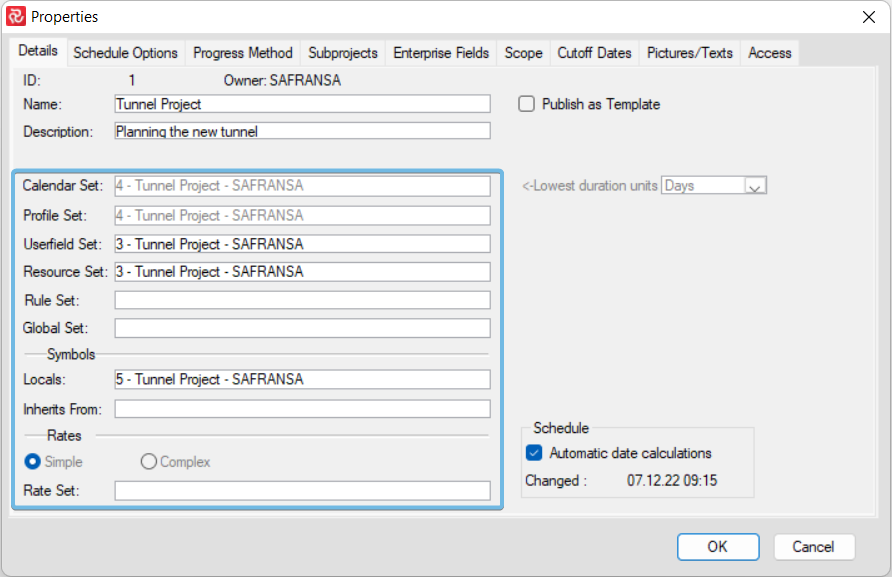
On the details tab you can enter a Name and a Description for your project. These two attributes will be readily available as header information for all layout and report configurations.
By default, the minimum required set of library sets will be pre-selected. Further, the project will use the database default Calendar and Symbol set, while a ‘New’ Userfield and Resource Set will be defined. The Userfield and Resource sets will be empty and be given default names derived from the Name of your project.
In some cases, especially within larger/mature organizations, the majority of library sets will often be pre-selected to use existing libraries in order to ease/simplify project setup and align with corporate coding structures.
Alternatively, you can also drop in to a library set list box and select any library you have access to. At the top of each list, you’ll also notice the option 'New' which will create a ‘new’ empty library set and be given a name derived from the Name of your project.
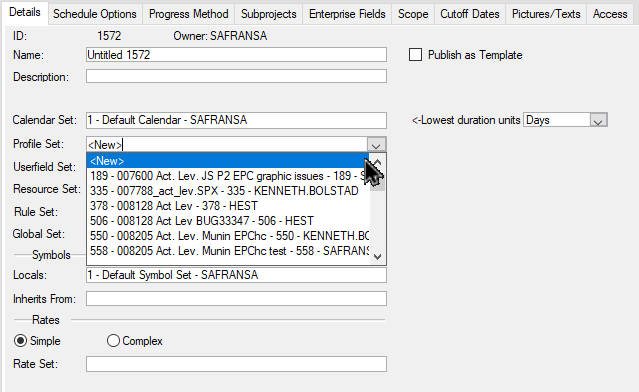
If you check 'Publish as a Template', the project you create will then appear on the list of Template projects available when you create a new project and select 'Create/Project from Template'.
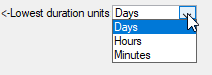
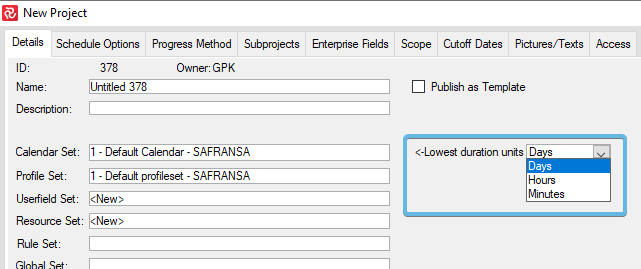
You'll also need to make the correct selection of the 'lowest duration units' before you proceed, as this will have consequences for your Calendar and cannot be changed after project is created:
| Field | Description |
|---|---|
| Name | Project name |
| Description | Project description |
| Calendar set | From the dropdown list, select the Calendar set that should be used for the project |
| Profile set | From the dropdown list, select the Profile set that should be used for the project |
| Userfield set | From the dropdown list, select the Userfield set that should be used for the project |
| Resource set | From the dropdown list, select the Resource set that should be used for the project for the project |
| Rule set | From the dropdown list, select the Rule set that should be used for the project |
| Global set | From the dropdown list, select the Global set that should be used for the project |
| Symbol set | From the dropdown list, select the Symbol set that should be used for the project |
| Publish as template | Select this project configuration to be saved as a template. |
| Locals | From the dropdown list, select the Symbol set that should be used for the project |
| Inherits from | Select the symbol set you want to inherit symbols from |
| Rates | Select the Simple or Complex rates/Rate set for your project |
Create Project From Template
To create a new Project using a template, click File/New/Project from Template and 'Next':
When the New Project From Template panel opens, click on the template project you want to use as the basis for your new project and click "Finish".
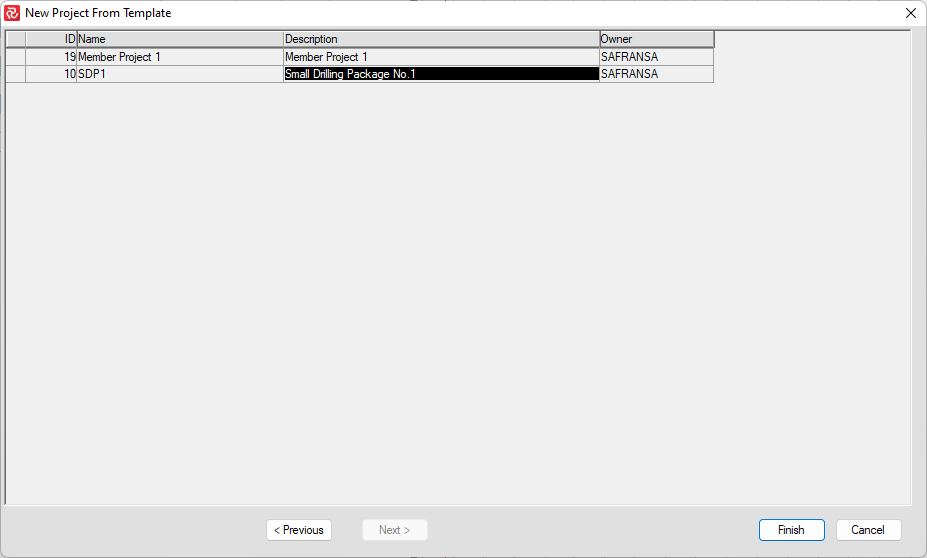
This opens up the template project with "Test" access allowing you to see it's contents but you will not be able to save any changes you make to the template. You may may however save changes to a new project by selecting File/Save As.

This will create a new Project ID with the chosen new name, but the setup will use the identical setup IDs at the Template project:
If you wish to have new setup IDs with the same content as the Template setup IDs, the easiest way might be to export the Template Project to an SPX file and import it again.
If your Template userfield uses this feature:
The most straightforward workaround would be to copy the userfield in Admin/Userfield Sets and then add it to your Project Properties:
Right-click and 'copy':
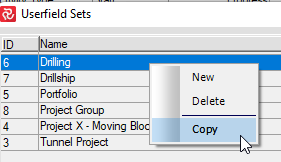
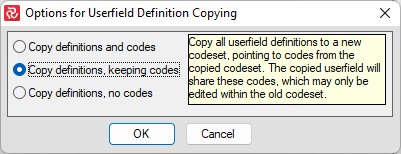
And choose this option 'Copy definitions, keeping codes':
Schedule Options
The Safran Project network analysis process/scheduler considers activity durations/constraints, activity relationships, and calendar information to calculate start/finish dates for each activity/resource and the project completion date. Safran Project calculates activity dates using the Critical Path Method (CPM).
Since project logic alone cannot always reflect all planning conditions, you may also want to consider the demand for resources and their availability when calculating the schedule. This process is called Resource Leveling. Resource Leveling is an automated process in Safran Project and delays the start of specific activities to when the resources are available while still meeting the plan’s logical constraints.
Your project schedule is dynamic: whenever you change activities or logic, Safran Project recalculates the schedule incorporating these changes.
Safran Project allows you to modify the default schedule options. In most cases, the default configuration should be sufficient. If this is not the case, it is easy to reconfigure the network analysis. You may modify the default options that the time analysis process uses. This may be done at any time before calculating the project schedule.
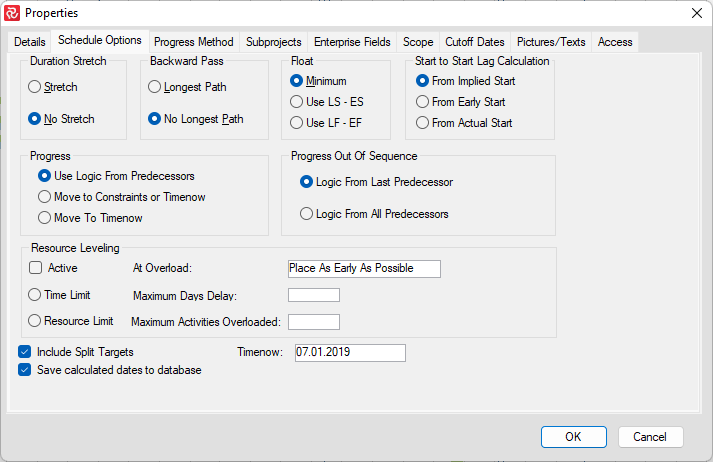
The various options and their effect on the calculations are discussed in the table below:
| Field | Description |
|---|---|
| Duration Stretch* | Specify whether the analysis process may stretch an activity duration. The default is No Stretch. (See comment 1. below) |
| Backward Pass* | Influences the late dates of the project. The default is No Longest Path.(See comment 2. below) |
| Float* | Specify how to calculate the total float on activities. The default is Minimum. (See comment 3. below) |
| Start to Start Lag Calc | Specify the starting point/date for Start to Start Lag, either Implied Start, Early Start, or Actual Start. The default is Implied Start. |
| Progress | Specify whether the incomplete part of an activity may be split from the complete part. The default is Use Logic From Predecessors. |
| Progress out of sequence* | Specify whether the incomplete part of an activity can be completed after the last predecessor or after all predecessors.(See comment 4. below) |
| Resource Leveling | Select the type and value for optimizing available resources. |
| Timenow | Enter the Timenow date for the time analysis. Used for calculating the Live Plan (ES/EF, LS/LF). |
| Include Split Targets | This option allows you to run a CPM project time analysis using either the split target information or disregard the split target constraint. (See Appendix A - Constraints for details about Split target). |
| Save Calculated dates to database | Mark this check box to save calculated results to the database. The default is On. |
-
The standard time analysis calculation allows the duration of an activity to be stretched by the constraints leading to and from the activity. The stretch option will enable activities to be stretched on the forward pass by preceding SF or FF constraints and stretched on the backward pass by succeeding SF or SS constraints. If the option “No Stretch” is chosen, the start dates are placed as late as possible, compatible with project logic, on the forward pass, and their finish dates are set as early as possible on the backward pass.
-
The backward pass calculates the late start and late finish dates and the total float and free float for each activity and constraint. Calculations regarding hammocks and resources are also performed during the backward pass. By default, the time analysis process bases each activity's late dates on the early finish dates for each finished activity. You may use the “longest path” option to change the calculation. By doing this, all late dates are based on the last activity found at the end of the longest path through the project. If your project has multiple “finish” activities, the analysis, while the longest path is chosen, will use the latest Early Finish as a start for a backward pass for all finish activities. “No Longest Path” uses the individual finish activity’s early finish as a start for the backward pass.
-
Safran Project calculates Total Float based on the activity's start or finish dates or as the minimum of these two values, i.e., the most critical dates. By choosing “Start,” float is calculated as the difference between LS and ES of the activity. By selecting “Late,” the float is calculated as the difference between LF and EF of the activity.
-
Progress out of sequence refers to an activity that is in progress or has been completed earlier than one or more of its predecessors.
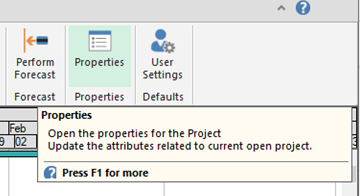
After setting up your new project, you can modify the Schedule Options by clicking Properties in the Project ribbon.
We recommend that you consult your planning manager or system administrator if you would like to perform changes in Project Properties in an ongoing project.
Progress Method
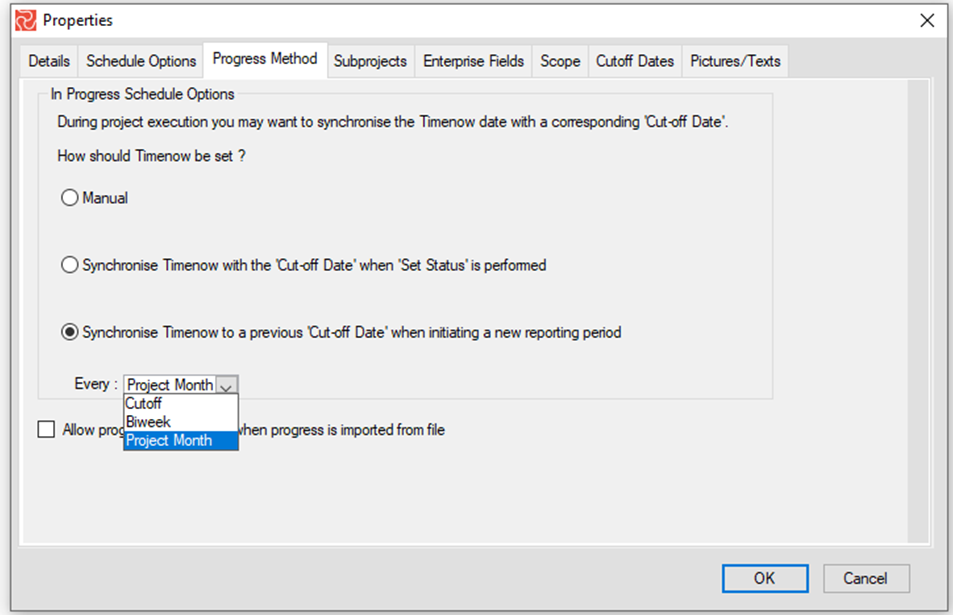
In Progress Schedule Options
Safran Project allows you to set a default progress method supporting three work practices. This may have already been selected as a default for all projects within your organization. You should, therefore, consult with your planning manager or system administrator before making any changes.
Timenow is the starting point for activities without preceding links or date constraints. For projects with weekly cutoffs, the default is to set Timenow to the Monday for the first week of your project. For day/hour/minute-based projects, Timenow should be set to the starting day/hour of the project.
The Timenow date may be changed manually at any time; however, in its simple use, it is only required to be changed at each Baseline Revision to re-schedule remaining durations and work.
Alternatively, it may be updated/synchronized at pre-determined intervals.
The progress method options support three different work practices:
- The manual option is the system default. The Timenow date remains unchanged until the user chooses to change the date himself.
- Synchronize Timenow with the Cutoff date when the 'Set status' is performed. This option updates and synchronizes the Timenow with the latest cut-off date every time a status update is performed.
- The third option allows you to synchronize the Timenow date with the latest Cutoff date/bi-weekly reporting date/Monthly Cutoff date when a new reporting period is initialized.
The options selected can be viewed using the project properties option from the Project tab. Choose the Progress method tab of the Properties window.
Allow Progress to decrease during Progress import.
In addition to manually entering progress and expended information, Safran Project also supports file import of such information. During the import process, Safran carries out many validations, including a check if imported progress figures are lower than reported in the previous period. This is an error by default; however, if required, a progress decrease can be accepted by checking the final option in the Progress Method panel below.

To provide a better understanding of how the progress method should be set, it may be helpful to clarify the relationships between plan sets, Timenow, and cut-off dates:
Live vs. Current plan sets
Although Safran has several plan sets or dates to control and visualize project performance, it is all based on one single activity network construction with activities, links, and resource requirements. The various plan sets are analyses with different starting points and may have different statuses or progress for the schedule analysis. This allows planners and project control team members to view, compare, and evaluate the project's progress, performance, and development.
Two similar (but different) user inputs control the starting point for the CPM (Critical Path Method) for the Live and Current Analysis.
- Timenow: The Timenow date is the starting point for all remaining work used for the Live analysis. If no progress has been reported, the Timenow date is the starting point for your project schedule. If the project is progressed, the live analysis uses the progress from the four fields: Actual Start, Actual Finish, % Complete (PC), and Remaining Duration.
- Cut-Off date: The cut-off date represents your project's reporting or status by time or date. You can have cut-off dates weekly, daily, or even multiple times per day. The latter is beneficial for running short-term projects such as campaigns or shutdown, Turnaround, and Outage projects (STO), where progress is reported and updated frequently.
When you define your project and reporting frequency, Safran Project generates a table of valid cut-off dates. The reporting period frequency also depends on your project's selected calendar unit. If your calendar has a minimum duration of days, you cannot choose a reporting frequency more often than once daily. If the calendar unit is hours, you can specify a maximum of 6 reporting periods per day. As the cut-off date represents the status by date, it also represents the starting point for the remaining work.
The progress input fields for the Current analysis are Actual %, Current Actual Start, and Current Actual Finish.
The cutoff date will not be set until you run your first status update. Timenow is set initially set when creating a project. The cutoff date is advanced step by step according to your selected reporting frequency.
During project execution, the Timenow date and Cut-off dates may differ, thus giving you two views of your schedule. However, Safran lets you align Timenow and Cutoff and update the Live progress field with the corresponding values from your project status update. When running a new baseline, this is part of preparing the new baseline.
Different Work Practices
Over the years, we have observed various work practices on how and when the Timenow date is synchronized with the cutoff date.
- Only when preparing for and running a new baseline
- After every status update (timenow=cutoff date (+1))
- Timenow is set to a previous Cutoff date from the weekly, bi-weekly, or monthly status updates before running a status update.
All three methods are discussed below. Safran Project also supports a setup that automates synchronizing the dates. The automation of this process can also be set as a default for all projects, using the project defaults option of the Sys Adm. application.
Before setting or changing these options, we recommend you consult your planning manager or system administrator.
Moving Timenow only when a new baseline is set
In effect, this method keeps the Timenow date at the point in time when the latest baseline was set. Immediately after setting a baseline, either initial or subsequent, the Baseline plan and the Live plan will be identical. Baseline dates are always a snapshot of Live dates as they were when running the Baseline process.
In many projects, the baseline is only updated or amended at pre-defined contractual periods (for instance, every six months). During this period, the approved baseline is 'frozen' and kept as a reference against which to measure progress.
During Project execution, it is likely that you will experience changes to the scope of work and your estimates. These changes should be added without you having to change your approved baseline. Safran lets you do exactly that.
The Current plan (Current Early Start/Finish) is advanced and analyzed during each Status update, considering the cutoff date and the progress (Actual %) for the activities and resources.
The Live plan (Early Start/Finish), using the same base date as the baseline, the Timenow Date, includes all new work added after the baseline was set in addition to the original work.
The Baseline plan (Baseline Early Start/Finish) consists of all known and planned work when setting the Baseline.
As the project progresses, progress information is entered, and a status update is carried out at predefined intervals. The Current plan represents all known remaining work starting from the latest cutoff. The period between the Timenow and Cut-Off dates will increase after each new status update.

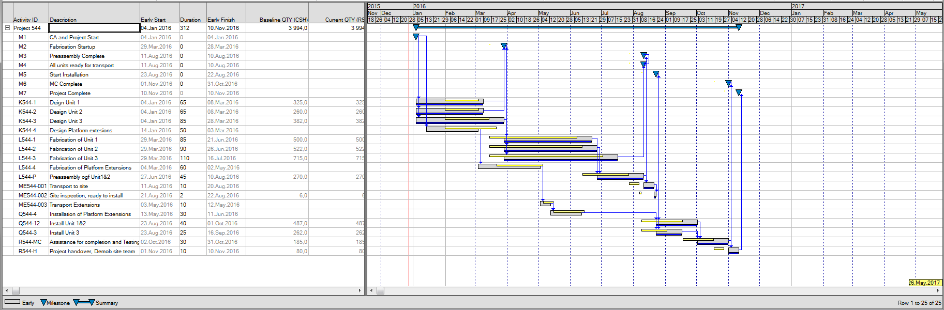
In this figure, a small project has been established with a baseline (blue bars), and the Live plan is shown in gray. After the baseline was set, some changes were made, i.e., new activities, design platform extensions, fabrication platform extensions, transport extensions, and installation of platform extensions have been added to the project plan. These activities were not part of our baseline and had no baseline reference. Keeping the Timenow at the baseline base date allows you to use the Live plan as the reference for work included and added after the baseline was approved. The red line shows the Timenow and the dark vertical line shows the current Cutoff date. A progress update has been run. The project's status is displayed with the yellow bars representing the current plan as analyzed using the progress entered and the cut-off date as a starting point for the current analysis.
Moving the Timenow after each status update
If you synchronize Timenow with your Cut-off date after each status update, Safran updates the Live plan with matching progress from the status update. The result is that the Current and Live dates are equal.
Some users claim that one loses one set of schedule and progress information. Others argue that by doing so, you simplify the schedule control in Safran.
The baseline is still unchanged and represents the progress and performance benchmark.
In this example, the Timenow date is synchronized with the latest cutoff date, and the live plan = current plan. This can be observed from the bars where the grey bar (Live Plan) and the yellow bar (Current Plan) are identical. The dark vertical line represents the cut-off date. A blue vertical shows the base date for the baseline plan. The baseline plan is kept unchanged.
Synchronizing the Timenow date with a previous Cutoff date
Sometimes, comparing your current progress with the status reported in an earlier reporting period is beneficial. You can do this by synchronizing Timenow and progress with a previous Cutoff date before entering the progress for this period.
Your live plan will now a) start at a previous Cut-off date and b) represent the status reported by that reporting period. You can now compare the latest progress reported with the previous status to see where there are slippages or gains between the two periods. This synchronization can be done weekly, bi-weekly, or monthly, supporting different needs.
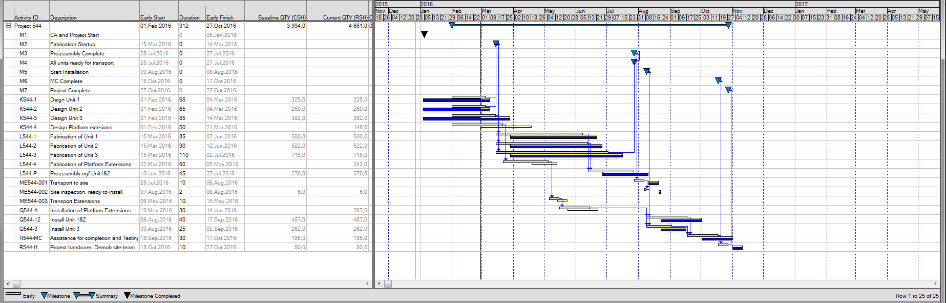
In this figure, the live plan is synchronized with the status update (the Current Plan) at the end of February. The project is advanced to the end of March, and the status update is completed. You can now compare your updated project schedule with the update from last month's reporting. The vertical lines represent blue = baseline start, Red: Timenow for the Live plan, and Dark- The latest status date and the Cutoff date for the current plan.
The progress method supports the three work practices.
- The manual option is the system default. The Timenow date is unchanged until the user chooses to change the date himself.
- Synchronize Timenow with the Cutoff date when 'Set status' is performed. This option updates and synchronizes the Timenow with the latest cut-off date every time a status update is performed.
- The third option allows you to synchronize the Timenow date with the last cutoff date, the last bi-weekly reporting date, and the last monthly cutoff date when a new reporting period is initialized.
Subprojects
Safran Project allows you to divide your project into any number of subprojects. You can also specify which users can access the subproject and at what access level. When opening the project, the user will be presented with the subprojects to which he has access and will only see the activities for those subprojects. Additionally, if an activity were linked to/from an activity from another subproject, the user would be able to see the activity but not modify it.
One typical use for this functionality would be if your project consisted of multiple buildings/contractors and you wanted all to develop a single coherent schedule in Safran. Each contractor has its discrete activities and a project owner who needs to access the total schedule.
Another widespread use of subprojects is when working with Contract Items.
| Field | Description |
|---|---|
| Name | Enter the contract item name. This name will be displayed in the screen title bar and as a reference to the project throughout the application. |
| Description | Contract item description. |
| Owner | Project owner. Output field showing user name. |
Adding Subprojects
Press the New button to add a subproject in the Properties and Subproject tab. You may add a new subproject even when the project is open.
Removing (or transferring) Subprojects
To remove a subproject, go to File/Open and right-click on your project. Choose Project Properties.

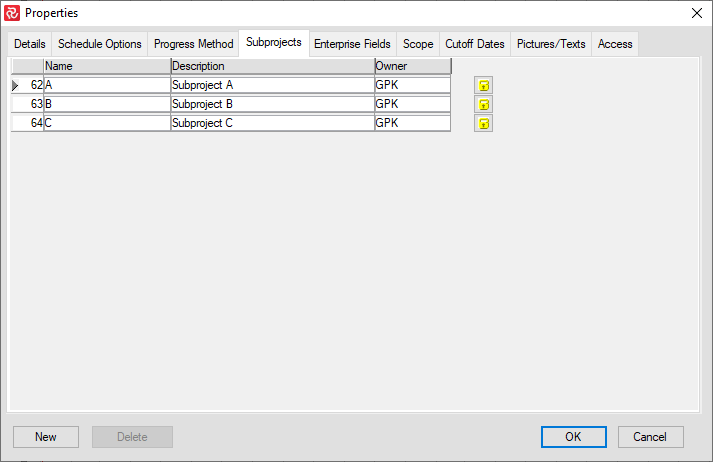
Go to the Subprojects tab.
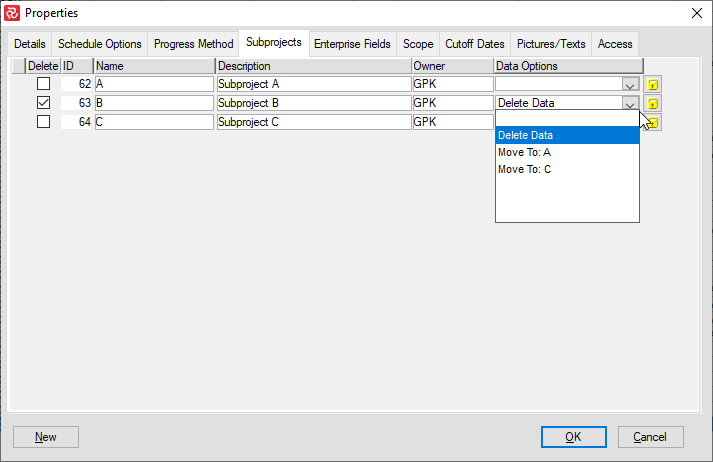
In the left column, tick 'Delete'; in the right column, choose what you would like to happen to the existing activities belonging to that subproject.
You can delete one or more subprojects or transfer all their activities to another from the Subproject panel.
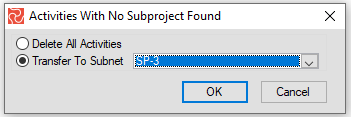
Transferring Subprojects
When establishing one or more Subprojects for a project with already existing activities, Safran allows you to select which Subproject the activities should be transferred to. Alternatively, you would be able to delete all activities if required.
Moving activities from one subproject to another
Suppose you need to move activities from one subproject to another. In that case, this can be done by choosing Subproject as a field in the Barchart Editor and modifying the value for the activity or activities in question. A more effective way of doing this for large groups of activities would be to use the 'Fill down' capability
or by using the 'Assign Fields' function tool shown below:
Adding Access to Subprojects
When in Properties>Subprojects, Click on the yellow icon next to the subproject you wish to give someone access.
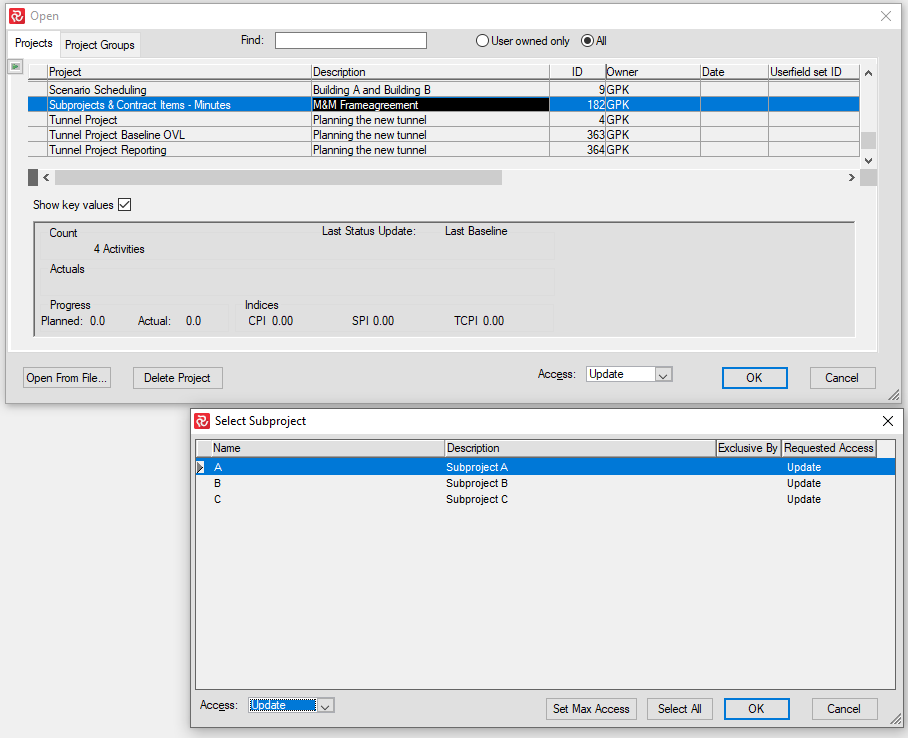
Open one or several subprojects.
When you open a project containing Subprojects, you may choose to open one or more subprojects depending on your access rights:
Contract Items
Your project may be divided into several contract items. A Contract Item is a part of a project potentially sharing a standard code value. It may be accessed and worked on as a separate entity. This philosophy supports individual project responsibility, multi-user project development, and analysis functionality. When dealing with larger projects consisting of multiple project phases, single discipline activities, etc., dividing the project into smaller parts is often recommended. In addition to controlling various Contract Items, Safran Project allows you to add logic between Contract Items and supports activities belonging to different Contract Items.
The two functionalities, "Contract Items" and "Subprojects," may be used independently.
You need a license key to unlock/display Contract Items on your Data tab in the menu bar.
Contract Items setup
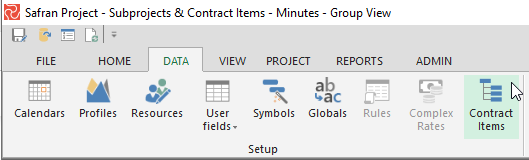
Once you have your license key, you may set up Contract Items for your project. Click on File/Data/Contract Items.
This message box appears the first time someone in your project clicks on Contract items. Click Yes.
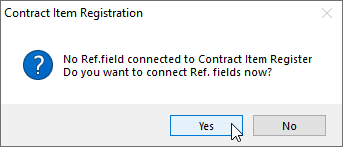
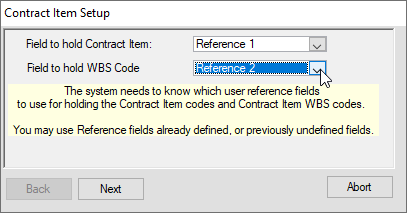
You must connect Contract Items to two of your reference fields. The reference fields that you choose may be already populated or empty.
If this is the first time you do this and, in particular, if this is an ongoing project, we highly recommend you take a copy (FILE/SAVE AS) of your project and test this functionality before implementing it on an ongoing project.
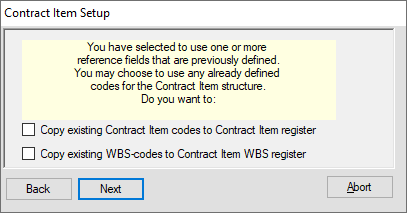
Choose what happens to these two reference fields and press Next.
A confirmation message appears:
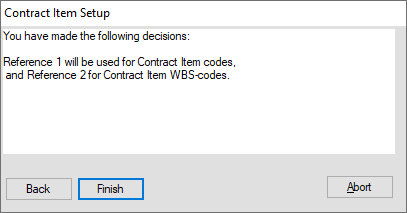
You will now see that the chosen reference fields are connected to Contract Items:
The 'sub_project' term in "Select Statement" must not be confused with Subprojects in Properties. In earlier versions, Contract Items were called Subprojects.
Subprojects and Contract Items go hand in hand but may be used separately.
Once you have added one or more Contract Items, these will appear in the Userfield set. You will see that these are grey and not black:
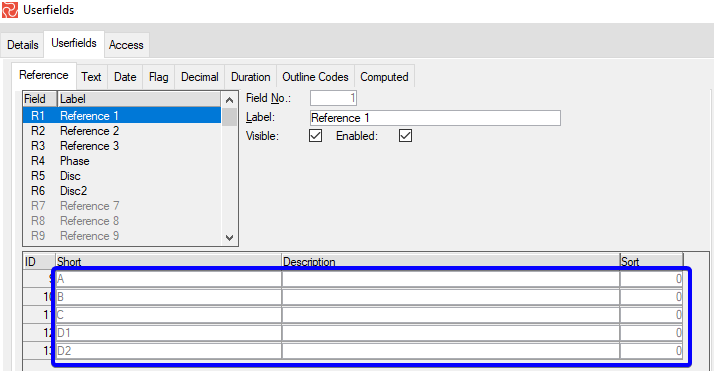
To add or edit them, it must be done through Contract Items.
Once the initial setup is complete, the next time you open Contract Items, it will (depending on your choices above) look like this:
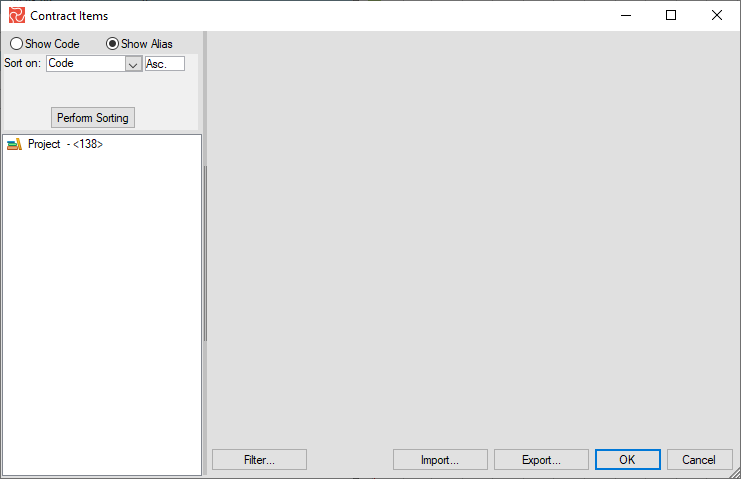
or this:
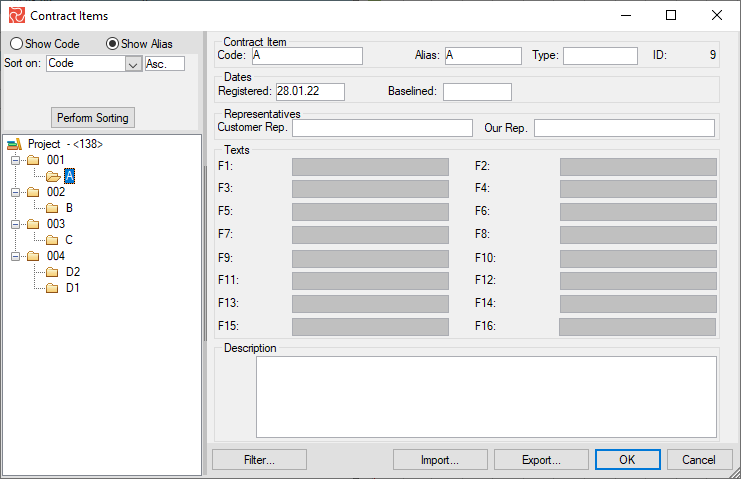
Adding Contract Items
In the Contract Items, right-click and choose New Contract Item. A Contract Item must belong to a WBS code, so you might have to create that first before adding a Contract Item. The relationship may be 1:1 or 1 to many, as shown below:
Removing Contract Items
To remove a Contract Item definition, right-click and select Delete WBS and Contract item, as shown in the picture above.
Import or Modify Contract items.
In the DATA ribbon, click on the Contract Item icon. In the opened window, you can import new Contract Items and modify and export the existing ones. Before inserting a new contract item, you should select a WBS code.
WBS Node:
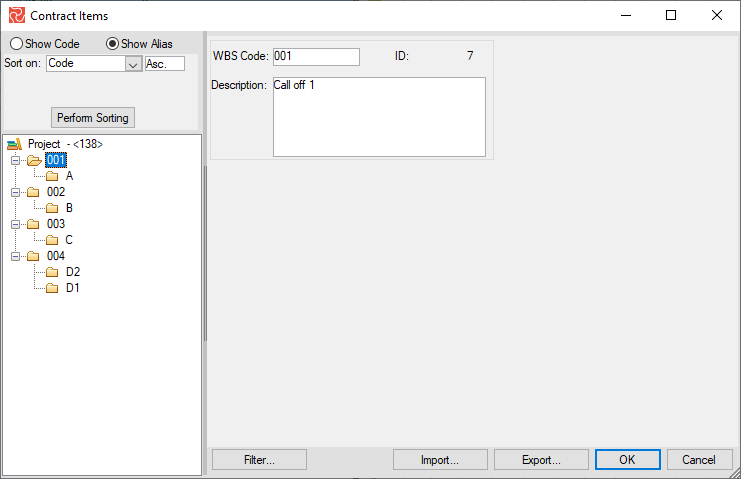
Contract Item Node:

Enterprise Fields
Enterprise fields are often used to categorize/filter/sort projects while working with Safran Project. Unlike Userfields, which are assigned at the activity level, an Enterprise field is set at the Project level.
In ADMIN/Enterprise fields, it is possible to define up to:
-
100 Text fields
-
100 Reference fields
-
100 Flag fields
-
100 DateTime fields
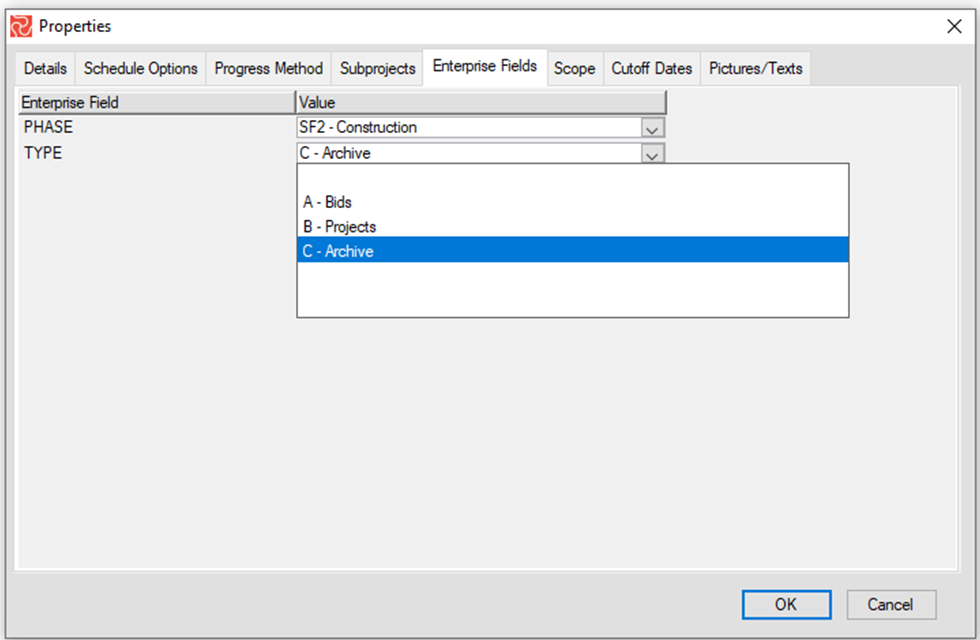
Assigning Enterprise Values
Project Type, Project State, Contract No., Project Owner, or Region are typical examples of Enterprise fields.
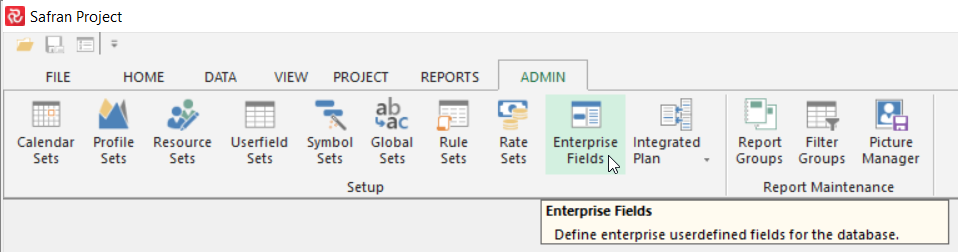
Defining Enterprise Fields
Enterprise fields are defined 'globally' for the entire Safran Project database. To define Enterprise Fields and Codes, look for the Enterprise Fields option under the Admin tab shown below:
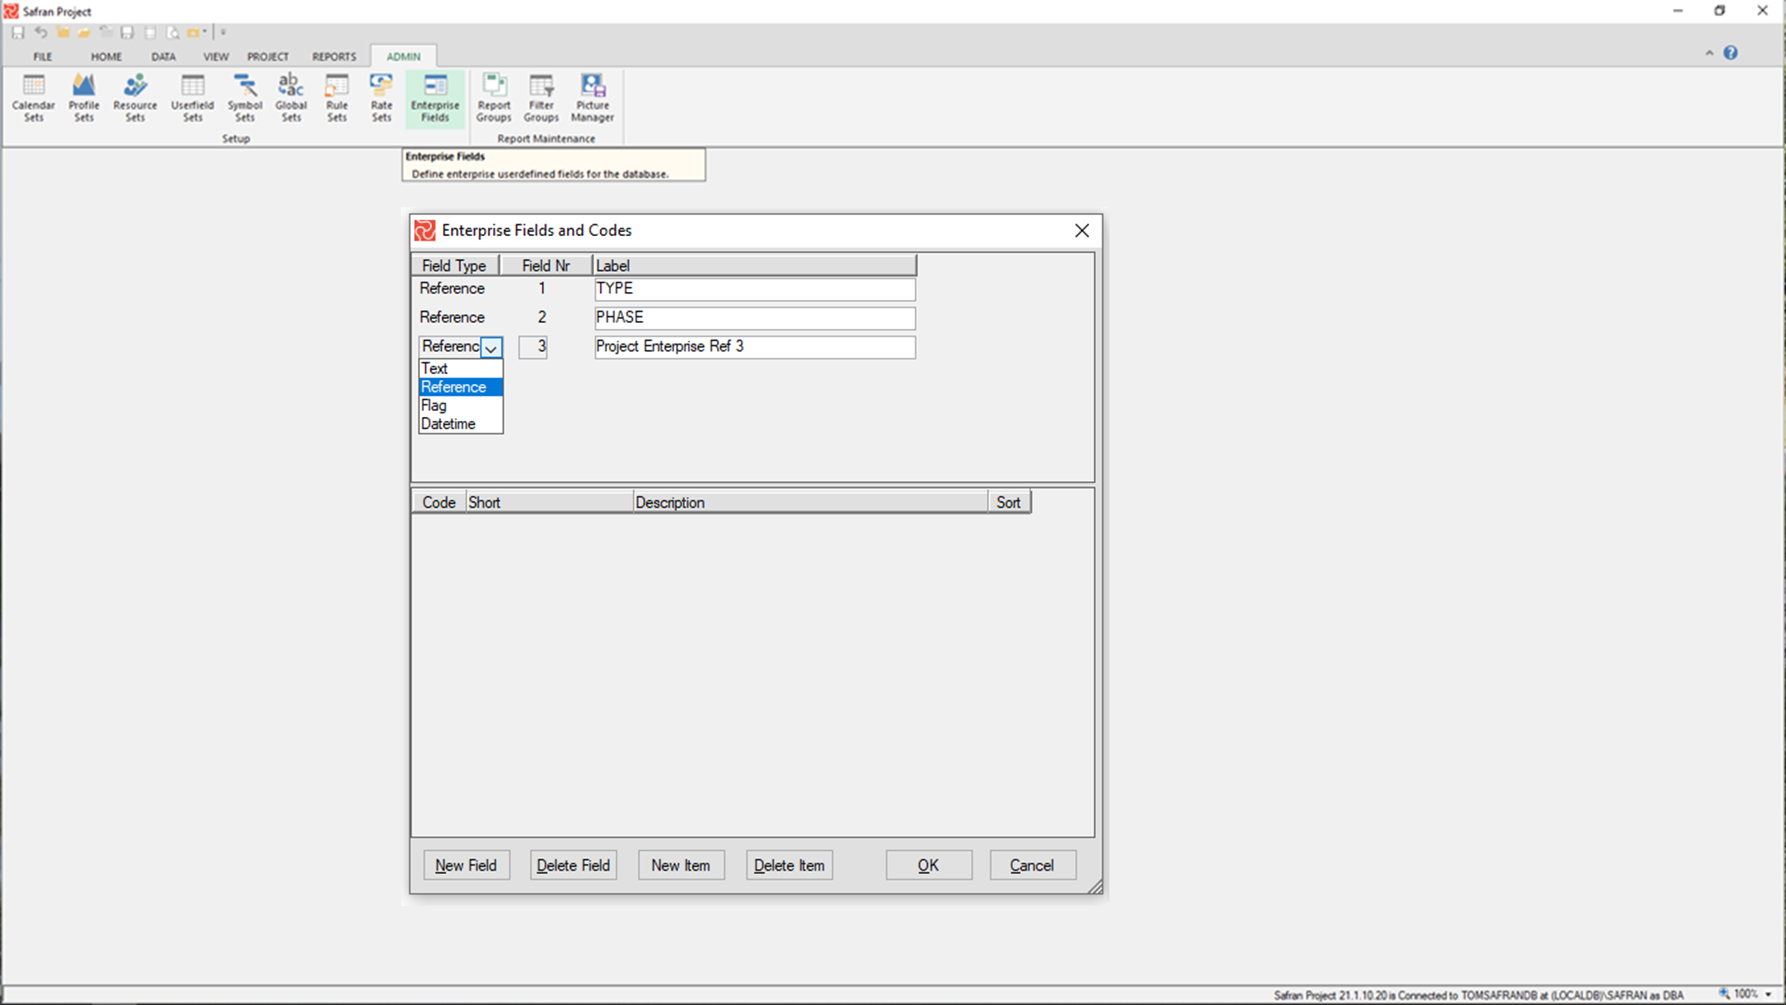
To define a new Enterprise Field, press the 'New Field' button and select the relevant field type. Enter a 'Field No' unique for the field type chosen and a label in the 'Label' column.
If you choose to define a Reference field, you will also have the opportunity to define valid codes/descriptions/sort for the field in the lower panel of the window by pressing 'New Item.'
When using a Reference field to group or sort on, Safran will, by default, sort by the 'Short' value. If the 'Short' values don't give the sort order you require, you can enter a 'Sort' value and specify to use the 'Sort' field in your layout or report.
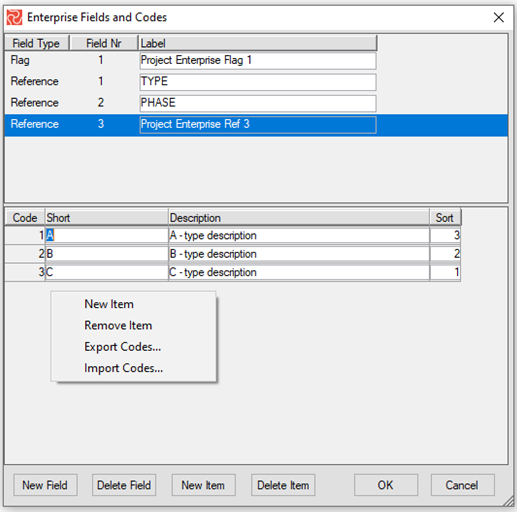
When you are finished entering/updating your Enterprise Field information, press the 'OK' button to save it and close the window.
Suppose you 'right click' in the upper panel. In that case, you will see a context-sensitive short-cut menu that, in addition to the 'New/Delete' field/item options, also allows you to export/import all or a single selected field definition and codes.

If you 'right-click' the lower panel, you can export/import codes for the Reference field in focus.
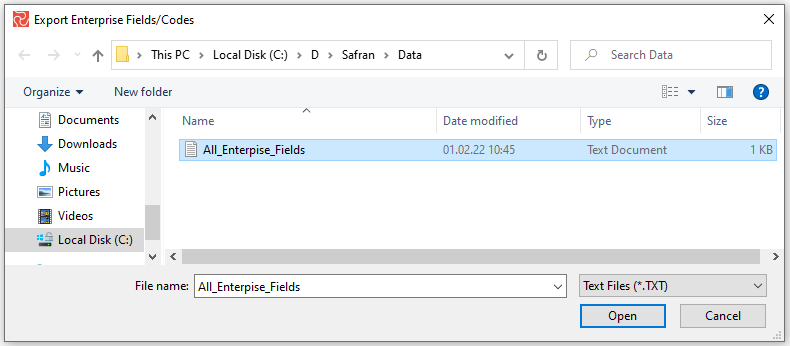
In both cases, the information is saved to/retrieved from a text-type file via a standard Windows file save/open window.
Using Enterprise Fields
When working in an environment with large numbers of projects in your database, using several enterprise fields to organize projects in the File Open panel is a convenient way of selecting the projects you would like to work with.
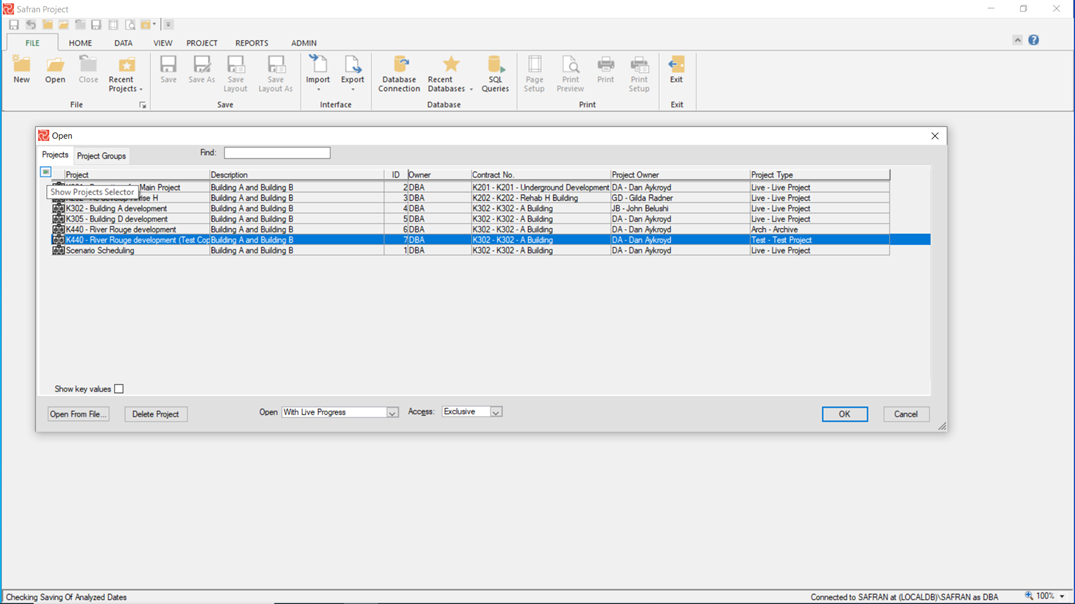
By pressing the 'Show Project Selector' button to the upper left in the File Open panel button (highlighted above), you'll be able to choose several Enterprise Fields to group on as shown below:
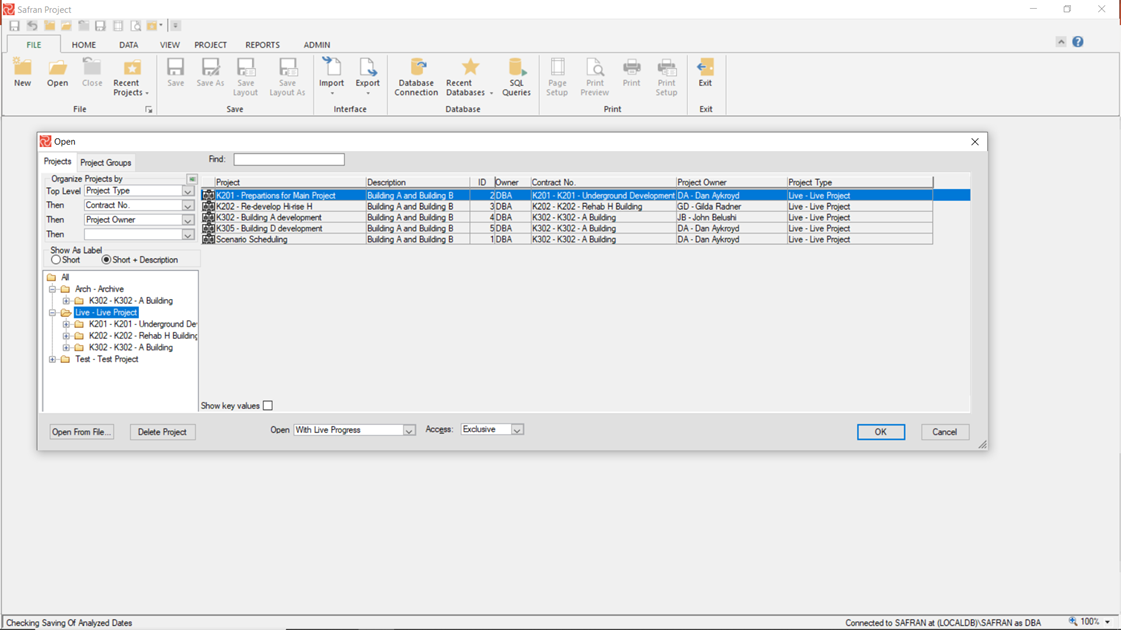
Enterprise fields are also available for grouping and sorting in the Barchart Editor and various reports. It is mainly when working with Project Groups.
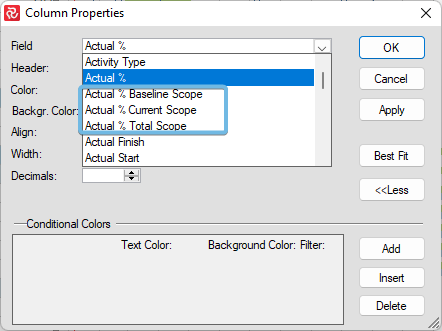
Controlling Scope Summarization
Safran Project provides you with three separate scopes to help you track and control your project:
- Baseline Scope
- Current Scope
- Total Scope
The Baseline scope would typically contain only the approved work for the project. The scope is kept frozen between Baseline updates/revisions as a point of reference to measure progress and performance and is only updated at pre-agreed intervals, typically Bi-annually. Progress measured and reported against the baseline is generally a client/project owner requirement.
The Current scope is slightly more 'dynamic.' It would typically accumulate approved changes in addition to the original baseline scope. However, it would be updated as a part of each Status Update and be more 'up to date' than the Baseline scope. This scope is often used for manpower histograms as it gives a more accurate picture than the baseline for the agreed resource requirement. Additionally, it may be used as a basis for progress measurement to see the 'true' project performance for projects with many changes to the project scope.
The Total scope is even more dynamic as it is updated at each Status Update; however, compared to the Baseline/Current scope, it also includes requested VOs. By using the Total scope as the basis for manpower histograms, you would be able to see a 'worst case' picture of the resource requirements if all requested changes were to be approved.
The above discussion of scope configuration is reflected in the default settings for a new project. Although the initial scope settings are experience-based 'sensible defaults,' you can change these to meet your project requirements.
Note: An essential and integral part of controlling scope summarization is the Change Control/Change Register functionality in Safran. After creating and 'freezing' your initial schedule, you can set up Safran to collect all changes to scope (additions/reductions to resources or new activities) in the Change Register. Changes can be categorized into four types: VO-Variation Order, VO-Request, Internal Change, and Subcontracted.

| Field | Description |
|---|---|
| Field name | The field code for the three separate scopes at the activity level. |
| Field label | The corresponding field description. |
| QTY type | Button to select one of the two quantity fields in the resource table. |
| Include change-types | Checkboxes for including the various change types in the scope fields. |
| Baseline update | Checkbox will include various changes into scope sets during the Baseline update. |
| Status update | Checkbox will include multiple changes into scope sets during the Status update. |
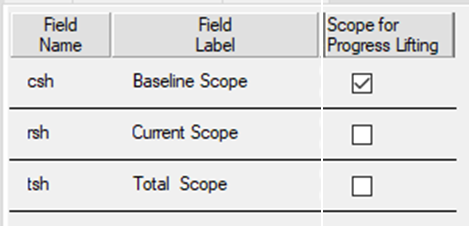
| Scope for progress lifting | Checkboxes to select which scope to use as a weighting factor when aggregating progress from resource to activity level. Only one field may be set. |
| Always on schedule against | Checkbox to select schedule for 'AOS' activities. |
| Lock resources from further updates | Configuration options for locking of resource entries. |
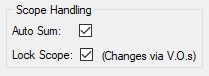
| Scope handling | Options for auto summary of autosum scopes and invoking of change order system. |
The Project Configuration— access/permissions system also controls Scope setup; hence, you can only modify the scope configuration for projects where you have been granted update access. Similarly, you may read (display) the QTY Configuration panel for all projects you have read access to.
How and when Quantities and Scopes are updated
Planned QTY is always the sum of all resource quantities for an activity irrelevant to Change type and status. If you enter/change a resource quantity, the Planned QTY is updated immediately.
The three scopes, Baseline(CSH), Current(RSH), and Total(TSH), will contain the original quantities from the initial baseline and accumulate quantities according to their configuration in the Properties/Scope panel. The three scopes will only be updated during a Baseline process and Status Update process again, according to the configuration made in the Properties/Scope panel.
The Total(TSH) scope will be updated at every change to a Planned QTY.
The two additional scopes, Current QTY(RSH Autosum) and Total QTY(TSH Autosum) will also be updated according to the guidelines above.
Because both Current and Total scopes are not updated between status updates, they would not immediately reflect a quantity change. This is because Baseline/Current/Total scopes are considered 'official,' must be 'consistent' figures, and are therefore only updated at pre-determined times.
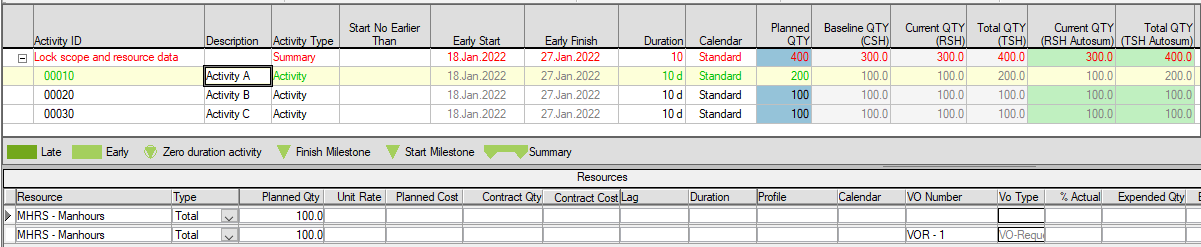
To view and report on Current/Total quantities, including changes before they are updated as a part of a Status Update, you can select the 'Auto Sum' option on the Properties/Scope/Scope Handling panel. This will ensure that the fields Current QTY(RSH Autosum)/Total QTY(TSH Autosum) are always up to date when opening the Barchart editor or running a report. However, if you change a quantity, you must do a save/refresh (F5) to update the 'autosum' scopes.
The following set of screenshots illustrate the concepts discussed above.

Three activities have been added to a project, and resource quantities have been assigned. Planned QTY and Total QTY (TSH) are updated.

A Baseline process has been run. Baseline QTY(CSH), Current QTY (Autosum), and Total QTY (TSH Autosum) are now updated.

A Status Update has been run. Current QTY (RSH) has also been updated.
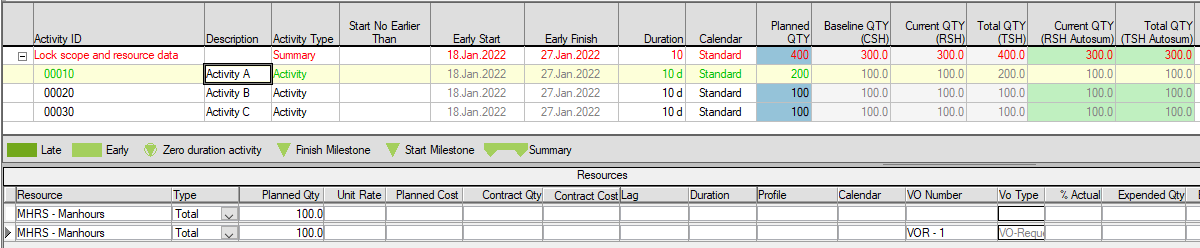
A new resource quantity/Change has been added with the status 'VO-request.' Planned QTY and Total QTY (TSH) are updated, while other fields (Autosum) remain the same.
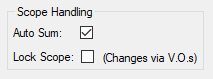
If 'Autosum Scopes' was checked/turned on, and the project re-opened or refreshed (F5), you would see that both Current QTY (Autosum RSH)/Total QTY (Autosum TSH) are now updated. At the same time, Current QTY (RSH)/Total QTY (TSH) remain the same as these scopes are only updated during Baseline/Status Update processes.
Scope for Progress Lifting
Safran allows you to have multiple reference points for aggregating progress while using the Barchart Editor based on the available configures scopes Baseline/Current/Total.
Note: This option only affects the view in the Barchart Editor, not the reports where you would choose which scope the report should be based on.
When choosing the Baseline for aggregation, Safran would only consider activities/resources with a baseline in the calculation and present the %Actual for baselined activities/resources. A client or project owner would typically request progress information on this basis.
Considering a situation where a large amount of additional work/scope had been added to a project and agreed/approved after a baseline but not currently included in the baseline, it would be of value to be able to check/follow the progress of all approved scope and get an impression of the project's 'true' progress. Switching the progress lifting basis from Baseline to Current and looking at the Barchart Editor %Actual would give you this information.
Switching between scopes for this purpose may be done at any time, but using the correct aggregation basis for the relevant report is imperative.
Instead of switching in Properties, adding the following columns in the Barchart Editor is now possible. Please remember they only "work" on the Summary level defined in Group Properties.
Always On Schedule Against
Safran allows you to have activities considered 'always on schedule' (AOS / auto progress). As a part of each Status Update, Safran calculates a 'Planned Progress' percentage for each activity. For AOS activities, the %Actual would automatically equal the planned progress figure for that cut-off.

The default option is to use the Live Plan; however, depending upon your use of Safran, you might change this to follow either the Revised or the Baseline Plan. If you do so, you should be aware that new activities added after either running a Baseline or generating a Revised Plan would not have a Baseline/Revised Plan. Therefore, Safran could not calculate a planned progress percentage for the activities in question.
Lock Scope
The option to Lock scope as part of Scope Handling ensures that planners use the VO/Change register functionality to adjust the activity scope. The VO/Change register provides you with a detailed overview of all changes to the project scope. Also, it allows you to compare your Baseline scope to your Current or Total scope, providing you with a picture of the project's variation in scope.
It is highly recommended that you enable Lock Scope after setting the initial baseline so Safran can track changes to the scope.
Lock scope ensures that you use the Change Control system. When you add another activity with a resource or another resource record to an existing activity after running the Baseline, you must 'connect' it to a Change to save it.
Until you run a Baseline, you can still delete the resource; however, you must delete it from the Change Register. After running a baseline process, you are not allowed to delete a resource that exists when running the process.
In all cases discussed above, you can always change the resource quantity.
If, for some reason, you don't want to use Lock scope, you can/should still make scope changes through the Change register.
For more information on how to use the Change Register, please see topic, Change Control.
Note: The "Lock Scope"-functionality has changed throughout the last releases. If you want to use Lock Scope as you did in, e.g., Safran version 5.0, you must also use the "Lock Resource data from further updates" configuration. Also note that even though you export a project with "Lock Scope" enabled, you would have to reenable it after import should you wish to keep it enabled.
Lock Resource data from further updates
In addition to controlling the deletion of resources, Safran also provides options to control the updating of resources during project execution concerning what part of the resource may be locked and when/during which process it is locked.
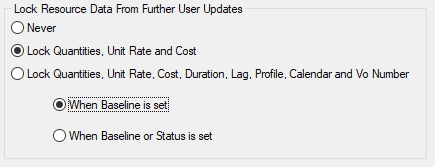
The default setting for locking is Never. However, for most projects with a fixed scope, it is highly recommended to use a locking option, as this will ease the tracking of changes and consistent progress reporting as the project develops.
When configuring resource locking, you have two options as to which part of the resource record you want to be locked:
The option 'Lock Quantities, Unit Rate, and Cost' would lock the quantity/cost-related fields Resource, Type, Planned QTY, Unit Rate, Planned Cost, Contract QTY, and Contract Cost (shown in gray) while leaving the schedule and VO related fields editable(presented in black).
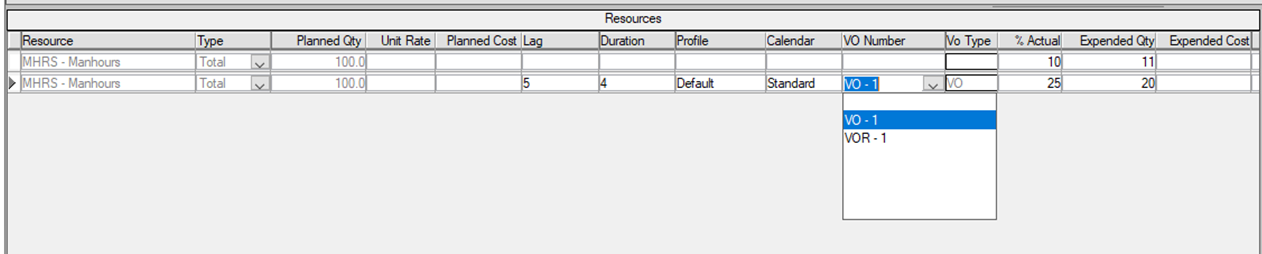
'Lock Quantities, Unit Rate, Cost, Duration, Lag, Profile, Calendar, and VO Number' would lock quantity and schedule-related fields.

In both cases, the status fields %Actual/Expended QTY/Expended Cost will always be updateable.
The final option controls when the resource locks are to be applied
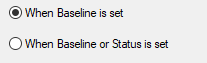
Choosing 'When Baseline is set' would allow new/non-locked resources to be updated until a new baseline process is executed, after which they will be locked.
Choosing 'When Baseline or Status is set' would put more rigid time limits regarding when the resources would be locked.
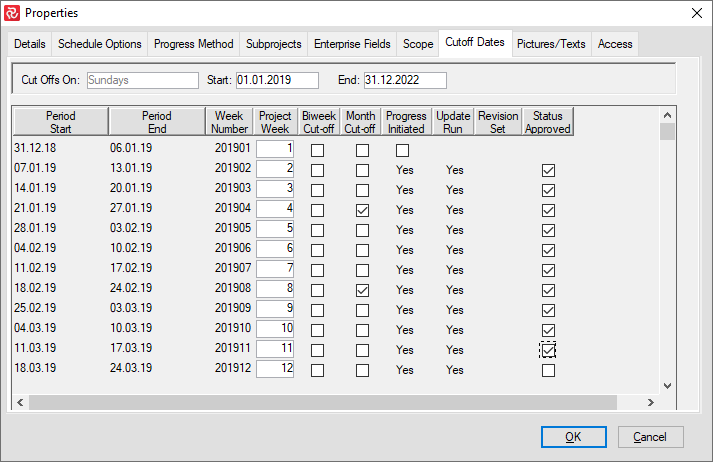
Cutoff Dates
After entering your project span and selecting the weekday for Cut-Offs, Safran Project generates the Cut-Off date table. This table lists reporting dates and periods—hourly, daily, weekly, monthly, and optional bi-weekly- listed on the cut-off dates tab. The cut-off date table is used to control the status update process. You may access the table to modify cut-off dates for bi-weekly and monthly reporting periods. The data content in this table may be modified, although no records may be added or deleted.
| Field | Description |
|---|---|
| Period Start | Period start date, display only field, according to specified weekday for cut-offs. |
| Period End | Period end date, display only field, according to specified weekday for cut-offs. |
| Week Number | Displays the calendar week number. |
| Project Week | A consecutive number starting at 1, counting numbers of weeks in the project span. |
| Bi-week Cut-Off | Marks weeks to be used as biweekly cut-off during periodic reporting. |
| Month Cut-Off | Marks weeks to be used as monthly cut-off during regular reporting. The last cut-off date for every calendar month. |
| Progress Initiated | Output field. Displays "yes" if progress input has been started for a specific week. |
| Update Run | Output field. Displays "yes" if a status update has been run for a particular week. |
| History Saved | Output field. Updated if users mark the save history checkbox during the status update. |
| Revision Set | The output field shows when a Set Revision process has run. |
| Status Approved | Status flag showing management approval of status update. The flag does not affect the application and is information only. |
There is a valuable function allowing you to have multiple-hour shifts in cut-offs. To enable this function, select the duration units in the details tab.
Now, if you go back to the Cut-Off Dates tab, you can select Multiple Hours Shifts in Cut-Offs On the drop-down list. Safran allows you to choose up to six daily cut-offs using the mouse right-click on the daily timeline. To do this, move your cursor over the desired time and mark it by the mouse right-click. You can use the same method to delete the selected hourly cut-off.
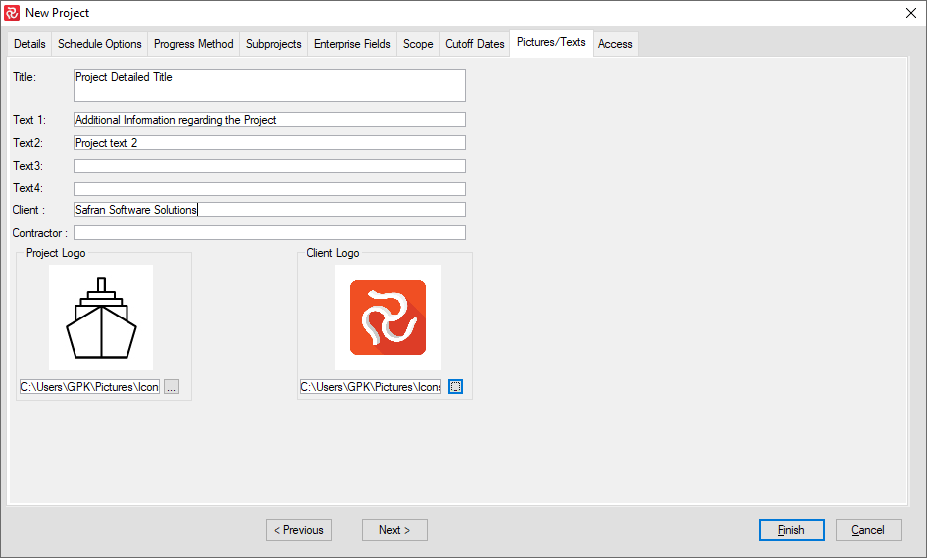
Pictures and Texts
Safran Project supports several standard project texts in the report header area, such as Title/Text1-4/Client/Contractor.
You can also include logos for your project (usually your company’s logo) and your client, which may also be placed on the right and left of the header area.
Your logo must be saved as a BMP, JPG, or PNG-type file.
To add a photo or logo, right-click on the logo area, choose your relevant option, and select your file.
The information fields Title and Client and Project/Client logos will then be available as defaults for all your reports.
An example report showing the default project information as described above:

Userfields (User Defined Data / Activity Codes)
Often, you need to extend the default information provided with the scheduling software to track additional data such as purchase dates, delivery dates, purchase order numbers, work orders, work breakdown structures, responsibility, and other codes and references.
Safran Project has a comprehensive set of predefined fields that can be labeled and configured to suit your requirements.
These fields are available for storing the unique data, plus the ability to perform computations and conditional tests on the data to generate the desired results.
In short, the userfields enable you to add your fields and values for activities. Once defined in the userfield data dictionary, the userfields are available in the Activity Columns, the Activity Details Information Form, and for reporting.
The userfield type ‘Computed’ is slightly different as a Computed field may not be entered manually and is always the result of a calculation. Further, they are only (temporarily) available in the Barchart Editor and are not stored as ordinary fields or columns in the database.
You can add up to 730 (v22.2: 290) userfield items for each activity. Safran Project supports the following user-defined field types:
| Field | Short | >v22.2x | v22.2x | Description |
|---|---|---|---|---|
| Reference | R | 100 | 60 | Codes and defined list values |
| Text | F | 100 | 40 | Text |
| Date | D | 100 | 40 | Dates |
| Flag | L | 100 | 40 | Checkbox, single character |
| Decimal | N | 100 | 20 | Decimal |
| Duration | U | 100 | 10 | Duration |
| Outline codes | O | 30 | 30 | Custom codes or tags that allow you to show a hierarchy of activities in your product |
| Computed | C | 100 | 50 | Computed/calculated display fields |
Reference fields and outline codes consist of a list of predefined codes/references. You can use a reference field to define a list of valid codes for the field and an associated text description. As an example, you might define a reference field called “DEPARTMENT" containing the following items:
| Value/short code | Description |
|---|---|
| MNGMT | Management |
| ENG | Engineering |
| PREFAB | Prefabrication |
| STRUCT | Structural steel |
When you enter data into the Reference field for an activity, as in the above example, the Department field, Safran Project ensures the value entered is in the list. Safran Project provides a list of defined values for quick and efficient data entry and validation. Furthermore, Safran Project uses the text description in the list for the summary titles whenever you summarize your schedule.
Reference fields are often used to code activities with their relevant WBS code, Discipline, Contractor code, Sub-contractor, Level 4 code, System, Department, Section, Area, Phase, and so forth. For any of the Reference fields R1-R100, you may enter an unlimited number of codes & descriptions.
Outline Codes are slightly different than reference fields as they are hierarchical by nature consisting of a number of nodes with parent-sibling relationships.
You can use the Outline Codes to create a hierarchical structure for your project that can be used to sort, select, and group activities.
When you create an outline code, you start by defining the number of levels in your structure and the coding for each level. Outline codes allow you to show a hierarchy of activities differing from the dynamic grouping by reference codes. Outline codes are typically used for WBS, OBS, or any other fixed breakdown structure such as AA.BBB.C01.DD, AA.BBB.C02.DD, AB.BBB.C01.DD, etc.
See, Enterprise Fields, for user-defined codes defined per Project ID (instead of per Activity ID).
Adding Userfields
Userfield configuration may be done in two different manners either when initially creating a project or at any time after the project has been created.
You’ll also find that the Userfield configuration tool is available in two places with slightly differing capabilities.
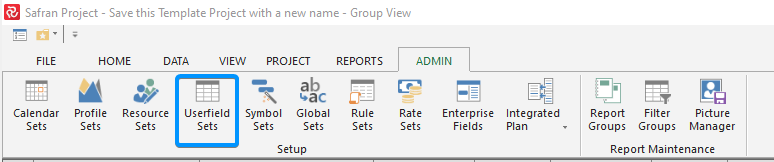
From the Data ribbon, Userfields allows you to access and configure userfields for your current project.
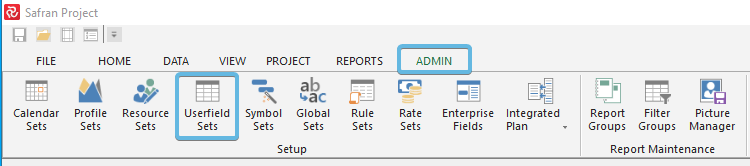
From the Admin ribbon, Userfield Sets allows you to access and potentially configure userfields for any Userfield set you have access to.
The userfield configuration pane is a tab-separated window organized by userfield type.
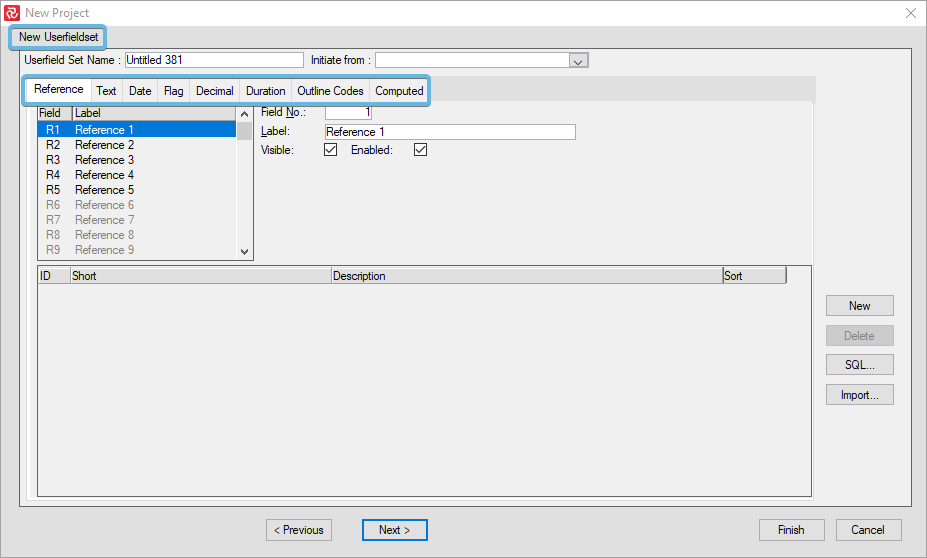
When you arrive at the "New Userfieldset" in the "New Project Wizard," you may add various Reference fields, Text fields, Date fields, Flag fields, Decimal fields, Duration Fields, Outline Code fields, and Computed fields.
A label, predefined codes, description, and an optional sort value define reference fields.
The Text, Date, Flag, Decimal, and Duration type fields are characterized by a label, further you can also define formulas to be applied at the activity level and the Summary/group level for the Barchart Editor.
A label, the maximum number of levels, and a detailed outline configuration define the Outline codes.
Computed fields are represented by label, type, and formula.
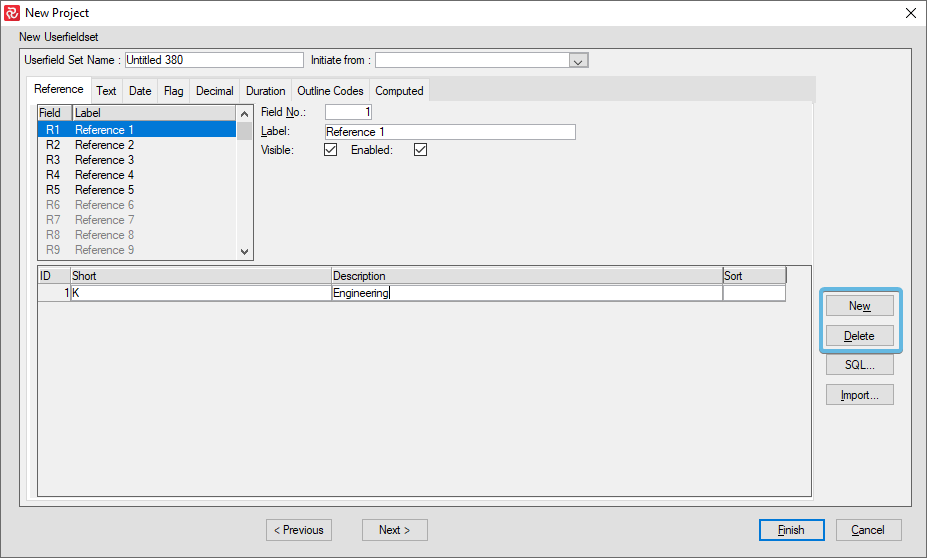
Select the tab corresponding to the required field or column type to add a new code, then press the ‘New’ button.
-
By pressing "New" in this window above, you will add a code to the Reference field 1 (R1). You may also import codes from a text file.
-
Pressing the "Delete" button deletes the current line containing a userfield definition record.
-
If you wish to create other fields than Reference fields, you should press on the various tabs:

- By pressing "Next," the wizard will save a userfield set for your new project and take you to the next step: creating a resource set for your project.
Modifying a userfield
During the New Project Wizard setup, adding all userfields and userfield codes at once is unnecessary. This may be modified later on. In fact, in most projects, the userfields are constantly updated with new codes during project execution.
To modify your userfield later, open your Project and go to Data>Userfields.
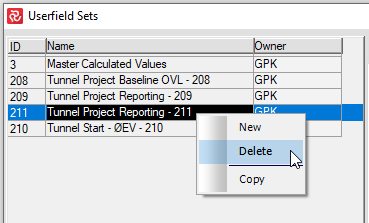
Deleting a Userfield Set
To delete a Userfield Set, go to Admin>Userfields, right-click and delete.
Importing & Exporting a Userfield Set
From version 22.1.00, an entire userfield set may be exported and imported.
Adding/Deleting Reference Field Codes
Move your cursor to the codes part of the pane and press ‘New’ to add a new short code-value description and sort.
Pressing the ‘Delete’ button lets you delete a single or all codes for a Reference field.
Please note that you cannot delete reference fields or outline codes if the userfield code is in use (added to an activity).
Importing Reference Fields from File
Valid reference field values may be imported from a file. The file must be a tab-separated text file with the following format: CODE tab DESCRIPTION tab SORT (optional). Then press Import.
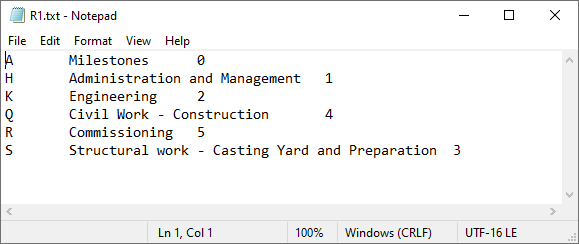
How to import from the text-file
- Add a Label.
- Ensure Visible and Enabled are ticked.
- Press import and find your text file.

Tip: If you are uncertain how to make an import file like this, export an existing Reference field and then edit and import that file.
Assigning Reference Fields and Codes from Foreign Tables
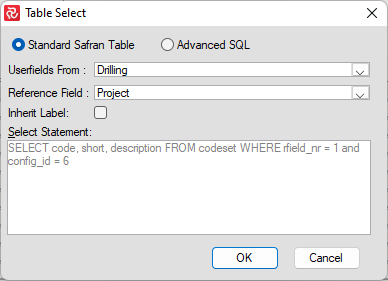
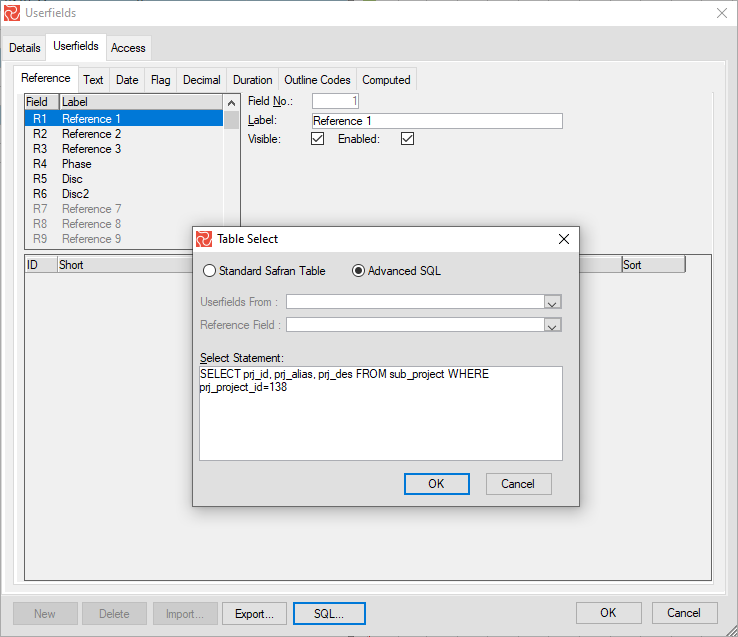
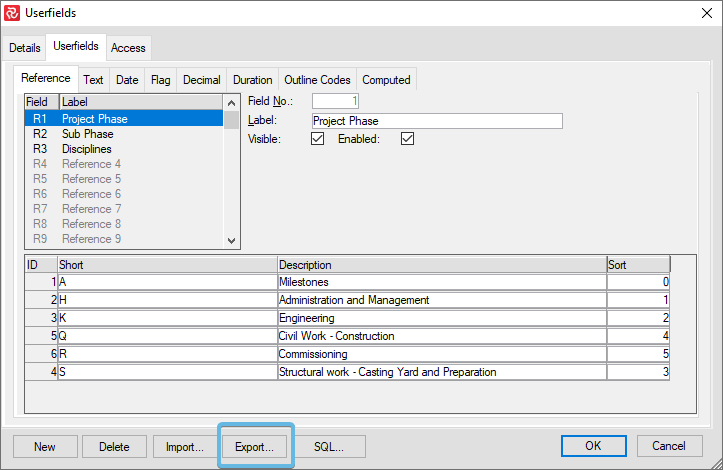
It is standard for larger organizations to keep such information in a data repository. To save repetitive data entry and duplicating information, Safran Project allows you to assign your code values from tables other than the code sets in the Safran data structures. To use this feature, you must have proper knowledge of Safran Project data structure and be familiar with SQL. The codes may be assigned from other Safran Project tables or foreign tables. Press the ‘SQL’ button, and within the ‘Table Select’ window, you may edit or write your own SQL select statement.
Open your Userfield set and click on the field (e.g., R1) that you wish shall inherit codes from another Userfield set. Click on the "SQL"-button.
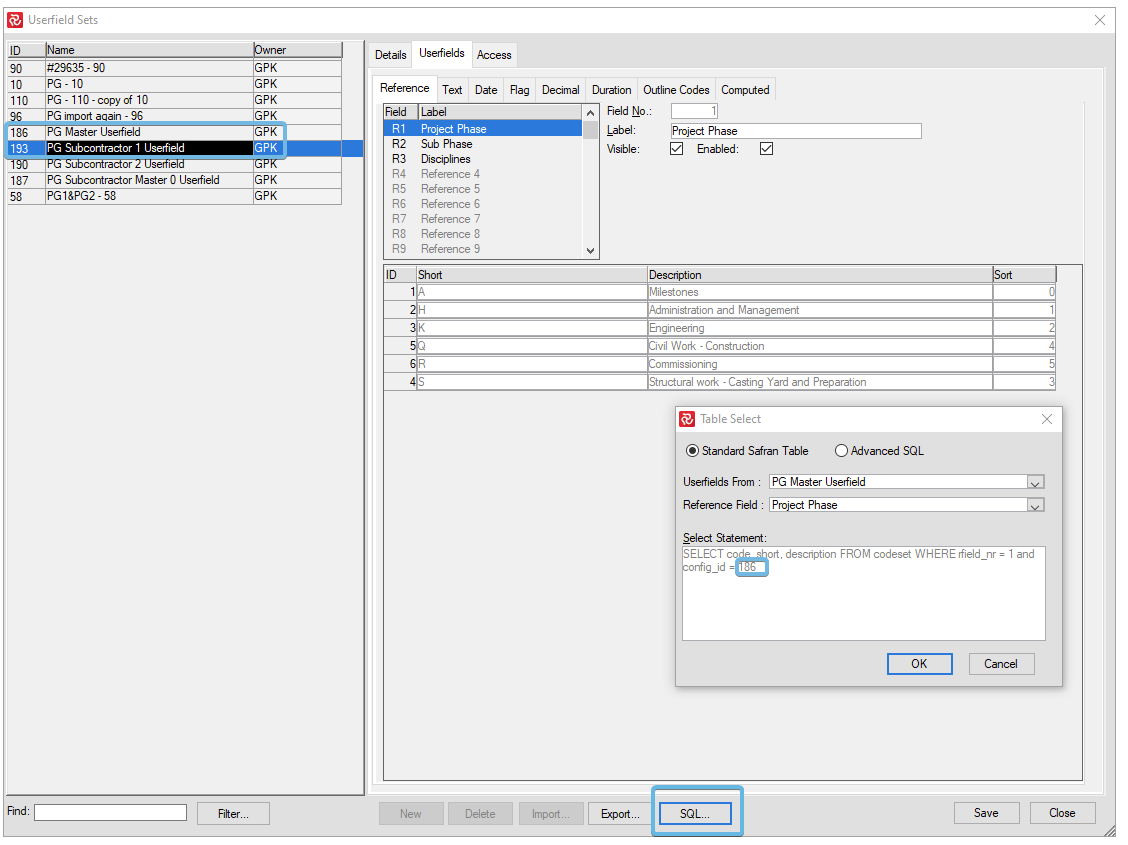
The above figure shows the default select statement generated by Safran Project. This statement corresponds to the definitions entered. You may edit or overwrite this statement to allow for other references.
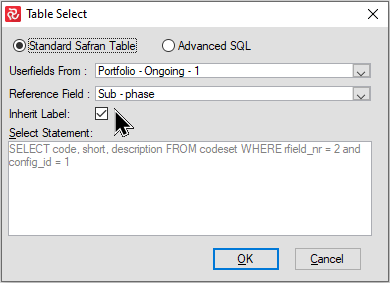
When referencing userfields from other userfield sets the name/label of your 'local' field will remain the default ie. 'Reference 2' allows you to specify your label. Check the' Inherit Label' box to use the label from the referenced field.
Notice how ID 186 has black (editable) fields:
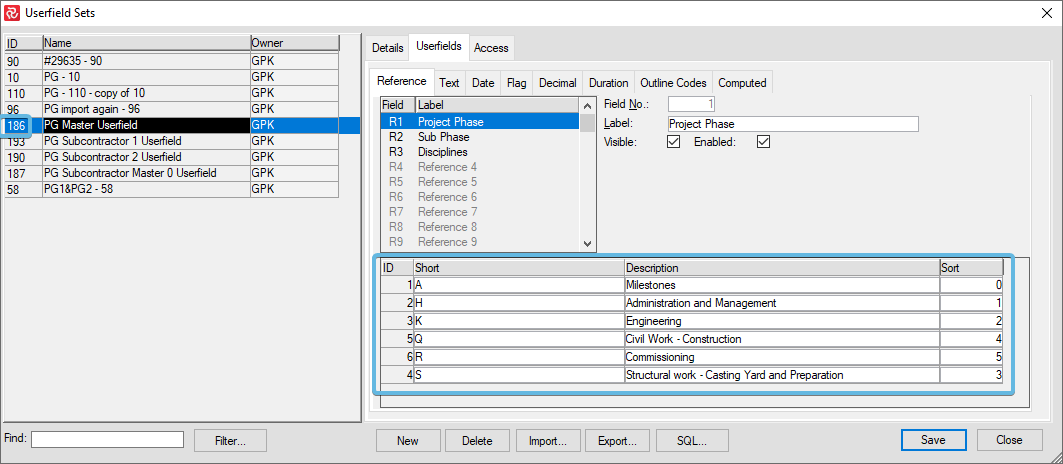
While ID 193, which reads from ID 186, has grey (none-editable) fields:
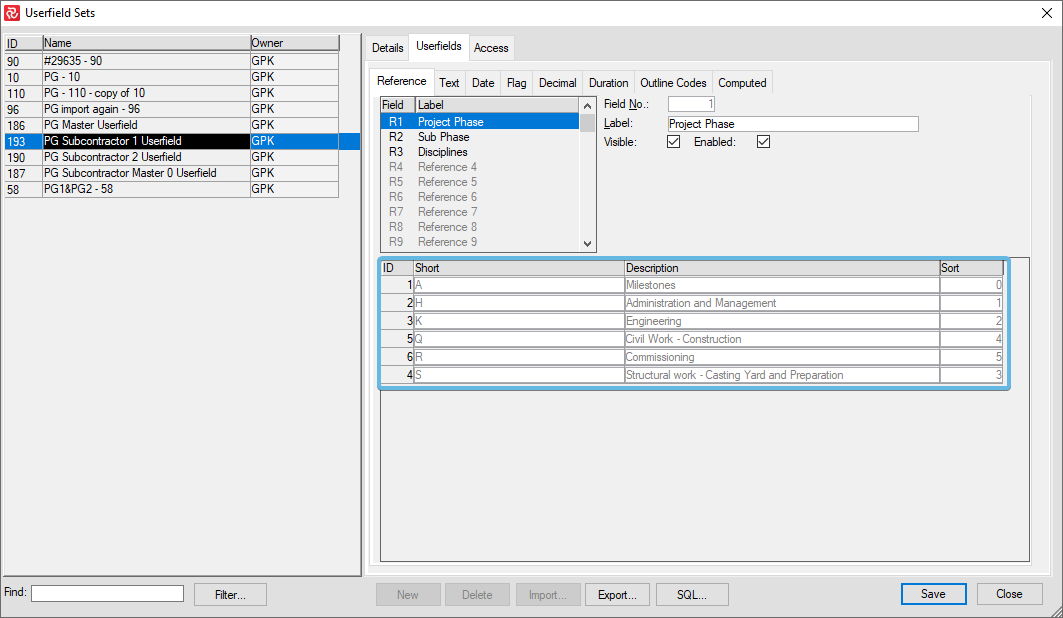
Similar functionality is available in other fields as well:
Outline Codes
Outline Codes allow you to create a corporate, project-specific, and user-defined hierarchy of activities and structure for your project. The breakdown structures by work, cost, organization, physical or other, all illustrate your project's division in successively greater detail. You can create multi-level codes consisting of uppercase or lowercase letters, numbers, or characters that you specify. As you define your outline codes, you create a lookup table that makes entering or assigning outline codes for each activity easier. A total of 30 Outline Code fields are available.
To define an Outline Code, set focus on a field and give it a relevant name in the Label box. Next, ensure that Visible and Enabled are checked. Then, select a maximum number of levels for the structure. The Max Level may be modified at a later time if required.
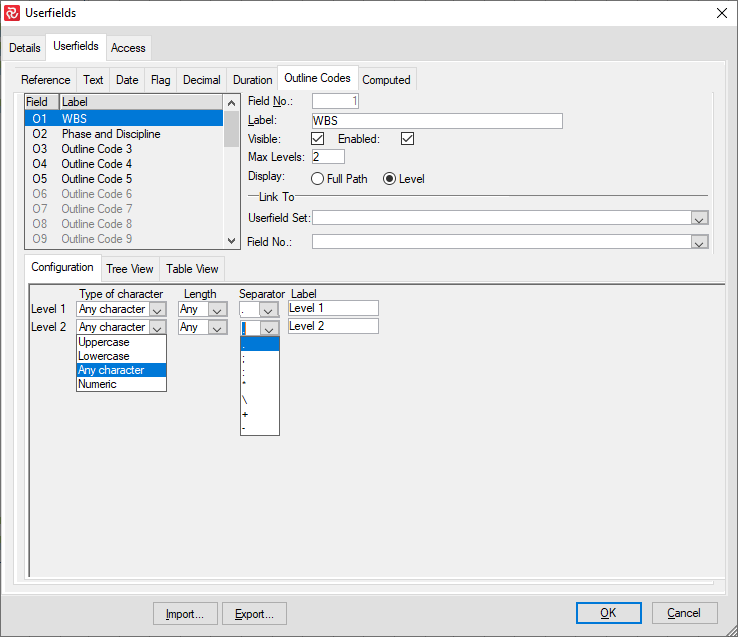
The Display Full Path/Level determines how the code will be presented when the field is shown in the barchart editor, either as the full path to the node chosen or just the selected node value.
Link To Userfield Set/Field number allows you to utilize existing code definitions from other Userfield sets in your database. This is often used to simplify/enforce corporate or industry coding standards.
When you have determined your Max Level, Safran establishes a list of levels in the Configuration panel. You can configure the type of character allowed, length, separating characters, and name/label describing the level for each level. The maximum number of levels allowed in Safran Project is 25.
After you have specified the basic characteristics of the outline code field, select the Tree View panel to enter Nodes and build your structure.
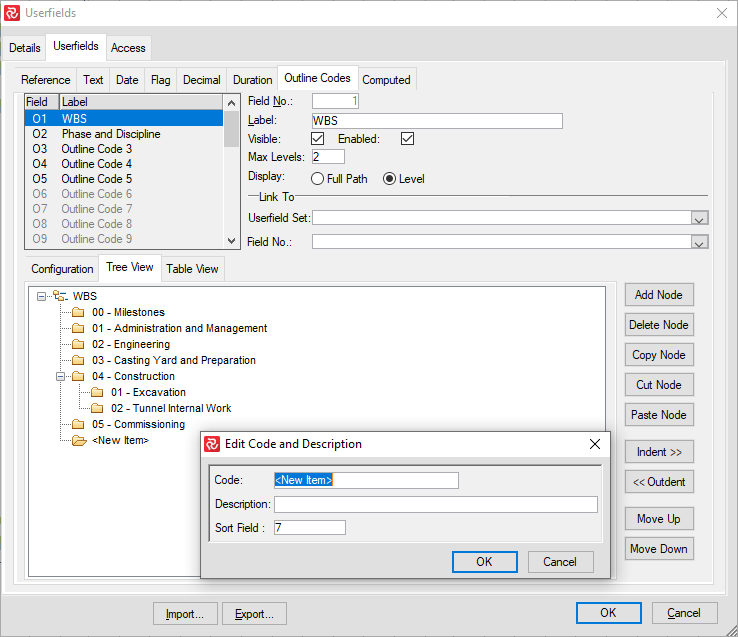
Press Add Node to add a new node. The new node will always appear as a sub-node of the node you have in focus. Each new node will have basic properties, i.e.:
Code = New Item / Description = 'blank' / Sort Field = Next available Number
Double-clicking a node opens an Edit window, allowing you to enter/edit your Code, Description, and Sort Field number values.
The Node manipulation functions are described in the table below:
| Function | Functional description |
|---|---|
| Add node | Adds a new node on the level below the node in focus. |
| Delete node | Deletes the node in focus. |
| Copy node | Copies the node in focus, which may be added under another node using 'Paste node.' |
| Cut node | Copies and remove a node after the node has been moved using 'Paste node.' |
| Paste node | Adds a copied node under an existing node. |
| Indent | Moves a node and its sub-nodes down one level in a structure. |
| Outdent | Moves a node and its sub-nodes up one level in a structure. |
| Move up | Moves a focused Node up one step. |
| Move down | Moves a focused Node down one step. |
Keep in mind that outline structures often become pretty extensive. The Userfields window may be re-sized/expanded by 'pulling' the lower right portion of the window frame.
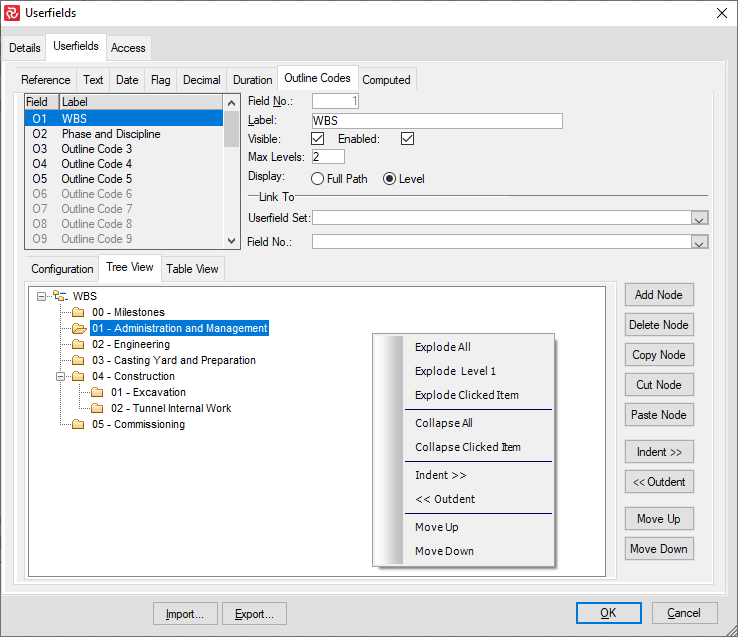
To simplify working with larger structures, several additional tools are available in the Tree View panel by right-clicking in the white/structure area, such as the Explode/Collapse functions.
The Indent/Outdent and Move Up/Down are also available from the context-sensitive short-cut menu.
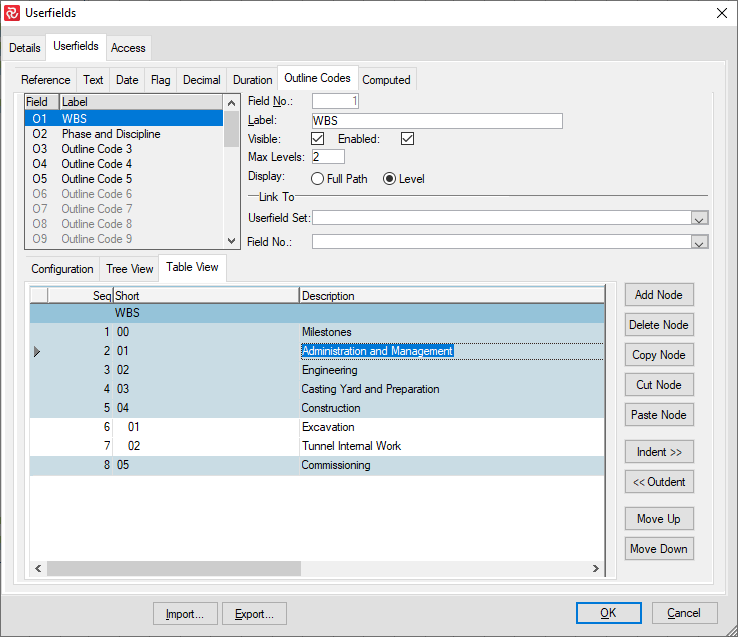
The Table View panel can simplify adding or editing your nodes' Short/Code and Description properties.
It can also be used to build your structure, as all the Add/Delete/Copy/Cut/Paste functions discussed earlier are also available in this panel.
Safran also allows you to quickly Export/Import an Outline Code structure/values via a tab-separated text file if you need to share an Outline code with a user on another Safran database/installation.
Building a larger structure from scratch might be more efficient than building the basic structure, i.e., nodes/levels in Safran, and then exporting the code to a file. The file may then be opened by Excel and edited to include the proper codes and descriptions. After editing, save the file as a Text (Tab delimited) type file.
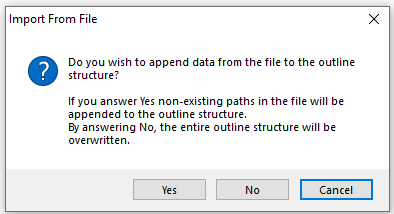
When you import nodes/codes/descriptions to an outline code, you can add/append new paths/nodes or replace the entire structure.
Building Outline Codes from Reference Fields
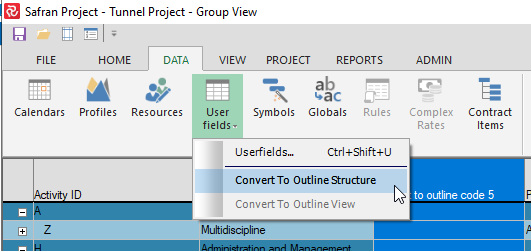
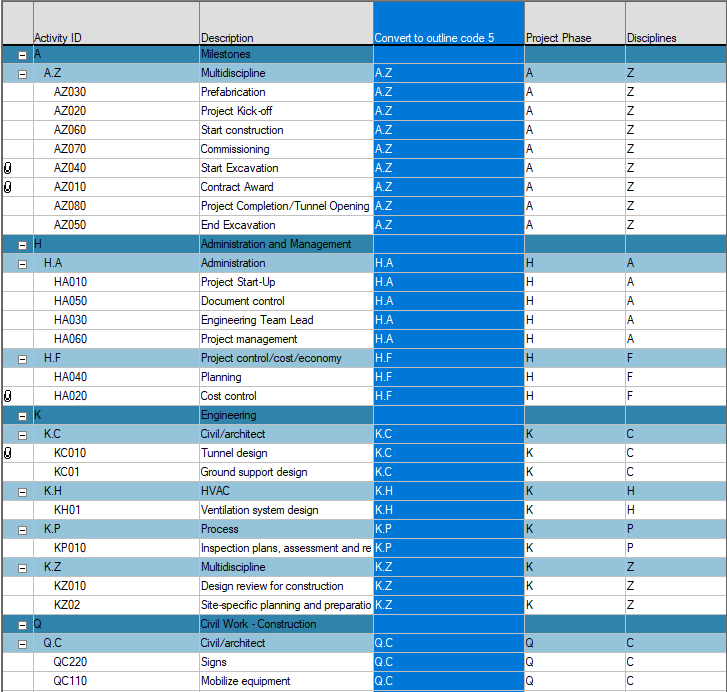
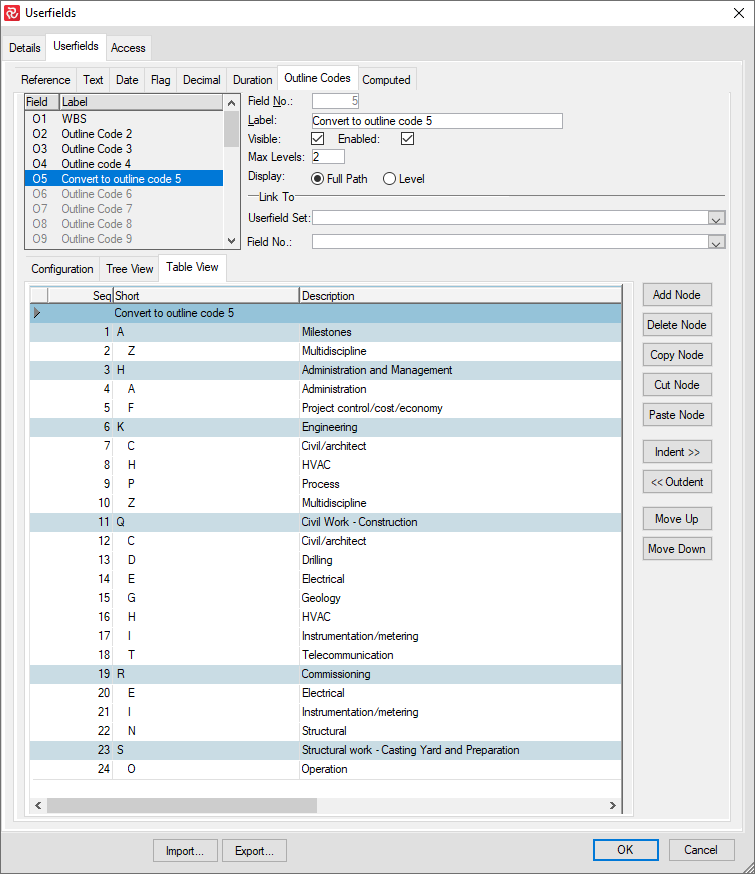
You may want to build an outline or a hierarchical structure from data already defined for two or more reference fields. For example, you may have reference fields for the project phase, discipline, and sub-phase. Now, you want to structure this into an outline. First, you define the new outline code. You open your Barchart Editor, group your Gantt according to the desired structure, add the new outline code to your columns, and select ‘Convert To Outline Structure’ from DATA > Userfields.
How to convert two reference fields to an Outline Structure
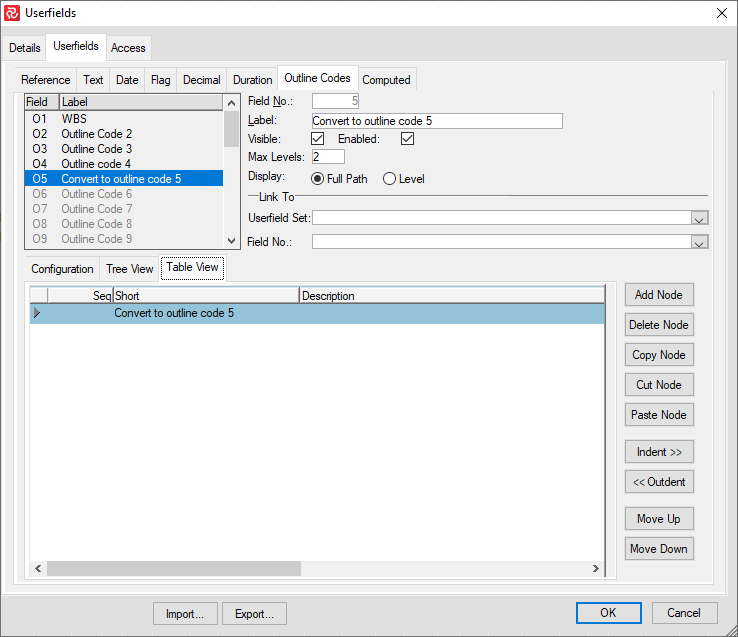
Define an outline code:
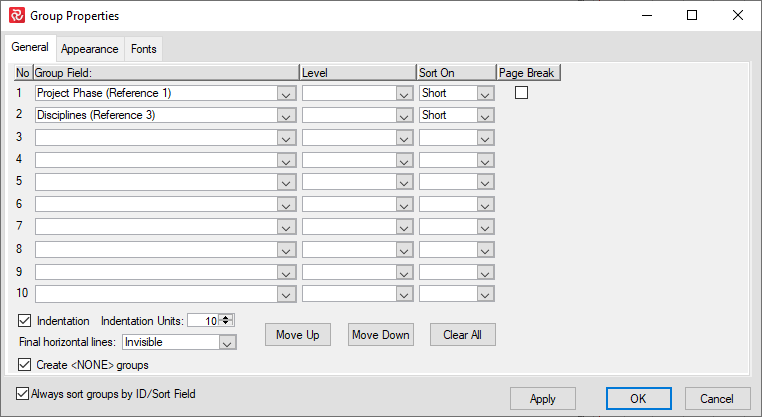
Open Group Properties and add the fields that you would like to convert to that outline code:
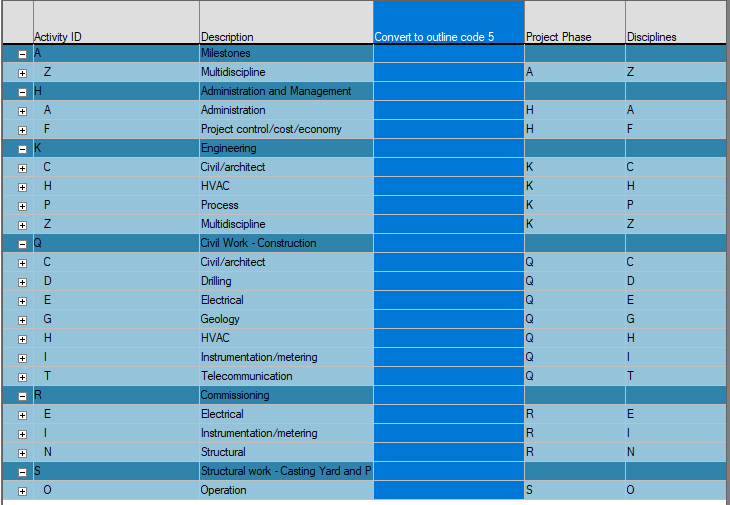
In Barchart Editor, add the outline code column and click on the column:
Click on the Convert to Outline Structure:
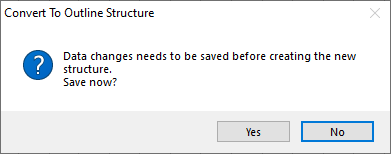
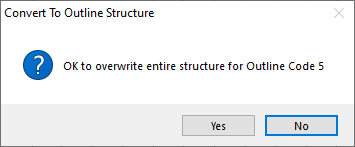
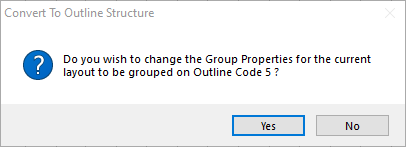
Click yes three times:
The result:
As the outline code levels can be used just as flexibly as individual reference fields for grouping and sorting data, converting reference fields into outline structures allows you to add new and other information into reference fields, using the outline codes where structures are in place.
Formulas for User-Defined Fields
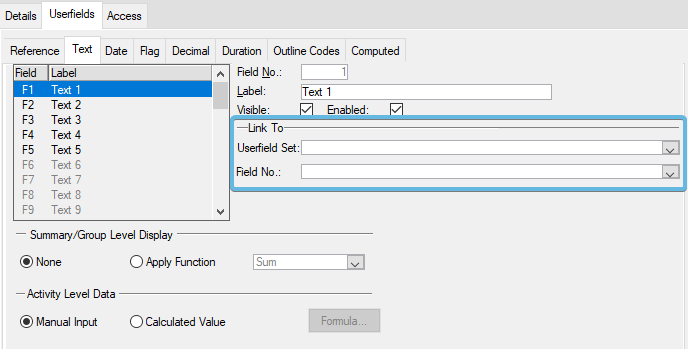
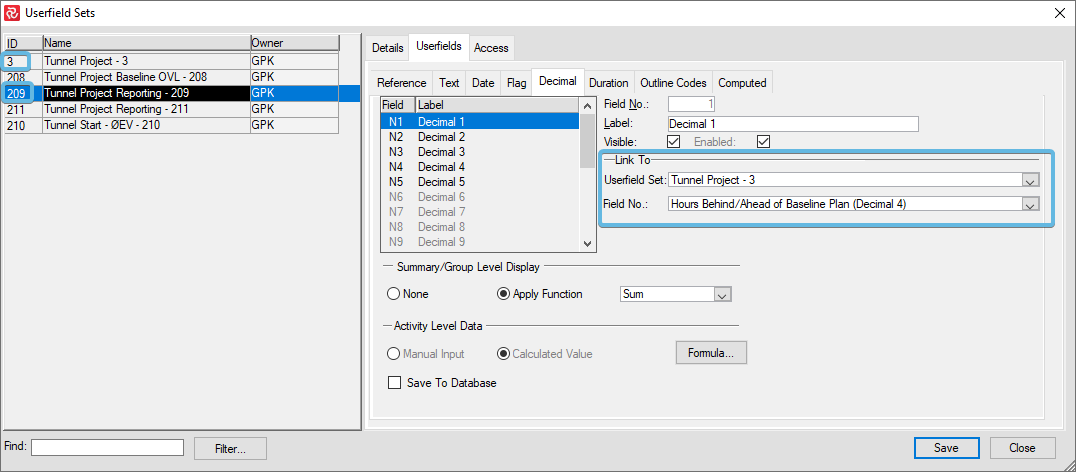
Safran Project lets you specify formula and filter expressions for the Text, Dates, Flag, Decimal, and Duration type fields. Using the formula feature, you can select a summary-level display for this field and determine if this particular field should be automatically updated as you enter other information or if manual input is required.
Create, for example, a Decimal field and add a formula like this:
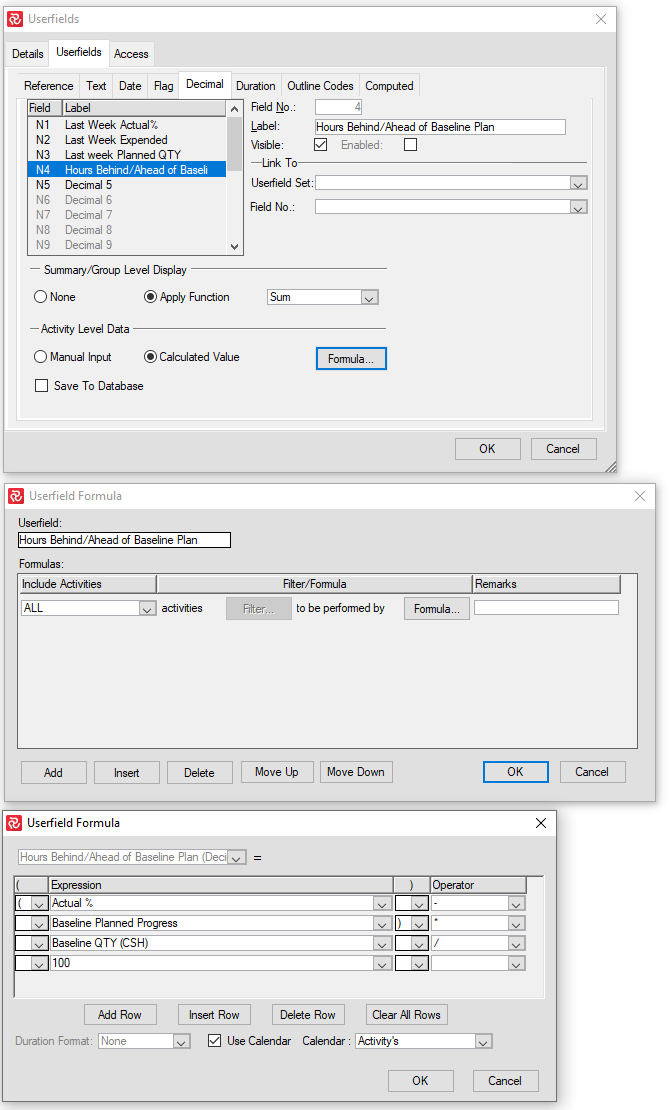
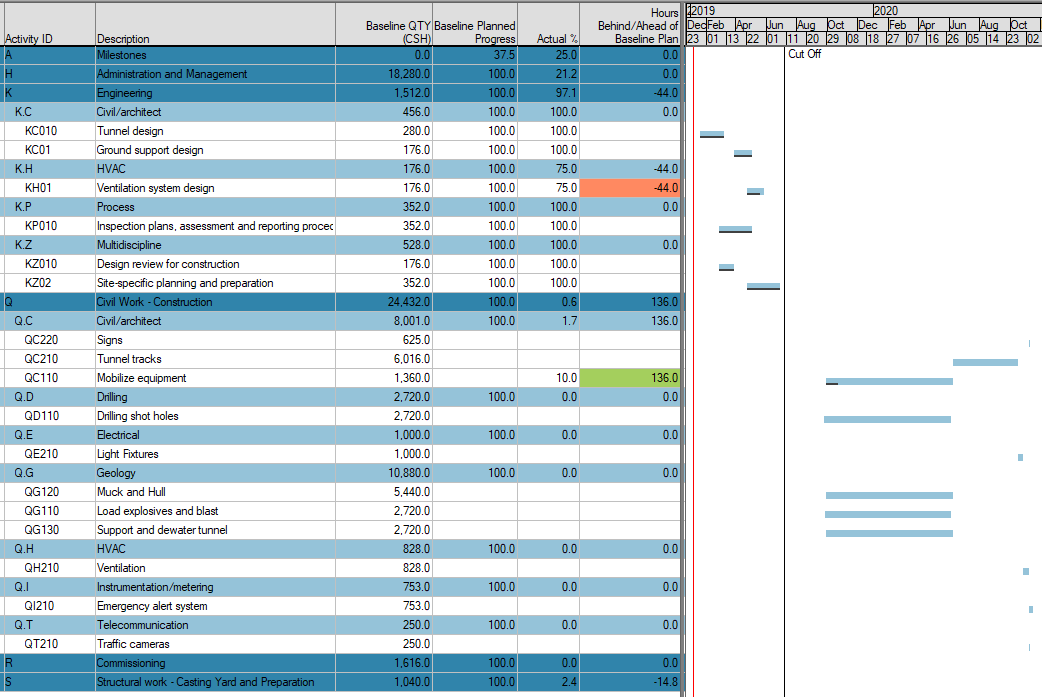
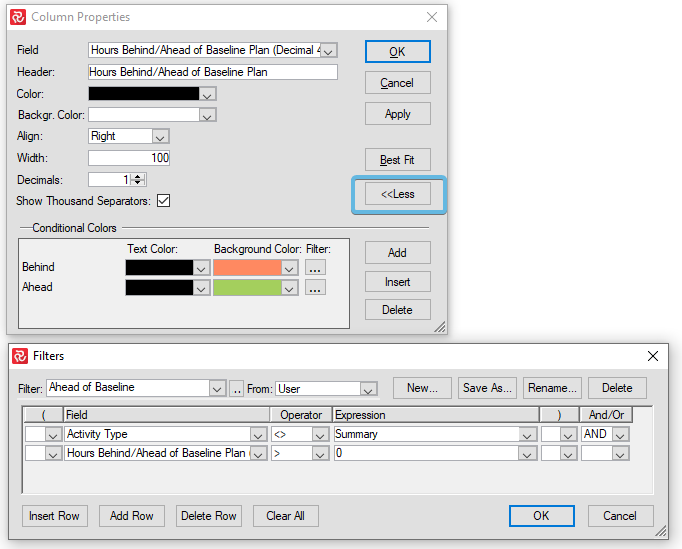
Together with Conditional Colors, you now can create a very effective Barchart Editor layout monitoring how many hours ahead or behind the Baseline Plan and Baseline scope you are:
If you have many projects in your database that want to make use of this kind of calculation, you may set up a Master computed userfield set and link your various userfields to the master:
Functions at the summary level include Min., Max., Average, Sum, Count, First, Last, and Calculate. The default definition for all userfields is the manual input option. When you choose the ‘Calculated Value’ option, you can specify the update formula and apply a filter to restrict the calculation to only a selected range of activities. The userfield formula dialog box allows you to build multi-line expressions with conditional computing using all, where, when, where, and remaining conditions and user-defined filters for each of these conditions and their formula.
Manual input works well with Assign Fields and Assign Field Packages.
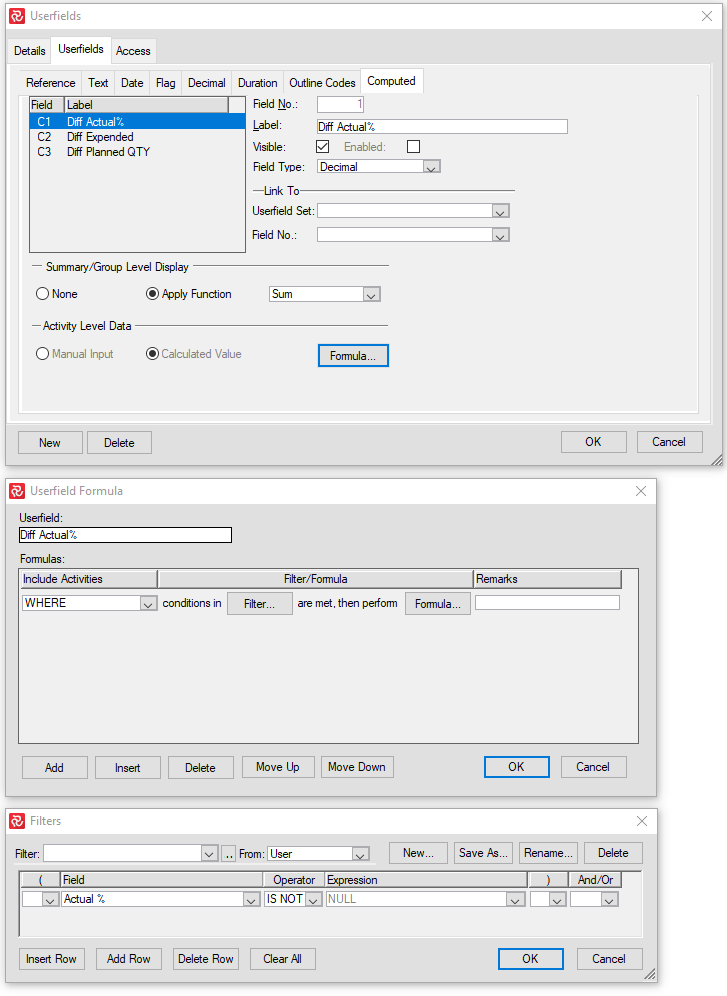
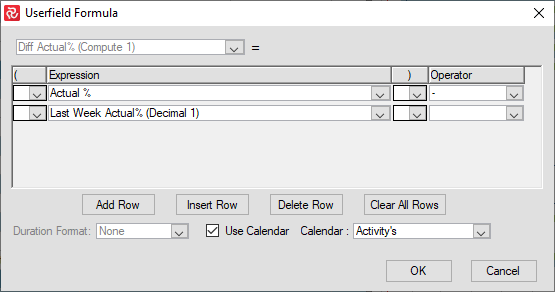
Computed Fields
Computed Userfields are used to perform calculations. Unlike the other userfields, you cannot manually enter data into a computed field.
When you set up a computed field, you must define its type. The field type depends on what output you want from your calculation, and you can choose between Decimal, Date, Text, Flag, and Duration. Safran Project has 50 computed fields.
After defining a new computed field, you can click the "Formula"- button to set up your desired calculations.
Note: The computed value is not stored in the database. It is calculated in real-time when the Barchart Editor is open.
Example:
Resources and Costs
You can develop a Critical Path Project that integrates activities, logic, resources, and cost to control your project effectively. Activity durations and their logical constraints are the basis for a CPM project; however, the resulting schedule does not consider resource requirements and availability. Your plan may not be regarded as complete until you consider the question of resources. Resources are physical elements needed to perform the work. They usually extend across activities and projects. You can assign a calendar and define the resource cost over time. To minimize the time and cost of a project, resources must be effectively controlled—particularly manpower or human resources.
The resources required by each activity and the quantities available over the relevant period will determine whether each activity can still be scheduled at its earliest possible date or needs to be delayed when the required resources are available.
When it comes to working with resources, the following tasks and issues should be considered:
- What resources are required?
- When will the resources be required?
- Definition of the individual resources required.
- The availability of each resource over time during the life of the project.
- The unit cost of the resource. Does the contract allow for constant cost rates throughout the project's life, or are complex rates with escalation tables and overheads required?
- An estimation of the resource(s) required for each activity in the project.
- Are the resources to be linearly spread or as profiles over the resource or activity duration?
Adding Resource Definitions
Defining a resource definition assists in data consistency and ease of data input for projects. Press the ‘New’ button (DATA > Resources), and a new line will be added to the list of resource definition sets. Enter the name of your new resource definition set.
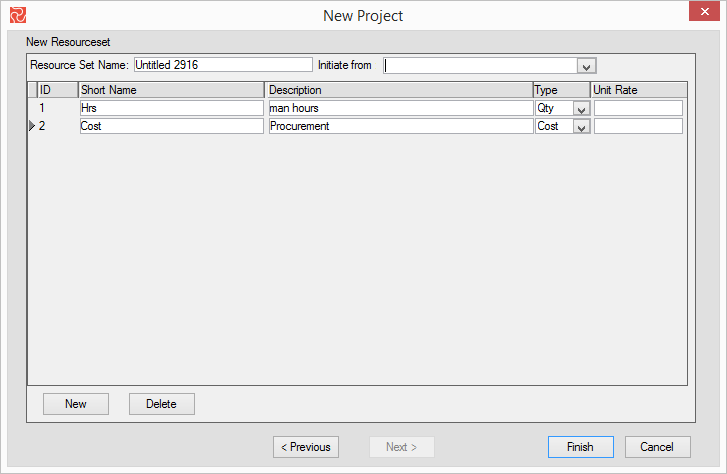
| Field | Description |
|---|---|
| Short name | Enter the resource shortcode. The application in the list box uses this code. |
| Description | Enter a long description of the resource. |
| Type | Specify the Resource type. Available options are QTY or Cost—only resources of type QTY will be considered in a resource leveling process. |
| Unit rate | Specify the unit of the selected resource. |
Deleting a Resource Definition
If a resource definition is not in use, i.e., associated with any resource requirements, you can delete it from your resource definition set. Highlight the resource definition to be deleted and press the Delete button on the sheet toolbar. You will be prompted by Safran Project to confirm the deletion of the resource definition.
Setting up Project Specifications
Many firms and organizations have developed standard userfield codes, working calendars, symbols, and resource definitions. This section guides you through the ways you can configure your project structure.
To configure a Project Set, e.g., 'Userfield Set,' go to the DATA Ribbon and Choose 'Userfield Set'. If you do not have the Project open, you will find it under the ADMIN ribbon.
The screenshot above shows that the 'Global Set' and the 'Rule Set' are grey. This is due to the opened Project not having any Global/Rule set defined in the Project Setup. To enable this, go to the PROJECT ribbon, choose 'Properties,' and add a Rule/Global set to the current project.

From version 22.1.00, it is possible to export and import Sets separately.
Calendars
Entering Calendar Data
Calendars consist of working hours per day, holidays, vacations, and other rest periods, allowing Safran Project to determine valid working periods. There is no need to enter hours per day for hourly-based calendars, only non-working periods. Safran Project supports unlimited calendars per project, facilitating extensive and complex requirements modeling. Calendar sets are assigned to each project, specifically to your project plan's activities, resources, and constraints. For example, if specific work requires a 5-day workweek, while other activities are performed during a particular period, you may create different calendars and assign various activities to each. Safran Project utilizes calendar information in all calculations involving dates, time arithmetic, schedule analysis, resource-load calculations, aggregate, etc. Calendars are essential in defining detailed and accurate schedules.
Specifying Calendar Units
The minimum unit for activity duration is controlled by the calendar type entry and is specified for your project. If you assign a calendar set specified with hours as units, all activity durations are perceived as hours during input and all calculations involving time arithmetic.
Specifying Calendar Span
You specify the calendar span for the entire project by entering a calendar start date and a calendar finish date.
Adding a New Calendar
Select Calendars from the DATA ribbon and select New Calendar on the right-hand side of the calendar editor window.
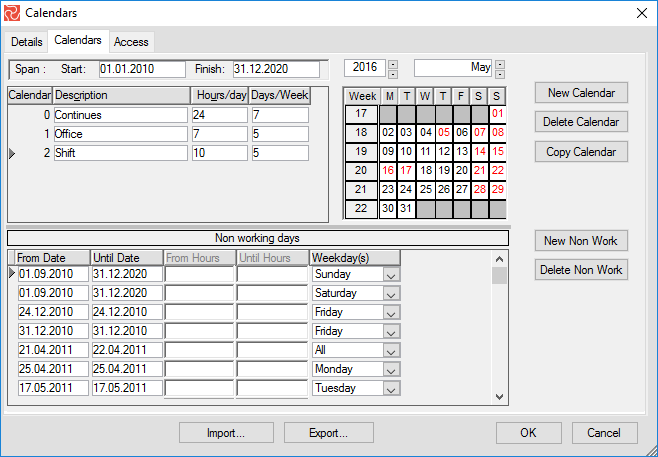
Safran Project now adds the new calendar line to the calendar editor window and defaults to using 7.5 hours daily. Now, you may enter your data, including a description of the new calendar.
| Fields | Description |
|---|---|
| Calendar | The calendar work pattern number is a number assigned by Safran Project. |
| Description | Enter a description for your calendar hours. |
| Hour/day | Enter the number of working hours per day. They are used for computing staffing workload. |
| Days/week | They are used when calculating Activity durations when duration is entered as a number of weeks. |
| From | Enter the start date for the non-working period. |
| Until | Enter the end date for the non-working period. |
| Weekday(s) | Enter a weekday as the non-working day or select all to indicate vacations or other nonworking periods. Single-day exceptions can also be made for dates that should waive the regular patterns. |
Copying a Calendar
To copy an existing calendar, choose the Copy Calendar option on the right-hand side of the calendar editor window.
Importing and Exporting Calendar Data
The Import and Export options used to export and import non-working period data for a selected calendar will be found at the bottom of the calendar editor window. You can use these options to quickly build a new calendar set with individual calendars from different calendar sets in your Safran database.
Specifying Non-Working Periods
Click the "New Non-Work” button, and Safran Project adds a new line to the non-working days table in the calendar editor window. Use this table to enter further non-working information. Time off may be entered as a specific date, for example, January 1st, a weekday (Saturday, Sunday), or a vacation or holiday period spanning several days or weeks. In either case, Safran Project requires both the From and Until date to be entered. If you work on an hourly or minute-based calendar, the from/until date may be specified to the hour using the additional from/until hour fields.
It is also possible to define Work Exceptions as individual dates or a range of dates that need to contradict the regular pattern of Non-Working Periods. For instance, if every Saturday is usually defined as Non-Work, it is possible to override this for one or more Saturdays that should still be work days. This makes it less cumbersome to define and administer complex calendar definitions.
Recommendation:
It is possible to enter non-working periods and not set a From or Until date, e.g., every Saturday or Sunday.
Recommendation if you are going to import the Safran plan into Synchro:
If you know you will send your Safran plan to Synchro, it is highly recommended to add every non-working period. If you have a week of non-work in a day-based calendar, add this to the Non-Working period as seven individual lines of non-work.
Deleting Non-Working Periods
Select the Delete Non-Work option in the calendar editor window to delete the selected non-working line.
Renaming a Calendar
To rename a calendar, edit the calendar description field. You are only allowed to edit the calendars of calendar sets where you have been given update access rights. Save your changes to the database after editing the calendar name to store the new name.
Assigning a Calendar
The different calendars are assigned to activities, constraints, and resources that comprise your project’s plan. By giving other calendars, you may create a project plan that allows you to plan and control complex project requirements. By default, Safran Project suggests calendar 0 for all activities, resources, and constraints. If you have defined additional calendars, you may assign them to the project elements using the appropriate forms or editors.
Changing Calendar Data
Rest periods and time off can be added to calendars as described above. Modifying an existing calendar by changing/deleting time-off periods or adding new ones may affect associated activities. If so, this will also affect your plans and schedules.
Keep in mind that once a calendar is used on an activity/resource that has been part of Baseline process or Status Update, the calendar in question will be presented in grey and may not be modified. This is due to the fact that changing a calendars characteristics would in this case potentially change historic data.
Deleting a Calendar
Choose Delete Calendar from the calendar editor window to delete the current calendar. You cannot delete a calendar if assigned to an activity, constraint, or resource requirement.
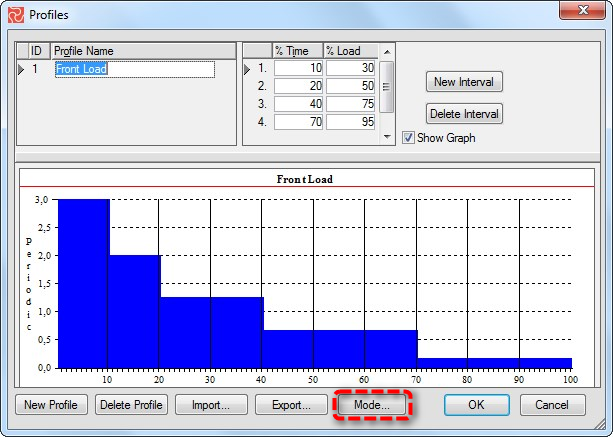
Profiles
Safran Project has facilities for distributing resource requirements and associated costs in two ways: linear or based on user-defined profiles. By default, Safran Project performs a linear distribution. This may be overridden by user input.
Linear Distribution
Safran Project evenly distributes the resource requirements (and cost) across the resource's duration. In Safran Project, resource requirements may have delays and durations. If you assign your help a time, Safran Project will spread the need proportionally over the resource duration, applying the resource delay to calculate the required resource's start and end date. By using multiple resource requirements, including delays and durations, it is possible to create complex resource profiles when summarized to the activity level.
Profiled Distribution
As an alternative to the proportional or flat-load distribution, using profiles provides a quick way to spread your requirements over time based on user-defined distribution profiles. Again, Safran Project does all the work for you, spreading the resource requirements over time. For example, you might anticipate using a resource to be intensive at the beginning of an activity and taper off towards completion. A graphical representation of this requirement would describe a front-loaded curve. Safran Project distributes any resource requirement according to the profile you define. When utilizing a distribution profile on your resources requirement, combining this with resource delays and durations is possible. The profile will then be applied to the specified duration of the resource requirement.
Adding and Editing Distribution Profiles
To add or edit existing profiles, select Profiles in the DATA ribbon. Select New Profile in the profiles window. Enter your name in the profile name field and the necessary reference points in the % time and % load fields.

The ‘% Time’ field represents a point in time relative to the resource duration. The ‘% Load’ field represents the corresponding cumulative percentage of the total resource requirement to be used. Safran Project requires all percentage values (Time/Load) to be entered as integers. You may enter a maximum of 100 x y points to help define the shape of a distribution profile, although only a minimum of 2 x y points is required (0,0 and 100,100).
Viewing a Profile as a Curve or as a Histogram
The profile's graphic representation may be viewed as a curve (Cumulative) or a histogram (Periodic). To switch between these views, click the Mode button in the graph area.
Deleting a Profile
Highlight the profile you would like to delete and select Delete Profile. Safran Project asks you to confirm the deletion of the profiles.
Importing & Exporting Profiles
Safran Project supports both tab-separated text files and XML files.
Resources
You can develop a Critical Path that integrates activities, logic, resources, and cost to control your project effectively. Activity durations and logical constraints are the basis for a Critical Path; however, the resulting schedule does not consider resource requirements and availability. Your plan may not be complete until you consider the question of resources. Resources are physical elements needed to perform the work. They usually extend across activities and projects. You can assign a calendar and define the resources’ cost over time. To minimize the time and cost of a project, resources must be effectively controlled—particularly human resources. The resources required by each activity and the quantities available over the relevant period will determine whether each activity can still be scheduled at its earliest possible date or needs to be delayed until the required amount of resources is available. When it comes to working with resources, the following tasks and issues should be considered:
- What resources are required?
- When will the resources be required?
- A definition of the individual resources required.
- The availability of each resource over time during the life of the project.
- The unit cost of the resource. Does the contract allow for constant cost rates throughout the project's life, or are complex rates with escalation tables and overheads required?
- An estimation of the resource(s) required for each activity in the project
- Should the resources be planned linearly spread or as profiles over the resource or activity duration?
This may seem like many options, issues, and questions to consider, and it looks like a lot of work. Below are the steps to follow.
Defining New Resources
Choose Resources from the DATA ribbon to add or modify resource definitions in your project.

Choose New to add a resource definition to your resource definition set. Safran Project inserts a new line, a resource record, in the window.
| Field | Description |
|---|---|
| Short Name | Enter the resource shortcode. The application in the list box uses this code. |
| Description | Enter a description for the resource. |
| Type | Specify the Resource type. Available options are QTY or Cost. Only resources of QTY will be considered in a resource leveling process. |
| Unit Rate | The rate per unit for the resource. Available only for QTY-type resources. The Unit Cost Rate is used in cost calculations. |
Deleting a Resource Definition
If a resource definition is not in use, i.e., associated with any resource requirements, you can delete it from your resource definition set by clicking the Delete button.
Userfields
For information on adding, modifying, and deleting Userfields, please read the Userfields (User Defined data/Activity Codes) section and subchapters.
See Enterprise Fields for user-defined codes defined per Project ID (instead of per Activity ID).
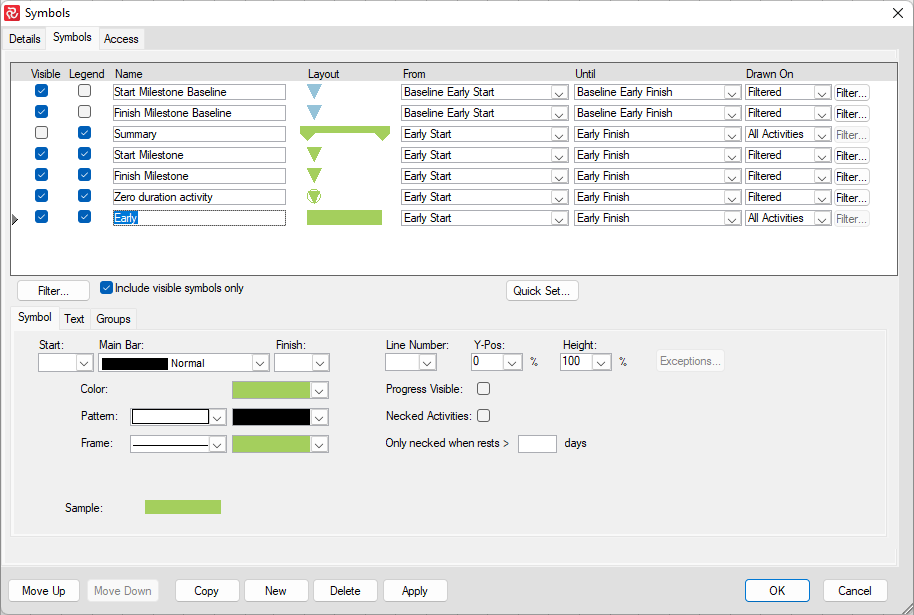
Symbols
User-defined symbol sets allow you to customize the barchart view for presentation and analysis. The symbol sets hold your plan's defined symbol styles and annotations. You can configure the activity bar's size, appearance, format, color, position, and other elements. Show one or more bars for each activity. Include conditional symbols for groups of activities or single activity annotation. You can use the symbols to define a standard set of bars for your project and then choose the bars, symbols, and text annotation you want to show. Symbol styles are saved as part of your barchart layout.
Symbols highlight or show different parts of the schedule; for example, a baseline bar, a current bar, a progress bar, or symbols with bars spanning user-defined dates.
In the following chapters, you will learn how to set up a symbol set and how to create/modify bars within a symbol set.
Symbol Definitions and Layouts
Symbols are used and displayed as part of the Barchart Editor layouts. Layouts store and hold the definitions of your library of different configurations. You will probably create different layouts to visualize your project schedule to various stakeholders and highlight your project from different views. The use of symbols can be layout-specific. This flexibility, combined with the capability of unnumbered layouts and symbols, is an excellent advantage in reporting.
Please study the Barchart Editor section for full details on creating layouts and working with the Barchart Editor.
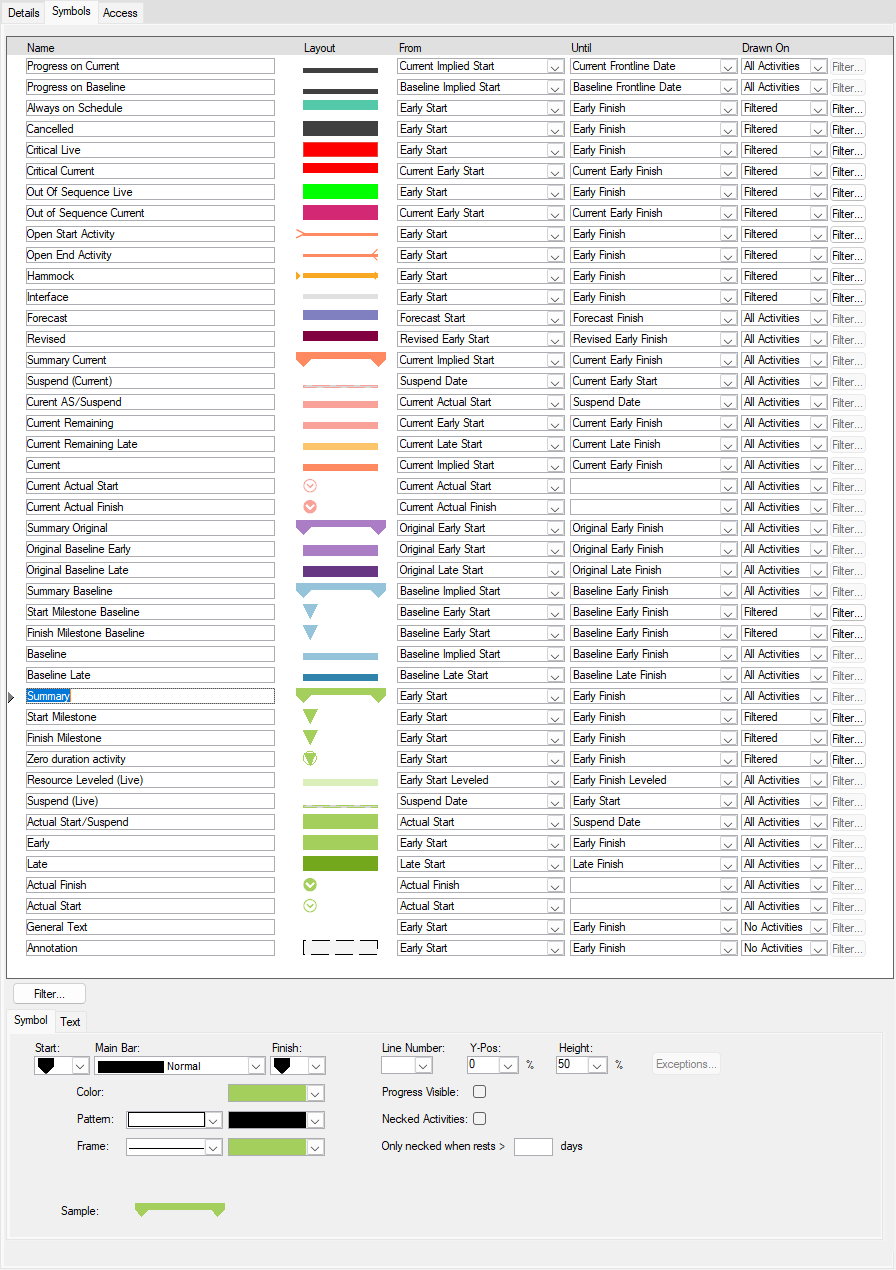
The Safran Project Default Symbol Set
Feel free to use the default symbol set that Safran Project provides or create/use your own.
The Symbol Set
Defining a new Symbol Set
A project symbol set is usually defined using the project setup wizard. However, a user would sometimes like their symbol set used in specific personal layouts.
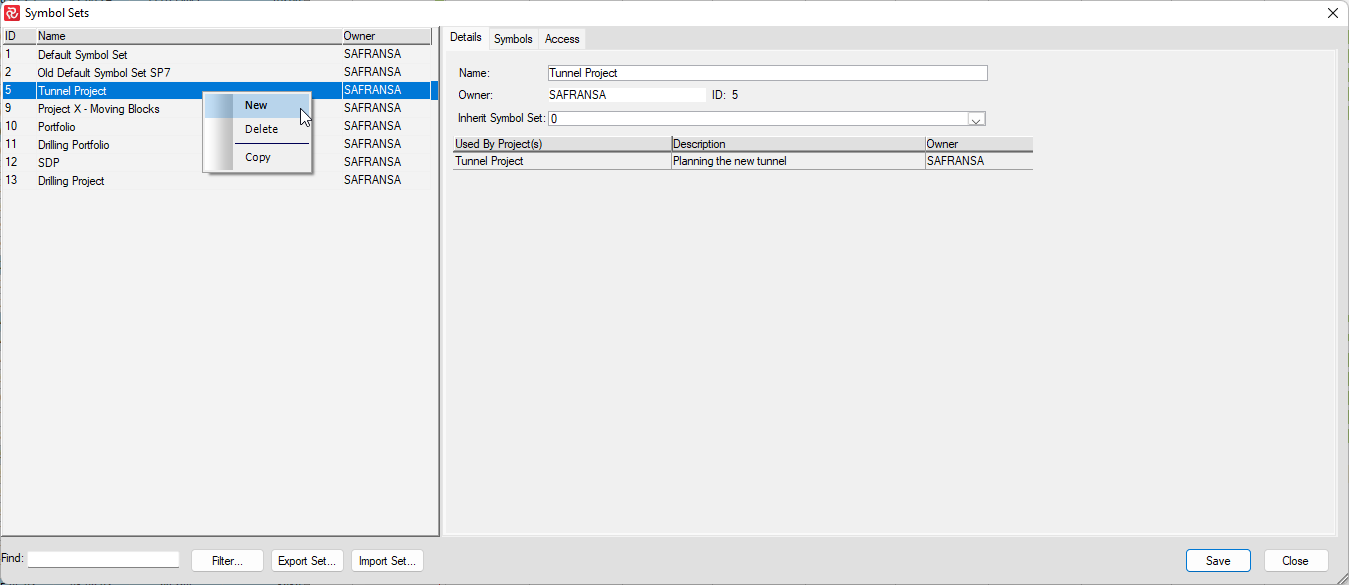
To define a new symbol set without using the wizard, go to the ADMIN ribbon and choose 'Symbol Set.'
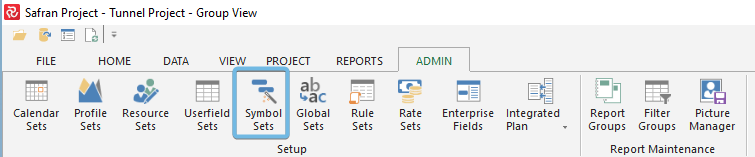
Right-click and choose 'New' or 'Copy'.
You may copy (and then modify) one of the existing symbol sets in the database or create a new one.
If you choose 'New,' the new symbol set will contain all the Safran Project Default Symbol Set symbols. Your new symbol set may be used as is or modified.
You may also import a symbol set.
When working on a project, this project will already have a symbol set defined. Go to the PROJECT ribbon and choose 'Properties' to view the name of the Project's symbol set:
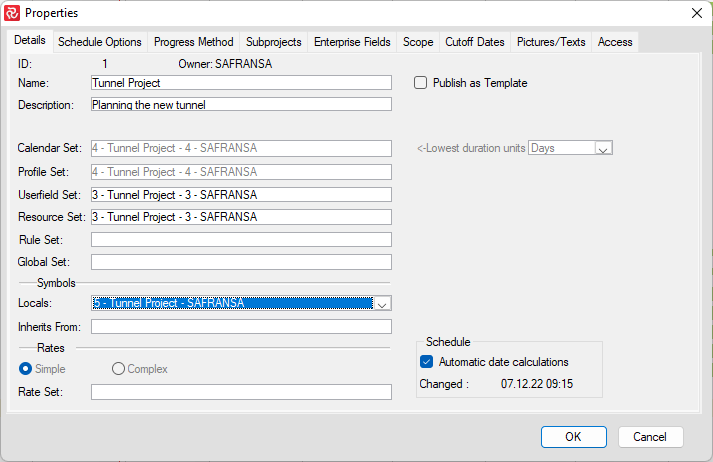
Note: In the layouts window, you may specify which Symbol Set the current layout should use. It does not have to be the Project's Symbol Set:
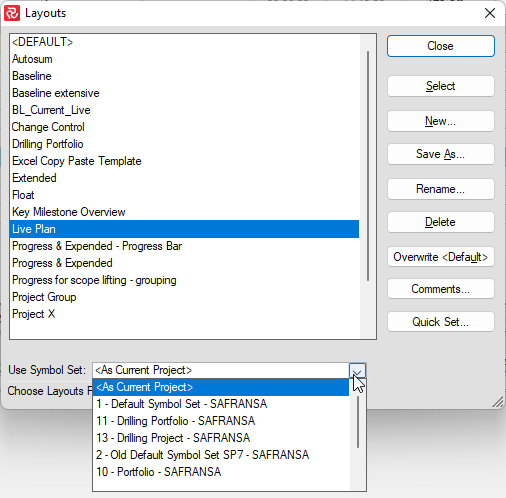
See the chapter on layouts for more information.
Opening the symbol set
Choose Symbols in the DATA ribbon to view the defined symbols, edit existing symbols, create new symbols, or remove/delete a symbol.
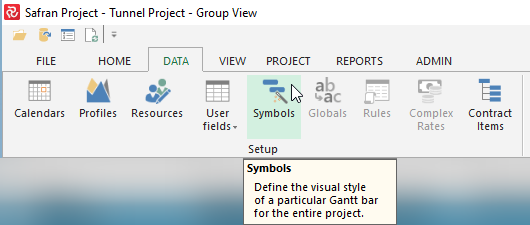
You may also use the quick access shortcut (right-click in the barchart).
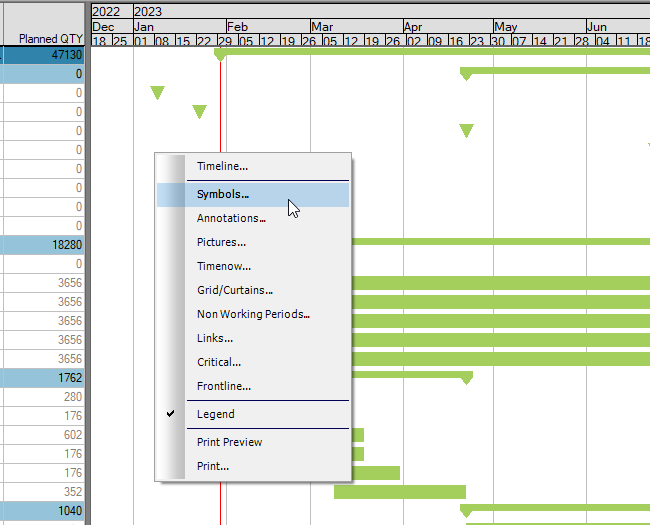
Include visible symbols only.
This flag allows you to reduce the number of symbols you see when opening the symbol set.
Ticking/Unticking this flag only affects your user.
This option will show only those symbols ticked 'Visible' or 'Legend.'
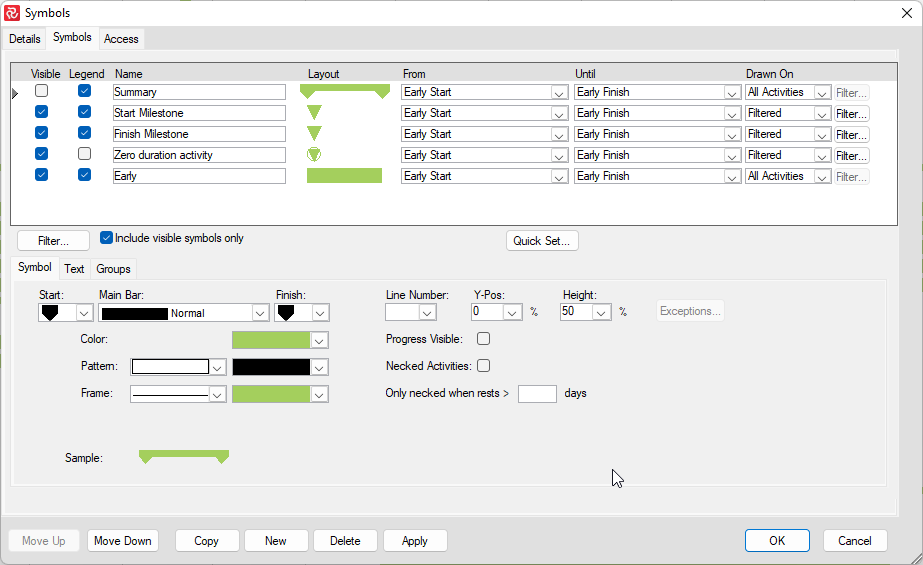
'Visible' means that the symbols will be visible in the barchart.
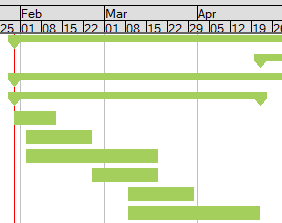
'Legends' means that they will show up here.

When printing/saving to PDF, you also have various legend options in 'Page Setup.'
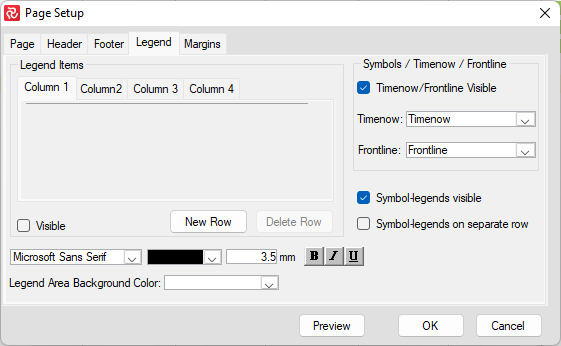
Moving symbols up/down
The ordered list of bars in the symbol set plays an essential part in how the symbols are displayed in the barchart. Notice how the blue Baseline bar shows on top of the green Early bar due to being on top of the list instead of at the bottom.
IMPORTANT: If you change the order in the symbol set, you will change the order for all users.
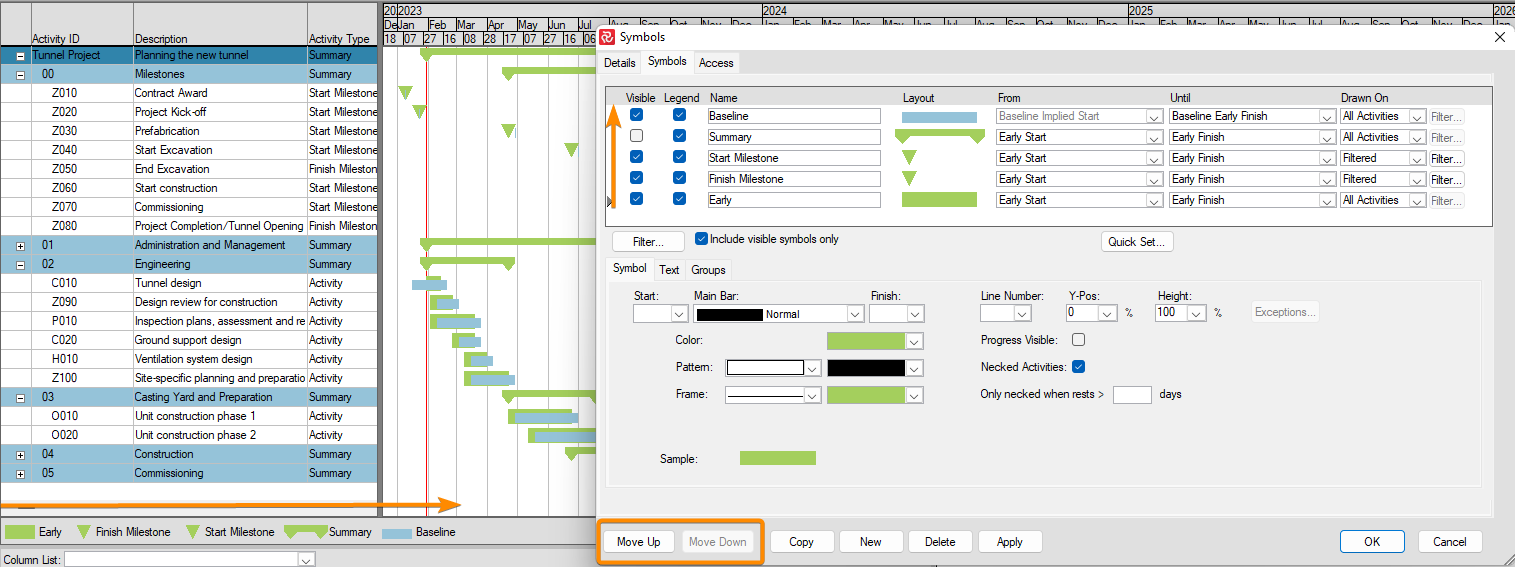
Before potentially moving symbols up/down, it is good to ensure that you have not ticked the 'Include visible symbols only' or have added a filter (ref. below)
Limiting the number of symbols in the window
Click on the 'Filter' button to limit the number of symbols.
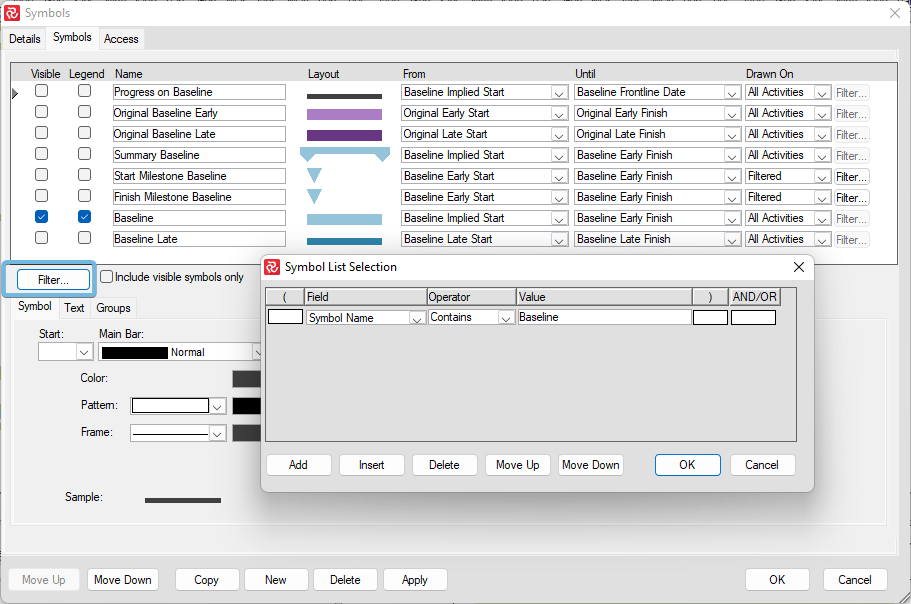
Adding a filter such as this only affects your user.
The symbol bars
Adding a New Symbol
Click 'New'. A new "untitled" symbol will be added to your symbol list. Rename the symbol and use the panels to configure symbol attributes.

Deleting a Symbol
To remove a symbol from your symbol set, highlight the symbol and click 'Delete.' Safran Project prompts you to confirm the deletion of the symbol style.
The Activity Bar Record
You can set up your barchart to display as many bars as are needed. Each bar shown for an activity/milestone must have a record defining its span. You select the span dates from the start and finish drop-downs.
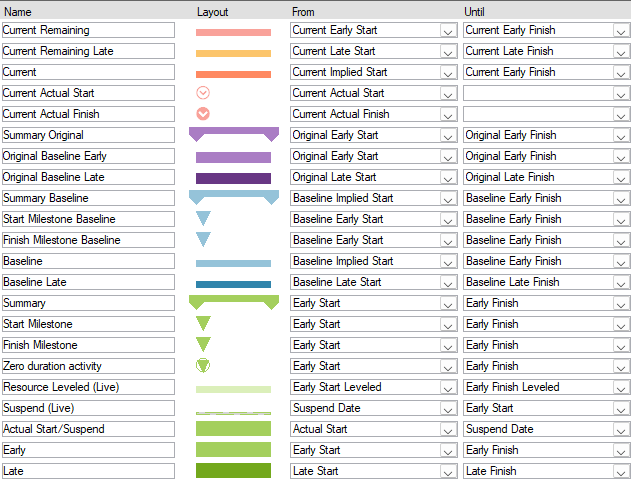
The start field holds the name of the field providing the start date for the graphical bar feature, and the finish field contains the name of the finish date field for the graphic bar feature.
Conditional Bars
By specifying a filter, the bar can be shown for all activities (default), no activities, or a group of selected activities. To do so, mark the Filtered Activities button and choose Filter from the shortcut or edit menu.
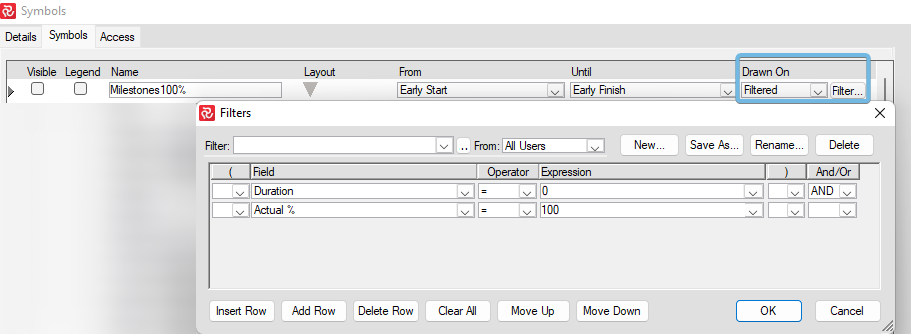
This option allows you to define conditional bars and symbols. The condition may, for example, be based on float or criticality, selected parts of your project or work breakdown structure, and many more.
Symbol Bar configuration overview
You can set up symbol configurations in three tabs: Symbol, Text, and Groups.
The symbol tab
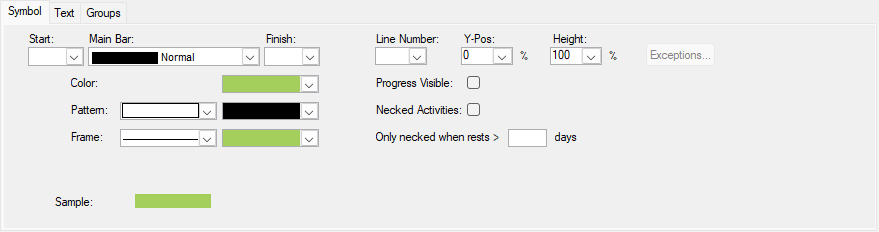
The text tab

The group tab
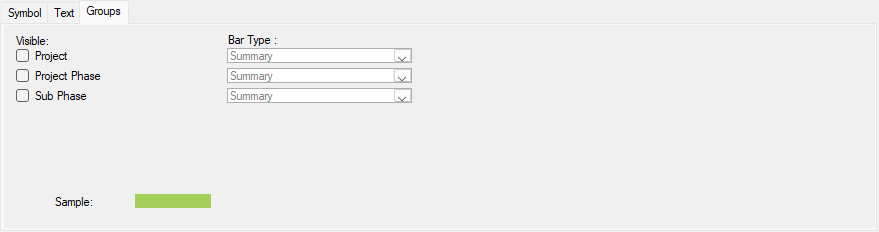
Choosing Symbols and Colors
An activity has three parts: a start symbol, the activity body or the main bar, and the finish symbol. Select the Symbols tab to select available industry-standard symbols or change colors.
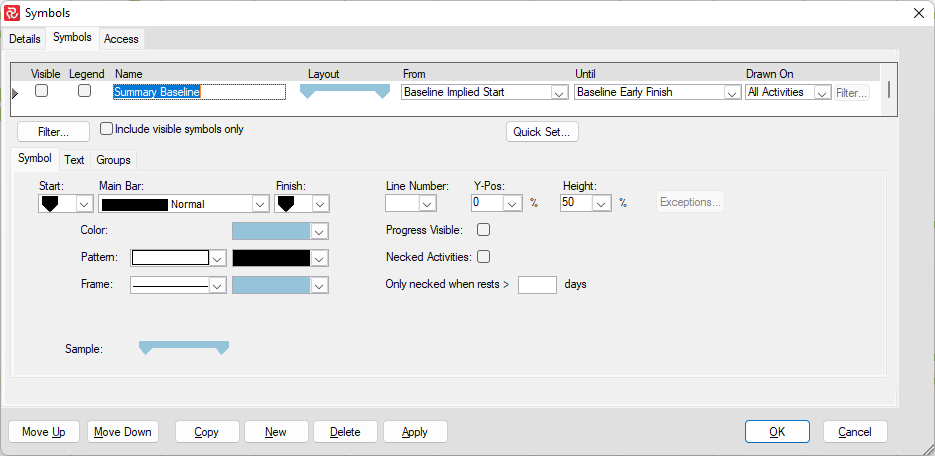
The start and finish symbols can be selected from a list of 190 graphical shapes.
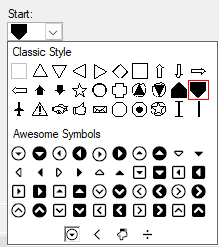
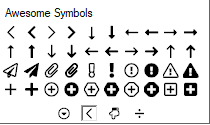
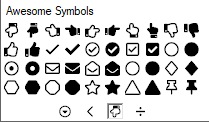
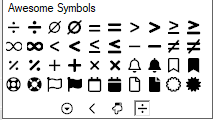
The main bar may be configured by selecting from 5 bar styles: 97 colors, eight patterns, 97 pattern colors, and 97 frame colors. The bar can be specified with pattern, frame, and style.

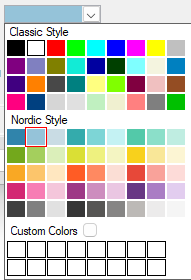
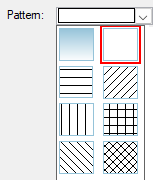
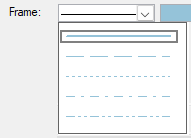
Choose Line Number
A symbol may be positioned relative to the activity row by selecting a line number. Valid positions are 2, 1, 0, -1, - 2.
Specify Bar Position
You can specify the symbol and bar offset by entering values in the Y-position and height fields. The Y-position is relative to the activity line counted from the top-of-line.
 {height="" width=""}


Necked Activity Bar
Mark the Neck check box to show rest and non-work time as a neck in the bar. Rest and non-work time include holidays and weekends.


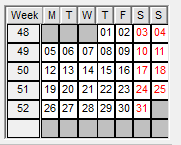
To restrict necking, you may enter a minimum number of non-working days before Safran draws a neck.

Showing Data on Bars
The text attribute allows you to add free text or include data items to be displayed with the activity bar for reference or information. The text label has three parts: a free text, Activity fields, and a free text. Enter your text or select a field from the drop-down, then specify the appearance by choosing color, character size, and font attributes Bold, Italic, or Underline for the text field.
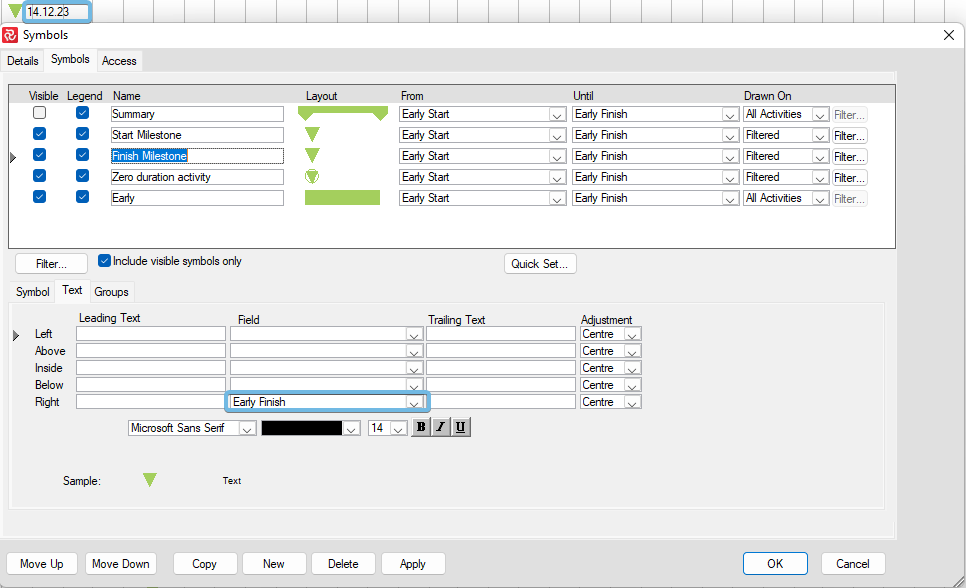
Free text and activity fields may be positioned to the left or right of the bar, above or below the bar, or inside the bar. Relative to these positions, the text can be aligned by selecting options from the Adjustment drop-down list. The Sample lets you preview the bar label position as you make changes. Select the position that suits your requirements from the available options.
To Specify Summary Bar Attributes
You may define the look and feel of your summary bars in your Barchart Editor. For the group tab to be active, your layout must be organized or grouped, then choose the Group tab. Now, you can mark the visible check box and specify properties.
The Group bar shows a continuous bar for each group. Since the summarized activity may contain periods when no work occurs, the continuous bar may not accurately represent the total duration.
By selecting the detailed bar, you can show planned work more accurately, as this bar indicates inactive time by a broken bar. Group bars may also be defined as a necked bar or a necked bar, including holidays.
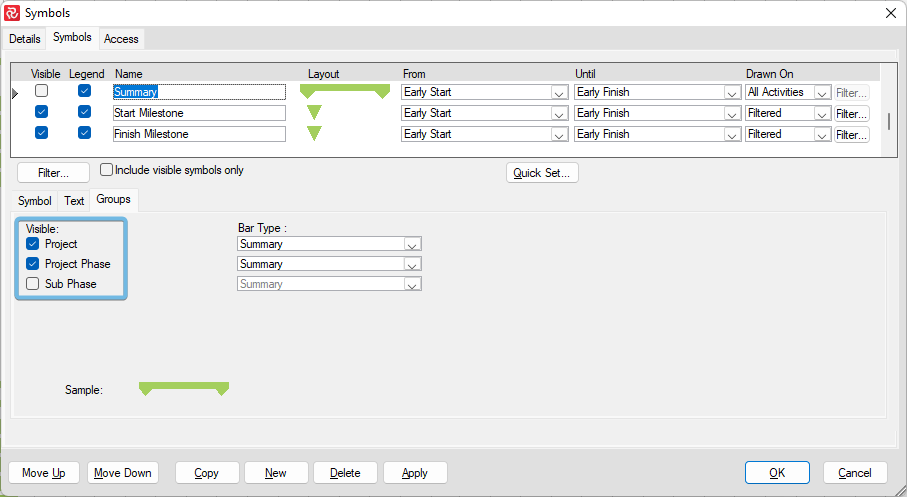
The Group tab can only be accessed if you work within the Barchart Editor and if Group Properties are defined.
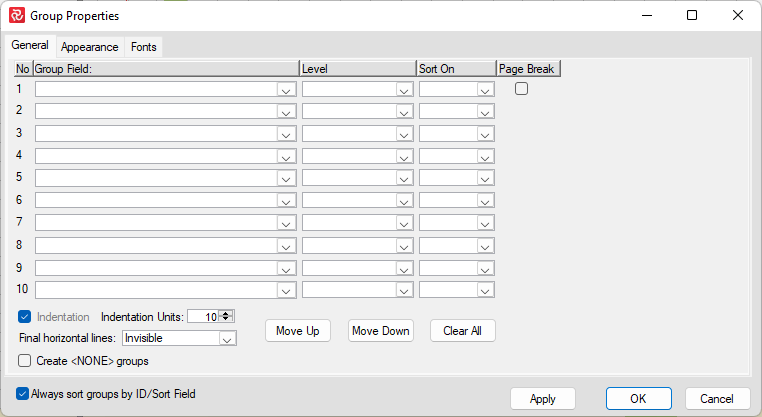

Globals
You can define variables for your project that Safran calls Globals. The definition of Globals includes type and value. Globals can be used throughout your project as a set of particular fields, e.g., for creating a text global with the value “hello” or setting a date global to 12.10.06.
Defining the Globals
Global definitions are stored within the Global set, and you must choose a Global set for your project to use this feature. You can define as many Global sets as required, and each Global Set can contain as many Globals of text, dates, or numbers as needed for your project.
To define a new Global, select Global in the DATA ribbon.
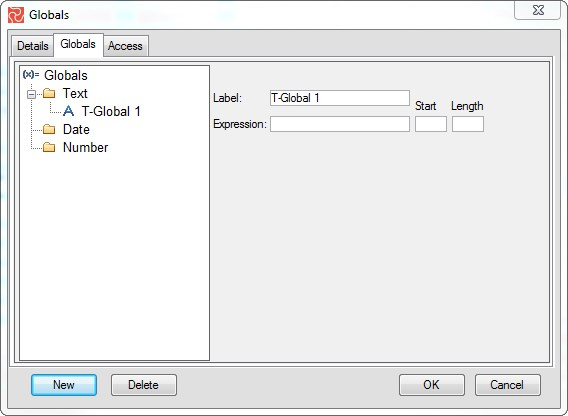
Select the global type and New in the Globals window to define new Globals. The Text global can be set to any text or selected from project text attributes. There is also the option to set the global as part of these text strings by specifying the start position and length of the text string. Date Globals can be set equal to a specific date, or you can select the date global relative to a set of system dates such as Today, Timenow, Cut-Off, etc. A decimal or integer defines the Number global.
Using the Global
Once you have defined the global and its expression, you can use it as an ordinary field in your select statements to filter and focus attention on specific areas within your plan. Your Global name is always at the bottom of the list. If you define a date global as cut-off + 24 days, you can apply this to your filter by selecting activities with either an early start or a finish within the next four weeks. Date Globals can also be used to define the calendar start and finish for the Barchart Editor and grid lines in the graphical area of the Barchart Editor. If your global text contains EPCI, you can use this to select activities with a description, including the Global.
Rules
Using the Rule Set feature of Safran Project allows you to define automatic field assignments. A rule set consists of predefined assignments that may be helpful and save keyboard time when entering new data into your project. A rule set, including all defined rules, is assigned to your project. You often want to set a code field or a function field identical to one or more characters from the Activity field. These fields may be used for selection, organizing, and grouping data. Instead of using advanced selection criteria, you may enter straight-forward criteria like “Where F1=CL”. The rule set allows you to define code logic between the Activity IDs, the F1-F20 fields, and the R1-R30 reference fields and codes.
Defining Rules
Choose Rules from the DATA ribbon to edit or define new Rule Sets.
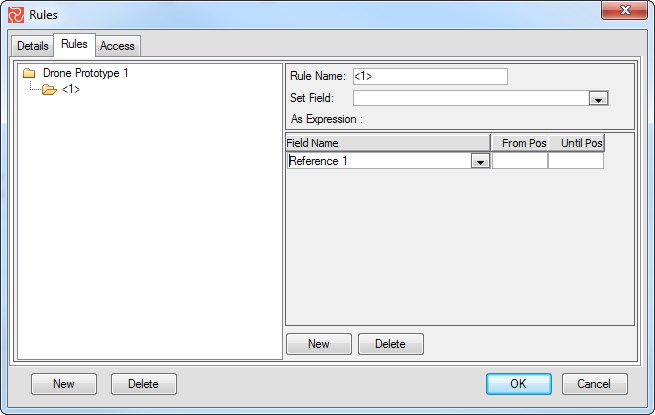
All the individual rules you make should be named. Right-click in the tab-separated window to add a new rule.
Specifying Rules
Select the result field from the drop-down list box to specify a new rule. Available fields are An, F1-F20, and R1-R30. Then specify the alias calculation on the format: Result field=f’dname/n1, n2, [n3-n4]/+f’dname+f’dname/n1, n2 [n3-n4]/, where the result field is:
- Any of an, f1-f20, or r1-r30, and
- f’dname is any of the fields, f1-f20 and r1-r30, and
- n1, n2, n3-n4 are characters or ranges of characters.
Extracting Characters
To extract a string from any available fields and place the result in another field, the rule should be in the format: Resultfield=f’dname/n1,n2 or Resultfield=f’dname/N1-N2. N1 and N2 are integer values indicating the position of the first and last characters of the string.
Concatenating
You may concatenate a selection of fields, extracted characters, or combinations up to the maximum field length. Use the format Resultfield= f’dname1+f’dname2+f’dname3.
Complex rates
Safran uses rate sets to store multipliers and escalated rates to generate derived costs. Since rates may change over time, rate sets define the applicable rate at any time and date. The rates specified in a rate set can be shared across resources. The rates defined represent the direct labor cost, overheads, general and administrative, and cost of money multipliers whose values can be predicted over time. Once defined, the rates are assigned to resources. Safran provides seven accounts:
- Direct Rates
- 4 Overhead Rates (OH1-4)
- General and Administrative (G&A)
- Cost of Money (COM)
Rate Calculations
The standard calculations for each value type are:
- Direct Cost = Hrs * Direct Rate
- Overhead Costs = Direct Cost * Overhead Rate
- G&A Cost= (Direct Cost + Overhead Cost) * G&A Rate
- COM (Cost of Money)= (Direct Cost + Overhead Cost + G&A Cost) * COM Rate
Defining Complex Rates
To use Complex rates with Safran is a three-step process:
- Select Complex Rates on the DATA ribbon.
- Click New Rate to define and create your rate records.
- Go to Resource Definitions to assign the rate records to each resource for budgets and actuals.

You will enter a starting date with its associated rate to specify rates. A new rate starts at the date entered. You cannot enter a date in the first-rate record, as this is from the earliest start of your project and is not restricted to a specific date.
You are not restricted to specify rate changes at any particular interval, such as monthly, quarterly, or yearly. In addition, a rate record may have only one rate. Typically, the indirect—Overhead 1-4, G&A, COM—contains a single rate that does not change over time.
The rate record is simply a rate associated with an escalation of time. You can set up different rate records for budgets and actuals or share them. One rate record may be shared across many resources, such as department or labor overhead. You will enter the rate as a number so that 45 is $45/hr, and a 15% overhead rate is entered as 0.15.
Reporting on Cost with Complex Rates
When you select to report on Cost, the Safran charts and report where it is relevant to allow you to choose what cost to include when reporting. For government reporting—CPR and X12 export—Safran enables you to specify where to put costs. Options are:
- Include in the body of the report.
- Include at the bottom.
- Include it in the body of the report and display it at the bottom as non-add.
Using the Histogram/S-Curve, you can compare direct, indirect, and total costs by selecting and deselecting cost accounts.

You should check the features of the different reports to familiarize yourself with the cost reporting capabilities.
Change Control
One of the most critical aspects of project control is the ability to track and trace changes to the baseline plan and the baseline scope of work over the life of a project. The Change Control facilities provided by Safran Project allow you to track the numerous and varied changes that generally occur as work progresses in a controlled and effective manner. Changes may reflect both internal and external variations. Examples of Changes:
| External | Internal |
|---|---|
| Administration | Technical |
| Technical | Schedule |
| Schedule | Financial |
| Scope of Work | |
| Financial |
Change in a project can seldom be prevented; however, its negative effect on project control may be effectively controlled, tracked, and documented for future reference. Safran Project allows you to set the baseline scope of work at project initiation and establish a master control estimate—the original baseline scope.
This facility allows you to ensure that all future changes, variations, and modifications involving resources, quantities, and costs can only be added to Safran Project as Variation Orders. If the new scope is added to an existing activity, you can track and trace the original budget and the work related to the change.
Safran Project allows changes to be categorized in the four different groups listed below:
| Type | Description |
|---|---|
| Variation Order | A Variation Order accepted and approved by the project client. |
| Variation Order Request | A request for a Variation Order was issued to the project client. If a VOR is accepted, its status may change to VO. |
| Internal Change | Internal changes to the scope of one or more activities. |
| Subcontracted Work | Creates a record (activity) for tracking/controlling subcontracted work. |
With Safran Project, you may determine how changes are to be summarized and when they are included in the various scopes. By doing this, you also control how they will be considered for reporting and measurement purposes.
See also the chapter on Scope and how the various change types can be set up to form the basis for your standard project reporting.
The Change Register
The Change register holds a complete record of all project changes/variations.
Variation Orders, VO requests, Internal Changes, and Subcontracted work may be added, modified, or deleted.
The Change register consists of two elements. One is the Change Order containing information about the change, such as VO number, Client number, responsible, and acceptance date. The other is a list of the detailed changes, such as addition or reduction of scope and corresponding cost that the Change Order covers.
A Change Order may cover multiple resource quantities and additionally span various activities. At the same time, an activity may contain multiple Change Orders.
Working with Variation Orders
To access the Change Register, press the Change Register icon on the DATA ribbon.
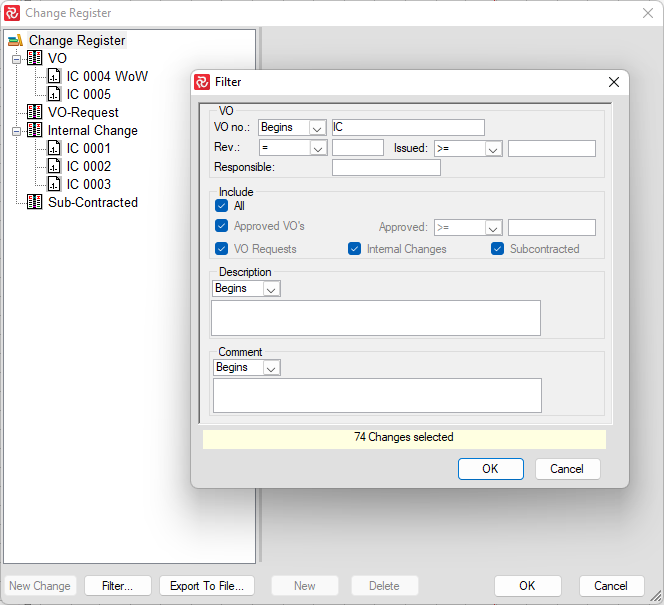
To add a new Change, right-click or press the 'New Change' button:
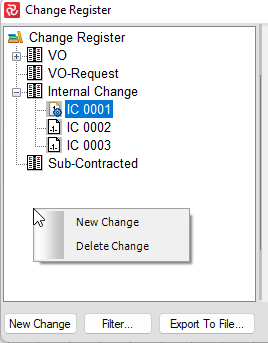
The Change Register pane is a three-view pane by variation order type. This window lets you browse changes by type, view a summary and the details of a variation order, add or delete variation orders, and add or delete elements of a variation order.
The details for a variation order include activities and resources with their estimates, a schedule impact registration, and the ability to link a document or URL address to a variation. You can select the required options from the Edit or right-click short-cut menu.
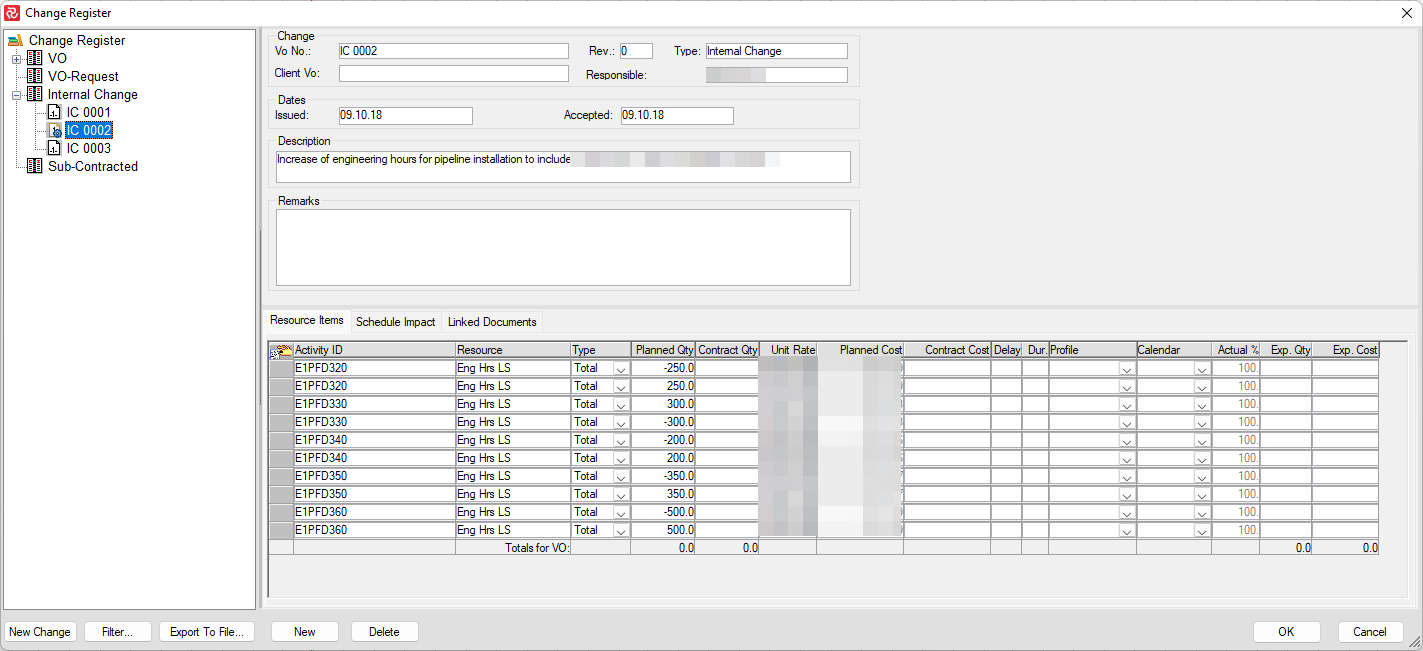
The upper half of the Changer Order entry/review screen contains the following fields:
| Field | Description |
|---|---|
| VO No. | Unique identification number for the Variation Order. |
| Rev. | Revision Code, default value = 0. You may overwrite this value. Info only. |
| Type | Choose status from the drop-down list. Controls which scope VO will be included in. If you highlight the VO type in the tree view and select new change, the type will be automatically entered. |
| Client VO | The project client Variation Order Number for the approved variation, Info only. |
| Responsible | Initials will be used to identify the person responsible for the VO. Defaults to user log-on ID. Info only. |
| Issue date | Date of issue for VO. By default, the date the change was initially entered in the register. It may be overwritten. Info only. |
| Accepted | Date of Client acceptance, Info only. |
| Description | Description of the variation order. |
| Remarks | Comments regarding the variation order. |
At the lower half of the Changer Register entry/review screen, you will find a tab-separated pane that allows you to add change item information. The three tabs are:
- Resource Item: used to add activity and resource detail information
- Schedule Impact: allows you to indicate estimated and approved schedule impact caused by this variation order
- Linked Documents: allows you to add document paths to detailed change documents or a valid URL to a change system and also open these from within the Change Register window to view these
In addition to holding positive values reflecting scope increase, Variation Orders may also have negative values to support reductions in scope.
You may export the change register details to a text file by pressing the 'Export to File' button. The export will export the entire change register unless you add a filter.

See also the Change Report Chapter if you are interested in reports.
Opening Existing Projects
To work with a project, adding or modifying the project data, first, you have to select the project you wish to edit. Press the ‘Open’ icon in the file tab to view information for each project in the database.
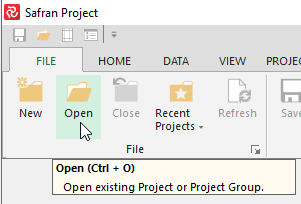
- You can filter the projects list to contain only projects you created or show all projects you can access.
- You can use the ‘Find’ box to type in the project name you want to open.
- Clicking a field header performs an automatic sort by this field.
- When you select a project, you can see the Project Properties or the Userfields Loading Options even before opening the project simply by pressing your mouse's right-click button.
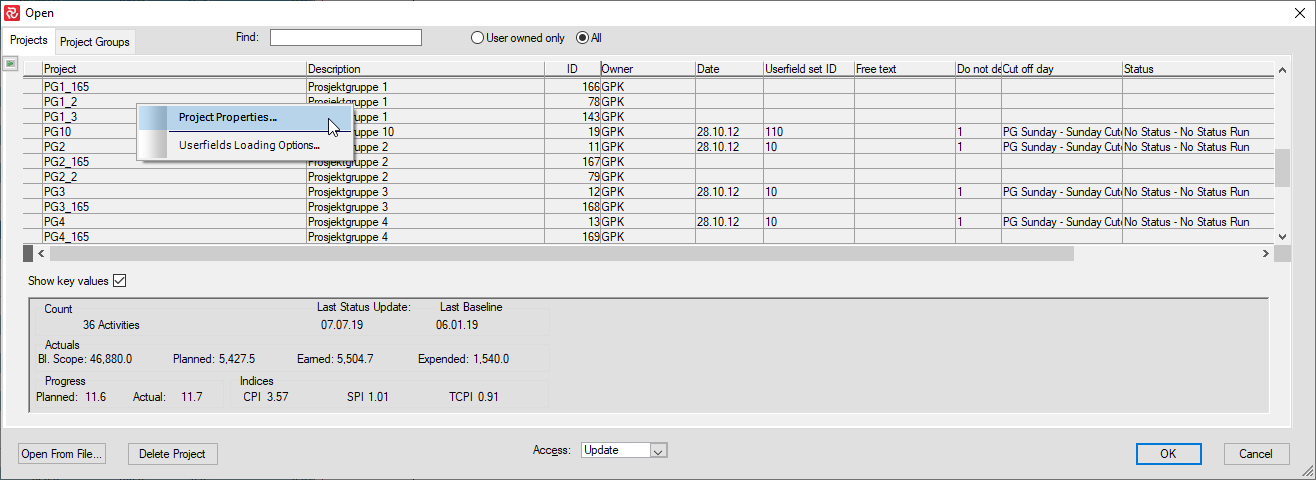
Open From File
At the bottom of the window, you can press the ‘Open From File’ button, allowing you to open an external project through a browsing window. The supported project file types are:
- Safran project (*.SP)
- Safran Planner (*.SPP)
- Microsoft Project XML (*.XML)
- Primavera Enterprise (*.XER)
Once a project is selected, the project name will be displayed at the top of the Safran Project window. You may delete an existing project by pressing the ‘Delete Project’ button at the bottom of the window.
Project Selector
If you use Enterprise Codes, the Project Selector might be helpful:
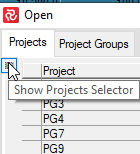
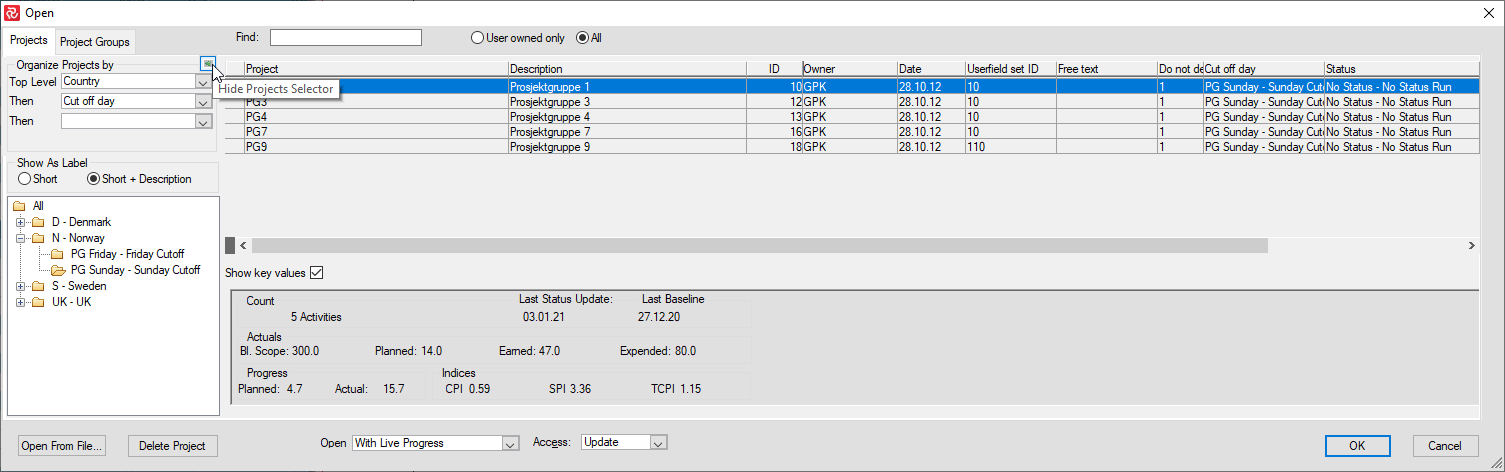
Opening Recent Projects
You may easily find and open the projects you have recently worked with by pressing the ‘Recent Projects’ button in the file tab ribbon.

Startup Options
Safran Project allows you to customize what you would like to see when clicking on the ‘Schedule’ tab. You may press the arrow icon in the corner of the file tab as shown below:
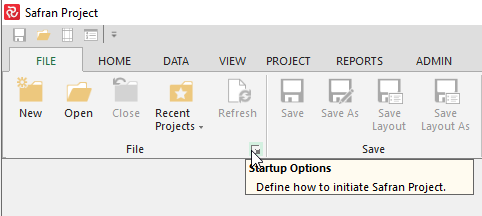
In the ‘Startup Options’ dialog box, you may select among the available alternative that suits you the best.