Home
The home screen is the first thing you will see when you start up Safran Risk. It contains a number of links that will help you get started. The home screen changes when you open up a project.
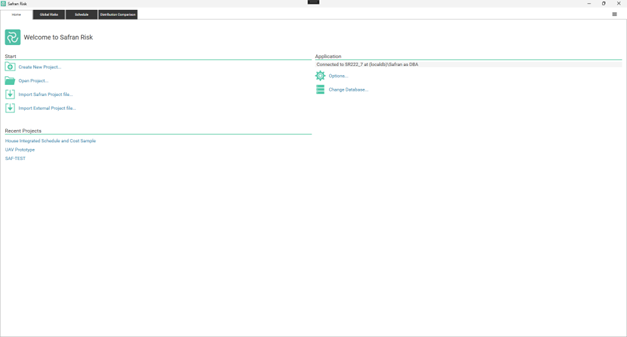
No project open
In the top left corner you will find the following links:
- Create New Project - This lets you create a new project in the database that you’re connected to.
- Open project - Displays a dialog showing all projects that you have access to in the database.
- Import Safran Project file - This lets you import a Safran .spx file. This is a file that holds all the schedule information in your risk model. The risk information is held in an .xml file that can be imported from the home screen when a project is open.
- Import External Project file - This lets you import an external file, meaning a file not generated by Safran. It can for example be an .xer file from P6 or an .xml file from Microsoft Project. A number of other formats are also supported. See the section: Importing External files for more information about this.
Below these links you will find a list of recent projects.
To the right you can find the global options and link that lets you switch databases.
Project Open
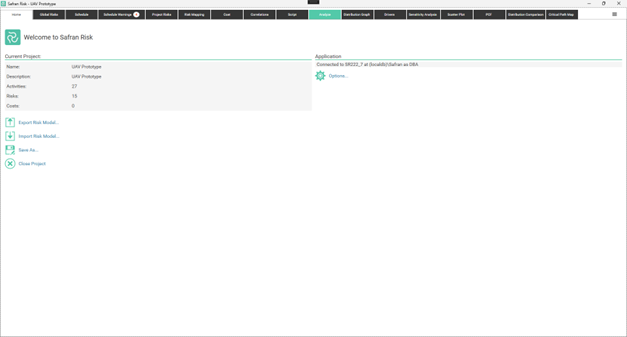
When a project is opened the Home screen changes.
The top left corner now shows you some statistics about the current project.
Below that you will find some useful links:
- Export Risk Model - This allows you to export the risk model to an xml file. The risk model contains all the risk info for the project (basically all the tabs except the schedule tab). To extract a complete model from a database you will need to export two files. The .spx file and the risk model xml file. The .spx model can be exported from the schedule tab.
- Import Risk Model.
- Save As…. This allows you to make a copy of the model in the database. It can be very useful for testing a new scenario or making a backup.
- Close Project
To the right we have the global options. The “Change Database” is not there since it’s not possible to change database when a project is open.
Importing External files
Projects can be exported from other tools and imported into Safran Risk. This is done by clicking at the “Import External files” link in Home tab. The import will convert the project data to a Safran Risk project. Since different tools work in different ways it might be necessary for the import to make small changes to the project. The import aims to create a project in Safran that will generate the same dates and costs as the project did in the tool that it originated from. In order to control that this is what happens the import saves down the original dates and costs to user fields. These can be used to validate the calculated values in Safran Ris.
The Safran Risk import currently supports the following file formats:
| Tool | File format |
|---|---|
| P6 | .xer |
| P6 | .xml |
| Microsoft Project | .mpp |
| Microsoft Project | .xml |
| Asta Powerproject | .pp |
More file formats might be supported in the future.
The import takes you through a wizard that has the following steps:
1. Select file
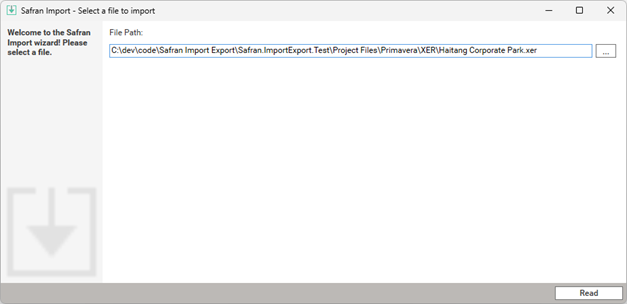
Here you can select any of the support file types. If the file is not supported you will get a message.
2. Set Import Options
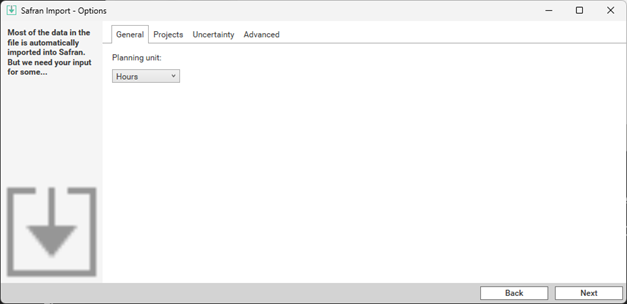
These are options that will affect how the data in the file is converted to a project in Safran Risk. The available options vary depending on the selected file type. The most important option is the “Planning Unit”. This decides the granularity with which durations and calendars will be stored in Safran. The larger the granularity the quicker Safran will be able to analyze the project. Therefore, you should always aim to use days even if you might lose some accuracy.
Other import options can be found in these tabs:
Projects
This tab will only be visible if your file contains more than one project. In here you can see some information about the projects in the file and select which projects you want to import. Since all the projects will be imported into one Safran project it's necessary to select which project the options, such as TimeNow (Data date) and other scheduling options should be taken from. We recommend to only import multple projects if they share the same TimeNow and scheduling options.
.png)
Uncertainty
If you want to map uncertainty from user fields in the file to the activity uncertainty in Safran you can do that in the Uncertainty tab.
It is done by selecting a user field for Min, Most Likely and Max. Note that for Most Likely you can also select the Remaining Duration.
The user fields that will appear in the drop down are the ones of type Integer, Numeric and Duration.
For each activity where the selected user fields contain valid Min, Most Likely and Max values a Triangle distribution will be added to the activity.
At the bottom you select if the values in the user fields have been entered as hours or days.
.png)
Advanced
In this tab the content will change depending on which file type you are importing. For an XER (P6 file) import it will look like this:
.png)
Here you can for example select what to do with WBS summaries (an activity type that is not supported by Safran).
3. Warnings
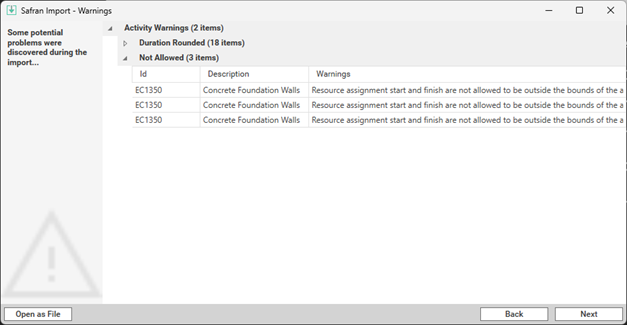
Sometimes the import cannot import the data exactly as it is in tool from where it originated. In that case warnings will be displayed. If you find that the results of the schedule analysis in Safran significantly differ from the one in the other tool, the warnings might be a good place to start to understand why this happens. You can also see all the activity related warnings as a column in Safran Risk after the import.
4. Save to database
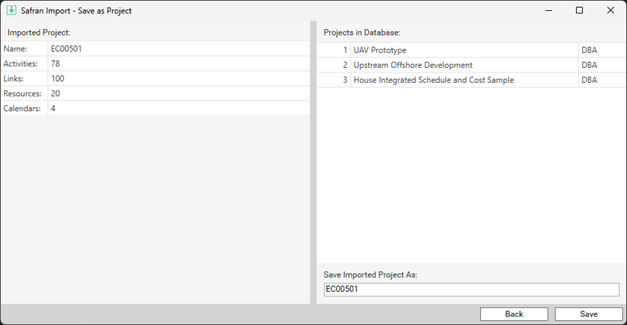
Now the project has been converted and can be saved to the Safran database. This view lets you see the existing projects and select the name of the imported project. If you select an existing name, you will see an extra step where you can choose to overwrite, update or append to the existing project.
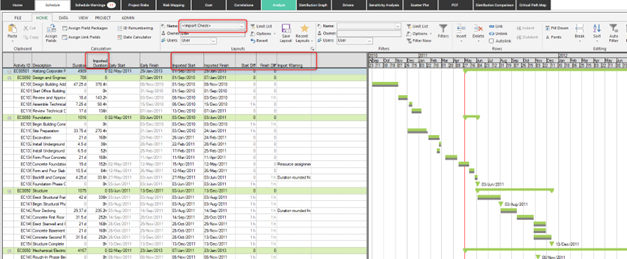
Once you’ve gone through all the steps in the wizard your project should be saved in the database and the layout called “Import check”. This layout will by default have some columns that lets you compare the original dates with the ones calculated by Safran. It’s important that there is no significant difference between these dates.