Introduction to Reporting
Safran Project's advanced integrated report generator creates analytical charts and graphs from current data stored in the Safran database.
Available reports include both graphical and tabular, spanning simple project metric values to advanced analytics. Each report is highly configurable, including the content, layouts, sorting and filters. User modifications can be saved for reuse in a multiuser environment.
All reports are run on-screen and can then be printed directly, saved as PDF, JPG or BMP, or copied to the clipboard for use in other programs.
With Safran Project's extensive charting and reporting, users possess a powerful and extensive real-time analytical capability that supports the creation of ad-hoc reports and a comprehensive array of "what-if" analytics for progress against baseline, current, live, scheduled, revised, forecast and actual plans.
The Report Package function makes running a set of reports at periodic intervals easy.
General report configuration
All reports share a standard configuration window, though some options are unique for each report. The standard setup makes learning a new report configuration easy when you have learned the basics of one report.
For each report, the configuration window contains some or all the following tabs:
- Titles – headers/footers on the printed report, including text formatting and logos.
- Filter – Set a filter to select the activities reported.
- Report – a range of options to customise the look and feel of the report - this screen will change the most between different reports.
- Entries/Fields – specify what data to show on the report.
- Resources – most reports allow for reporting per resource using the options on this panel.
Saving a report configuration
All report configurations can be saved for later use. When satisfied with your report configuration, click the Save or Save As button at the bottom of the configuration window. Give the report a meaningful name to make it easier to reuse later. A lot of companies have naming standards for reports.
All saved reports are accessible to all users in the database. Users can modify any saved report, but no user can overwrite another user's report. You can modify other users' reports and save them as new ones.
Report types
Safran Project offers a wide range of reports suitable for all project needs throughout the entire project lifecycle. The reports are described in detail in the following modules.
The available reports are:
Charts
- Histogram/S-Curve
- Performance Chart
- Pie Chart
- Bulls Eye Chart
- Bubble Chart
Tabular Reports
- Progress Summary
- 6 Period Summary
- Schedule Health
- Float Trend
- Schedule Performance
US Govt.
· Contract Performance data
· Contract Performance report
· Export CPR Data
· UNCEFACT Schedule Export
Change Report
- By Change
- By Activity
- Detailed
- Extended
Progress
- Progress Status
The most frequently used reports will be explained in the next module.
The Most Frequently Used Reports
Safran Project offers various graphical reports, enabling you to choose the report type that best presents the relevant data.
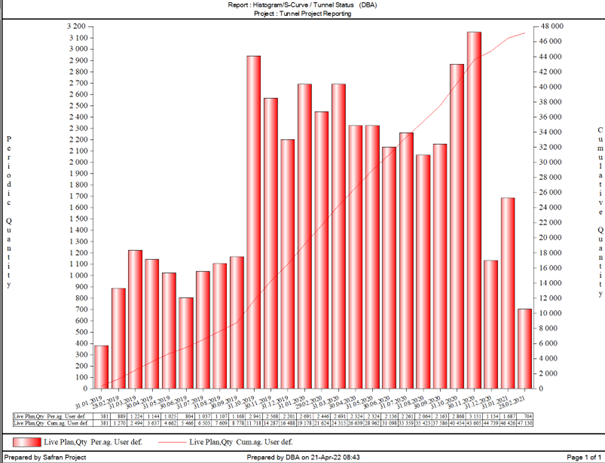
Histogram / S-Curve
The Histogram/S-Curve report, in conjunction with the Barchart Editor print, is a versatile tool in Safran Project. Its flexibility allows you to configure several distinct reports from the same configuration panel, giving you complete control over your data presentation.
The graph can show and compare QTY, cost, manpower and percentage data across periodic or cumulative periods, together with tabular data. The most common use of this report is to show project progress compared to the plan. It is simple to set up a quick comparison of live against baseline or live against current (the plan as it was when we last ran a Status Update)
A significant advantage of this report is that it delivers the data you want to compare on three levels: periodic (histogram), cumulative (S-curves) and table view. This combination allows you to evaluate and compare the reported progress with the planned progress much more effortless. When configuring this report, you can visualise how the Earned (Actual %) measures up against Expended and Baseline, which provides a quick visual check of whether your project is on track.
When configuring reports, always have the end-user in mind. Don't include extra data just for the sake of it – keep things simple! This 'Best Practice Planning Tip' reminds you to focus on the essential data the end-user needs to understand the project's progress, ensuring your reports are clear and compelling.
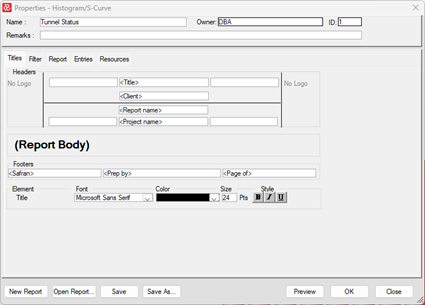
Configuring a new Histogram/S-Curve report is a straightforward process. Navigate to REPORTS > Charts > Histogram/S-Curve, and you're ready to start.
Report
After setting up your titles and filters, the Report tab contains three sub-tabs full of options specific to the Histogram/S-Curve report:
General:
- Set the report timespan (project week, month, etc.) and interval (from minutes to years)
- Select whether to report on Cost or Qty.
- Selecting Page On will print a new page for every field value you choose. This is useful for printing one page per project phase, area, etc.
- Adjust the margins, print orientation, and table look, and add a background picture.
Axes:
- X-axis
◦ Configure the X-axis' date format, text size and how to print the dates
- Left axis
◦ Edit the title of the left axis and show values as quantity or percentage
◦ Set a max and/or min value and make adjustments to ticks
- Right axis
◦ Edit the title of the left axis and show values as quantity or percentage
◦ Set a max and/or min value and make adjustments to ticks
Grids/Curtains:
· Add grids or curtains to the report
· Grids are lines you can show to highlight an important date or a milestone or to illustrate a capacity threshold. Grids can be horizontal or vertical.
· Curtains can also be horizontal or vertical. Vertical curtains span from one date to another and can highlight essential periods in the project lifespan, such as construction or non-working periods. Horizontal curtains span between values on the left axis.
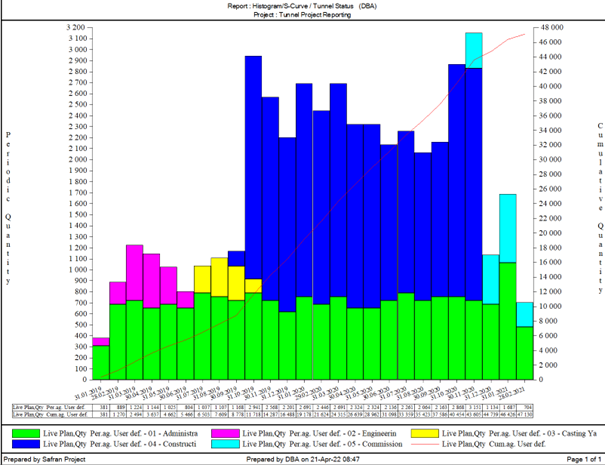
Entries
Edit the data you want to report on. This window is divided into Periodic Bars, Cumulative Lines and Table Entries. You can remove or add lines in every section. Every section has four tabs to their right: Main, Layout, Scope and Rates (only active if you use complex rates). It is worth exploring the entries panel to understand the available options fully.
By default, the values of the periodic bars are displayed on the left axis, and the values of the cumulative entries are displayed on the right axis. This is configurable, but the default setup is an accepted standard.
By default, the report is set up with 'Live Plan, Early' as the only entry for Periodic Bars, Cumulative Lines and Table Entries. This default setup is an accepted standard, designed to guide you in your reporting. However, you can report from any plan set or other earned value metrics available in Safran Project. Right-click in one of the sections to add or remove lines in that section. You can also edit the entries that are already there.
When you add a line, you can edit its properties. When adding a new bar or line, Safran Project automatically adds a corresponding entry to the table entries. This results in a table below the graph displaying the exact values of the periodic bars and the cumulative lines. If you don't want to keep the table entry, simply right-click on the line in the Table Entries section and choose Delete Table Entry.
When you add a new line to the Periodic Bars, Cumulative Lines or Table Entries, you can select what scope to show for that entry. You do this by clicking the Scope tab to the right and change scope from the Scope drop-down list. You can choose one of the predefined scopes: Baseline, Current or Total, or select a user-defined scope using the Original, Approved, Estimated, Subcontracted and Internal checkboxes.
The layout tab for the periodic bars and cumulative lines provides formatting options for the colours and styles of the bars and lines.
For the periodic bar, you can also choose if the bars will display QTY or manpower using the Bar On option on the Scope tab. If you select manpower from the list, the values are converted by Safran Project from QTY to manpower based on the calendar used for each activity.
Resources
The Resources tab is blank by default, running the report for all available resources. You can filter the report on specific resources by dragging them from the list on the left to the right.
Progress Summary Report
The most frequently used tabular report, the Progress Summary Report, is a status report giving key earned value metrics to help evaluate project performance on a periodic and cumulative basis. It's an important project management tool for many Safran Project clients, and it's often used together with the Histogram/S-Curve report. The configuration window offers many options under the Report and Fields tabs.
Report
In the Report On section, you can show cost or quantity data and what cutoff to report on. By default, the report is set up to the last cutoff, but you can uncheck the Last checkbox and choose older cutoffs to report on. You also set the reporting period to Week, Bi-Week or Month, and you can set the overall grouping level for the report if you don't want the report to show every activity in your project.
In the Sectioning/Header Color/Format section, you can set further grouping for the report and format each group.
The Plan/Scope section lets you choose what plan and scope to report against. This is, by default, a Baseline plan against Baseline scope. Still, you can set it to report on Live Now, Live Previous, Revised or Forecast plan against any combination of Baseline, Current, Total or User-defined scope. To use the Live Previous plan, you must save Activity History during the status update.
Under Plan/Scope, you can further specify how expended progress should be handled by setting the radio button to Include all expended or Expended only on the scope.
Finally, you can edit display formats for numbers, make font adjustments and edit colours and labels for the reports' sub-headers.
Fields
Under the Fields Tab, you configure the report by checking or unchecking the fields you want to include. The report is always in landscape mode and can handle a total width of 278 characters. You can adjust the column width of each field you select by changing the number in the Size field. A calculation at the bottom of the tab shows how many characters you have left before using up the space available.
In the Fields tab, you'll see that the report is divided into five sections:
- Group - will show activity or group ID and description.
- Totals - will show budgets or scopes.
- Period - will show periodic values.
- Cumulative - will show cumulative values.
- Next Per. - will show next-period values.
Like many other reports, you can generate the report for specific resources using the Resources tab. By default, the Progress Summary Report includes all resources.
Six Period Summary
The Six Period Summary Report shows all the major earned value indices and factors, which are sectioned by Current Period Data, Cumulative-to-date Data, Completion Data, and Statistical and Independent Forecasts.
The Six Period Summary report allows you to compare data for six periods side by side, whereas the Progress Summary report gives data for just one selected cutoff.
Report
To configure the Six Period Summary report, the Report tab lets you set the report span and report interval and choose to report on QTY or cost. If you select Cost, you can specify what to include further. You can set a Page Break On, select landscape or portrait orientation and edit fonts.
Fields
The fields tab lets you select what fields you want to show. Each section of the report has several earned value indices and factors.
The Six Period Summary report will be generated on all available resources by default. You can still change this under the Resources tab by selecting the resources you want to include.
Schedule Health
The Schedule Health report summarises activity, logic, milestones, float, performance indices and more to assess how "good" your plan is.
The report is a project metric analysis tool that provides detailed insight into schedule quality and key project performance metrics. Understanding the quality of a schedule is hard unless you construct the plan yourself. You can use the Schedule Health report to help you assess your schedule's integrity and credibility.
Set minimum standards using the Schedule Health report before crucial project milestones, such as baselines and phase completions.
Report
The Schedule Health Report can be fully customised by you (User Defined), or you can set it up to use the 14-point Assessment and the Standard Tripwire metrics. This is done at the top of the Report tab in the 'Include fields as' section. If you choose 14 Points Assessment or Standard Tripwire, the report configuration is set for you automatically, and you can tweak it to your liking.
Setting thresholds or configuring what fields to include improves the report's readability and gives you immediate yes/no feedback on the plan's quality. However, unless you are confident in EVM and scheduling, it is recommended that you use the predefined setups.
The 14 Points Assessment was initially developed as a checklist for the US Defense Department against contractor schedules but has come far along the way to becoming an industry standard. This method views the logic, leads, lags, relationship types, constraints, float, duration, resources, and measures against defined limits for each metric.
The 14 Points Assessment report will show if your schedule exceeds these limits. You can adjust your schedule and re-run the report to see if you pass the criteria.
The Standard Tripwire method is focused on Baseline Execution Indices and standard EVM indices such as 'Critical Path Length Index', 'Schedule Performance Index', 'To Complete Performance Index', etc.
Warnings/Thresholds
The indices used in the Tripwire method can be adjusted on the Warnings/Thresholds tab.
One significant benefit of running a Schedule Health Report and performing a 14 Points Assessment or Tripwire test is that more people are likely to engage in the work associated with establishing a credible schedule.
Performance Chart
The Performance Chart report lets you compare performance indices as periodic bars, cumulative lines and table entries, much like the Histogram/S-Curve report. The setup of these two reports has a lot in common.
Report
You'll find the same three sub-tabs under Report here as you saw on the Histogram/S-Curve report.
General:
- Set the report timespan (project week, month, etc.) and interval (from minutes to years).
- Select the type of report (quantity or cost).
- Set Page On to insert a page break for each field value you select.
- Format margins, text, legend, orientation and background picture.
Axes:
- Set the title of the left and right axes.
- Show values as quantity or cumulative percentage (0-100%).
- Adjust the max/min value and tick intervals for the axis.
Grids/Curtains:
· Add horizontal or vertical grids (or activity grids).
· Add horizontal or vertical curtains.
Entries:
Add the fields you want displayed in the report. The entries window is divided into three parts, like the Histogram/S-Curve report: Periodic Bars, Cumulative Lines, and Table Entries. Each of these is further divided into Main, Layout, Scope, and Rates (if using complex rates), which are available as tabs on the right side of the window.
When working with Performance Charts, the following definitions are helpful to know:
-
Performance Factor = Expended/Earned - below 1 is "good", above 1 is "bad."
-
Schedule Factor = Planned/Earned - below 1 is "good", and above 1 is "bad."
-
Performance Index (CPI) = Earned/Expended - above 1 is "good", below 1 is "bad."
-
Schedule Index (SPI) = Earned/Planned - above 1 is "good", below 1 is "bad."
-
To Complete Performance Index" (TCPI) = Work remaining / Budget Remaining - this indicates the performance level required to complete the project within budget. A value above 1 means you are falling behind and must increase performance to complete within budget.
It's commonly accepted to be between 0,8 and 1,2 for these indices. So, suppose you are on an index's "good" side. In that case, you should still investigate and find the cause if you are overperforming more than 1,2 on the index, as this could mean that you have overestimated the work or other issues causing you to overperform.
The periodic and cumulative values are displayed on the left and right axes. Performance Factor (AC/EV) is the default instance under the periodic, cumulative and table entries. Other options are Schedule Factor, Performance Index, Schedule Index and TCPI.
You can add any of these by right-clicking on the section you want and selecting New. Adding one additional entry to the Periodic or Cumulative entries automatically adds a similar entry to the table entries. This enables you to read the exact number for each Periodic or Cumulative entry in the table listing. If you do not want to keep the table entry, you can right-click it and Delete it.
If you click on the layout tab for either the periodic bars or cumulative lines, you can adjust the colours and styles of the bars and lines of the Histogram / S-curve.
When you add a new line to the periodic bars, cumulative lines or table entries, you can manually decide from which scope to get the information. You do this by clicking the scope tab and then the drop-down list. Here, you can choose one of the predefined scopes: Baseline, Current or Total, or select a user-defined scope using the Original, Approved, Estimated, Subcontracted and Internal checkboxes.
You can also choose if the periodic bars will display QTY or manpower using the Bar On option. If you select manpower from the list, the values are converted by Safran Project from QTY to manpower based on the calendar used for each activity.
The resources tab is blank by default, so the report for all available resources is run. You can filter the report on specific resources by dragging them across from the list on the left to the right.
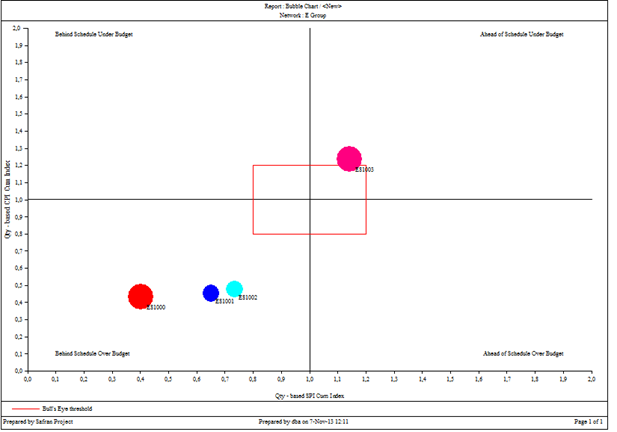
Bulls Eye Chart
The Bulls Eye Chart plots the cutoff periods on a Cost Performance Index – Schedule Performance Index matrix to show trends over time, specifically if a project is ahead/behind schedule and over/under budget.
By default, the quadrants show:
| Under Budget Behind Schedule | Under Budget Ahead of Schedule |
|---|---|
| Over Budget Behind Schedule | Over Budget Ahead of Schedule |
In this default configuration, cutoffs in the upper right quadrant are good news, but they may also indicate poor planning (over-cautious, artificial budget contingency, etc.)
The best practice in some countries is the reverse view, so establish project standards if using this report. To get the reverse view, report on Indices instead of Factors.
It is possible to add a user-defined threshold square to increase the report's readability, where any value inside the square is considered acceptable, even if it lies within the over-budget, behind-schedule quadrant. The default threshold is 0,2.
Bubble Chart
The Bubble Chart is like the Bulls Eye chart. The chart plots the performance for each project or cut-off and adds a third dimension: the size of each bubble represents the size of each project or cut-off's baseline scope.
The configuration options are similar to the Bulls Eye report, with an added option to exclude specific projects from the report.
Barchart Editor Print
The Barchart Editor is the most commonly used view in Safran Project, and the availability of layouts, filters, symbols, groupings, and more lets you set it up to show a wide variety of data. The Barchart Editor is a standard method of presenting data in formal and informal settings.
The Barchart Editor Print report is a print of the project (activity list and Gantt diagram) shown in the Barchart Editor. The presentation of the activities and the Gantt diagram are as viewed on the screen, so to tweak the Barchart Editor Print report, you need to tweak your layout.
The Barchart Editor Print is not a standard Safran Project report, so you won't find it listed under the Reports menu. The configurable parts of the Barchart Editor Print are all the parts in a layout and can be found under FILE, HOME, VIEW and DATA ribbons:
FILE
· The Print section holds the Page Setup and Print Setup
HOME
· Layouts section holds your layouts
· Filters hold the filter selected for your layout
· Editing holds configurations for Page breaks and Fonts
DATA
· Setup > Symbols, holds your symbol configurations
VIEW
· Columns
· Grouping
· Grid
· Show
· Timeline
Most of these setups can also be accessed by right-clicking on the activity list or in the Gantt chart so they can be easily accessed when editing a layout.
To print a Barchart Editor layout:
- Select the layout you want to use for the report.
- Select Page setup and configure paper size, header/footer, etc.
- Run Print Preview to check the look.
- Print the report to a printer or PDF.
Create layouts for running the Barchart Editor Print report – a great timesaver.
Barchart Editor Histogram
The Barchart Editor Histogram is available in the Information Panel in the Barchart Editor by clicking Histogram in VIEW > Information.
To configure the Barchart Editor Histogram, right-click on the histogram and choose Histogram Properties.
The upper half of the window focuses on configuring the layout of the report by setting paper size and orientation, report span, configuration options of the axes, table header and footer information and so on.
In the lower half, you decide what plan and scope information you want to show in the periodic bars, cumulative lines, and table.
The Page tab lets you set the report to Page On an information field. Paging on a Reference field gives you a new page for each field value you have chosen. You can also set a background picture on the Page tab and select the report's orientation, paper size, and frame colour.
On the X-Axis tab, you can set the date span of the report. You can control the start and finish date of the chart by selecting from the Span drop-down:
· Total Span - sets the starting point of the histogram to be equal to ES for the first activity of the plan, while the finish point will be equal to the EF date of the last activity in the plan
· Activity - gives you a histogram spanning from ES to EF dates of the selected activity.
· Locked - This lets you set the Start and Finish date by entering specific dates or by choosing from a list of system dates.
· As Gantt - gives you a histogram span equal to the span in use on the Gantt chart.
The X-Axis tab also lets you set how many days/weeks/months per period using the Interval drop-down menu and a number. You can also format the text font and size on the X-axis and rotate the X-axis text. This can be a nice feature if you have a large span with many periods shown on the report.
On the Left Axis tab, you can choose whether to show the periodic values as the field value or convert them to Manpower. You can also format the ticks' max and min values, text format, and more.
The Right Axis tab lets you show the values in cumulative percentage instead of actual values and the same formatting options for ticks as on the Left Axis tab.
The Barchart Editor Histogram shows the histogram and a table of values by default. The table is shown below the histogram when you preview or print it. You can remove the table by unchecking the "Visible" checkbox on the Table/Values tab. There are also some formatting options for the table text; you can change the table's header.
You can add gridlines and/or curtains to make specific dates or values stand out in the histogram. Curtains can highlight a period, like a shutdown, in the histogram. This is done on the Lines and the Curtains tabs.
The Resource Filter tab allows you to select what resources to report on. You do this by adding the resources you want to be part of the histogram here. The default setting reports on all resources.
The bottom half of the configuration window controls values shown in the histogram with one tab per data type.
Periodic Entries control the data used for the bars in the histogram. The entries are shown in the list on the left. To add a new entry, click the New button at the bottom of the page. With the new entry selected in the list, you can edit its name, legend, data type, start/finish date set, colours and more. The 'Stacked By' field enables the bar to be stacked on Safran system fields, reference, text, flag, or outline code fields. Stacking will split the bars into parts, and the sizes of the parts will be relative to the values related to that stack group.
The Cumulative Entries tab is identical to the Periodic Entries tab but relates to the cumulative lines in the histogram. To add a new line, click the 'New' button. The configuration options are the same as on the Periodic Entries tab. The Spread on function is the line version of Stacking. Setting a cumulative entry to Spread on a field gives you one line per value of the chosen field.
When you add a new periodic or cumulative entry to the histogram, Safran Project automatically adds an entry to the Table Entries tab. If you make any changes to a Periodic or Cumulative entry setup, it is automatically updated in the Table Entry setup. You can delete a Table Entry by selecting it and clicking the Delete button. You can also add entries manually by clicking the 'New' button. The editing options are the same as for the periodic and cumulative tabs.
Schedule Performance Report
The Schedule Performance Report is a new, simple report designed to meet the regulatory requirements of some industries. It compares the planned % complete from the original contract, most recent baseline, and forecast with the actual % complete on a periodic and cumulative basis.
The Report tab of the report configuration lets you set grouping for the report, select the cutoff date and make some formatting of text and colours.
Other Reports
Pie Chart
A traditional Pie Chart can show scopes, duration, quantities, expended or any user-defined decimal or number field. You can show the data as a field value or a percentage.
Float Trend
Utilize the Float Trend Analysis report to gain insights into your activities' float over a specified period. This report, available for each cutoff, bi-weekly, project months, or the last cutoff only, provides a comprehensive view of your project's progress.
The report presents a table with the activity count for the total number of activities, completed activities, activities with negative float, activities with float 0-20 days, activities with float 20-40 days, activities with float 40-60 days and activities with float more than 60 days. These numbers will be listed in a table with each period on a new row. It is also possible to group these values.
Change Reports
Controlling changes to the scope of work is essential to project control. Safran Project offers four different change reports to help you understand, manage and control change:
- By change order
- By activity
- Detailed
- Extended
The 'By Change Order' report has three configuration tabs: Report, Fields and Sort.
The Report tab lets you section your report on VO type or responsible. On this tab, you can set the report orientation, and you can also set how to show the totals for the change report.
The Fields tab lets you customise what fields to show, their size and names.
The Sort tab lets you specify a sort order based on fields from the change register.
The 'By Activity' report, which lists activities with their change orders, resource estimates and costs, is designed with simplicity in mind. A straightforward configuration can be found on the Report tab, where you can adjust what VO types to include and some sectioning and scope options.
The Detailed report lists the variation orders, detailed activity and resource information, quantity and cost for estimates and expended and actual % complete. The report also contains a summary line for each variation. The only customisation available is the sectioning and orientation of the report.
The Extended report, which allows you to choose what VO types to report on and further filter on specific activity information and Variation Order information, is a comprehensive tool. It provides a wealth of information, such as the client VO number or the acceptance date, and allows you to set a grouping for the report.